This document was made by OCR
from a scan of the technical report. It has not been edited or proofread and is
not meant for human consumption, but only for search engines. To see the
scanned original, replace OCR.htm with Abstract.htm or Abstract.html in the URL
that got you here.
 ALTO
ALTO
USER'S
HANDBOOK
OCTOBER 1976
This
document is for Xerox internal use only
XEROX
PALO ALTO RESEARCH CENTER
OCTOBER
1976
This document is for Xerox internal use only
Table of Contents
Preface
Alto Non-programmer's Guide 1
Bravo Manual 27
Markup User's Manual 59
Draw Manual 73
DDS Reference
Manual 103
FTP Reference Manual 115
Preface
This
handbook contains documentation for all the standard Alto services intended for
use by non-programmers. It is divided into six sections,
separated by heavy black dividers:
The
Alto Non-programmer's Guide, which
has most of the general information a non-programmer needs.
The
Bravo manual,
which tells you how to deal with documents containing text on the
Alto.
The Markup
and Draw manuals,
which tell you how to add illustrations to documents.
Section 10 of the Non-programmer's Guide is an overview on illustrations.
Finally, two reference manuals, one for the DDS filing
service, and one for the FTP service which transports files between
machines. These manuals supplement the introductory information on
these two services in the Non-programmer's Guide.
If you are new to the Alto, start at the beginning of the
Non-programmer's Guide. Read the first four sections there, and then the first
two sections of the Bravo manual. After that, you should be able
to find what you need by looking at the tables of contents, and browsing
through the rest of the material. If you have trouble, don't hesitate to ask an
expert for help.
ALTO
NON-PROGRAMMER'S
GUIDE
by BUTLER W. LAMPSON
Alto Non-programmer's Guide
Table of Contents
1.
Introduction 2
2.
Getting started 2
3.
The Executive 5
3.1 Correcting
typing errors 5
3.2 Starting
a service 5
3.3 Aborting 5
4.
Files 6
4.1 Naming
conventions 6
4.2 File
name patterns 6
5.
Recovering from disasters 8
5.1 Reporting
problems 9
6.
Keeping up to date 10
7.
More about files 11
7.1 Version
numbers 11
7.2 DDS 11
7.3 Copy 13
7.4 Dump and Load 13
7.5 CopyDisk 14
8.
Communicating with Maxc 15
8.1 Chat 15
8.2 About Maxc 16
8.3 Maxc
files 16
8.4 Hardcopy on Maxc 17
8.5 Archiving 18
8.6 Messages 18
9.
File transfers 21
10.
Pictures 23
11. Documentation
and software distribution 25
1. Introduction
This document is intended to tell you what you need to
know to create, edit and print text and pictures on the Alto.
It doesn't assume that you know anything about Altos, Maxc or any
of the other facilities at Parc.
You will find that things are a lot clearer (I hope) if
you try to learn by doing. This
is especially true when you are learning to use any of the
services which use the display. Try out the things described
here as you read.
Material in small type, like this
paragraph, deals with fine points which can be skipped on first reading (and perhaps on subsequent readings as
well).
I
would appreciate comments on this guide. In particular, I would like to know
what you found to be confusing or unclear, as well as anything
which you found to be simply wrong.
2.
Getting started
To do anything with an Alto, you must have a disk pack.
This is a circular, yellow or white object about 15
inches in diameter and 2 inches high. Your secretary can tell you how
to obtain a new one from the stock kept by your organization. The most common source
is the yellow cabinet in the Maxc room (room 1153 on the first floor). Go
straight through the first room, and you will find the
cabinet in the second room, in the far left corner. When you
take a disk, be sure to write your name on the logging form provided for
the purpose, together with the serial number of the disk pack, which you will
find on its bottom.
INITIALIZE
YOUR DISK
The next step is to get the disk initialized with copies of all
the programs you will need to use. Here is how to do this:
Go to the first Maxc room (room 1153 on the first floor;
this is the room you just went through to get your disk
pack). There you will find a rack containing (among other things) a
disk pack labeled BASIC
NON-PROGRAMMER'S DISK, and an Alto which has two disk drives,
each with four square lights, a white switch and a slanted plastic
window. Take this BASIC
NON-PROGRAMMER'S DISK and load it into the drive labeled 0. You do
this as follows:
The drive should have the white switch in the LOAD
position, and the white LOAD light should be lit. Open the
door by pulling down on the handle. Put in the disk by holding
it flat, with the label facing you, and pushing it gently into the
drive until it stops. Then gently close the door and push the white switch to
RUN. The white LOAD light will go out, and after about a
minute the yellow RUN light will go on. The disk is now loaded and ready to go.
If anything else happens, you need help.
Now start the Alto. This is done by pushing the small
button on the back side of the keyboard, near the thick
black cable. Pushing this button is called booting the Alto. It resets the machine
completely, and starts it up working on the disk you have just loaded. After
you boot the machine, it will tell you at the top of the screen what it thinks
the state of its world is, and then it will print a
">" about halfway down the screen. When the screen
looks like that, anything you type will be read by the Executive, whose basic
job is
to start up the service you want to run. There is a
section on the Executive later in this document.
For now, you will find everything you need to know right here.
You
are going to use a service called CopyDisk, which copies everything on the main
disk (which you just loaded) onto
another disk which you will load into the disk drive labeled 1. This copying erases anything which is already
on the disk in disk drive 1, so you should be very careful not to copy onto a disk which has anything you want to
keep. Load your new
disk into the disk drive labeled 1, doing just what you did to load the BASIC
NON-PROGRAMMER'S DISK into drive 0.
Now type
>Copy DiskC3.
The CR
stands for the carriage RETURN key on the keyboard. In this and later examples, what you type is underlined in the example, and
what the Alto types is not.. On the screen, of course, there won't be any underlining. It doesn't matter whether you
capitalize letters or not;
the capitalization in this manual is chosen to make reading
easier.
The CopyDisk service will start up and ask you some
questions, which you answer as follows:
Copy from: DP0a the digit zero, not the letter 0
Copy to: DP1CL
Check after copying: Yes
Copy from DPO to DP1 with checking on [ confirm ] Yes
Now
CopyDisk will copy the contents of the BASIC NON-PROGRAMMER'S DISK onto your new disk pack. This takes about two
minutes. While it is running, it records its progress in the two numbers near the top of the screen: they have to count up to 406
twice. When it is done, it will
ask you "Do you want to make another copy of the original disk?"
Answer No, and CopyDisk will return
to the Executive, which will type its ">" character, meaning that it is waiting for further instructions.
Now you
can take both disks out of the machine. Before you do, you should tell the Executive that you are finished, by
typing
>0u4CR
You
will see that after a couple of seconds the screen goes blank and starts to
display a white square that
jumps around. This is an indication that the memory test program
is running properly; an Alto
should always be left in this state when it is not being used.
Now
take out both disks, by pushing the white switch on each drive to LOAD. The
yellow READY light should go out,
and about 25 seconds later the white LOAD light should go on. Now you can open the door (aeainst a slight resistance) and remove the disk. Put the
BASIC NON-PROGRAMMER'S DISK back in the rack where you found it.
If the
Alto in room 1153 is broken or unavailable, you can do a CopyDisk from one standard Alto to another; the procedure for doing
this is described in section 7.5. Since it is a little more complicated than the method just given, a novice should
use it only as a last resort.
LABEL
YOUR DISK
Before
doing anything else, put a label on the new disk with your name, and
any other identifying
information you like. Now you can take the new disk to any Alto, load it in, boot the machine by pushing the button on the
back of the keyboard, and start working.
NAME YOUR DISK
When
you do this, if you look at the information printed at the top of the screen
just after you do the boot, you will see that it says
--- OS Version x/x --- Alto #xxx --- NoName --- Basic
Non-programmer's Disk --‑
This is because your new disk is an exact copy of the BASIC NON-PROGRAMMER'S DISK, which
has no owner, and owner and disk name information got copied along with everything
else. To give the disk your own name as owner, you should type
>Installa
to
the Executive. It will ask you whether you want the "long installation
dialogue"; answer No. When it asks you for your name, type in your Maxc
account name, followed by a CR. When
it asks you for a disk name, choose a suitable one and type that in, again
followed by a CR. Next
it will ask you whether you want to give your disk a password. If you do this, the Alto will ask you for
the password every time you boot it, and won't let you do anything until you
provide
it correctly. This provides
a modest level of security for the information on your disk. If you do give
your disk a password, it is best
to use your Maxc password, since the Alto will then know it and use it
automatically whenever you
communicate with Maxc. Don't forget the password, since there Js no simple way
to find out what it
is, and you will need an expert to get access to anything on your disk.
There will be a pause for a few seconds, and then the Executive
will come back (If you assigned a password to your disk, you will be asked for it
first). Now your name is installed on the disk, and the system
will display it near the top of the screen whenever the Executive is in control,
and will put it on the cover page of anything you print.
3. The Executive
This is the service to which you are typing right after a
boot, and whenever any other service finishes its job.
It has two display areas on the screen, a small one of six lines at the
top, and a large one of about 20 lines in the middle. When you are talking to
it, your typing and its responses appear in the large area.
Whenever you call another service, the large area is erased, and the command
you gave to call the other service appears at the bottom
of the small area. In between the two areas, the Executive displays a clock and
some other useful status information: the versions of the
Executive and the operating system, the owner name and disk name installed on
the disk, and the serial number of the Alto you are using.
3.1 Correcting typing errors
When you are typing at the Executive and you make a
mistake, there are a few special keys you can type to correct the mistake. The BS (backspace) key
erases the last character you typed. The DEL key cancels the
command you were typing completely; it prints "XXX", and
then starts a new line with a fresh ">" character.
3.2 Starting a service
As
we said before, the Executive is for starting up other services which do the
work you want done. To start a service called Alpha, you just type
>Al phagi
It doesn't matter whether you type in capitals, lower
case, or a mixture of the two. If the service needs some other
information about what to do, you type that after the name of the service.
For example, there is a service to type out a document on the screen. Suppose
you want to type out the document called "Notes". You just say
>Type Notes
The
Executive won't ever do anything until you type the final CR; if you change your
mind, just type DEL to cancel the command any time before you type the CR.
3.3 Aborting
You can usually stop what is going
on and get back to the Executive by holding down the left-hand SHIFT key and striking the blank key in the lower right
corner of the keyboard (called the SW AT key; on an Alto 2 it's in the upper right
corner). If this doesn't work, you can push the
boot button.
If you push the SWAT
key while holding down both CTRL and SHIFT, you will find yourself talking to a
service called Swat
which is of no interest to non-programmers. Usually no harm is done if this
happens; you can get
back to what you were doing before by typing PC (control-P; hold
down the CTRL key and type P).
4. Files
The Alto stores on your disk all of the material
you are working on (text and pictures), as well as all the
programs which provide the various services described here. The named unit of
storage on the disk is called a file.
Each different document you handle will be stored on
its own file. The facilities for identifying files are not ideal, but you will
get used to them after a while. Better facilities are the subject of
current research.
A file is identified by its name, which is a string of
letters (upper and lower case can be used interchangeably), digits,
and any of the punctuation characters "+-.!$". A file name can
have two parts, which are called the main name and the extension., they are separated by
a period. For example, "Alto.Manual" is a file name, with main name
"Alto" and extension "Manual". File names cannot
have blanks in them, or any punctuation characters except the ones just
mentioned. A file name must not have more than 39 characters; most people
don't notice this restriction.
A file name can also have a version number, which
is a number that comes at the end of the name, preceded by an exclamation
point: for example, "Alto.Manual!4" is version 4 of the
file Alto.Manual. Version numbers are discussed in detail in
section 7.
4.1 Naming
conventions
It is important to name your files in some systematic way,
using the extension to tell what kind of file it is, and the
main name to identify it. For instance, useful extensions might be
Memo, Letter, Note, Figure, Calendar. If you are a secretary keeping material
for several people on one disk, you can stick the person's
initials in front of the extension, e.g. BWLmemo, JGMmemo etc. If
you don't have anything specific in mind, it is customary to make
the extension the same as the name of the service which creates the file, e.g.
Report.bravo for a document which doesn't have
any special properties,
and is written
using Bravo.
The Alto doesn't care whether you capitalize
letters in file names or not (i.e. ALPHA and alpha and aLpHa
refer to the same file), but it is a good idea to use capitalization to make names
more readable. This is
especially useful when a name consists of more than one
word, since blanks are not allowed in file names: e.g.,
TripReport or MasterList.
4.2 File name
patterns
The Executive provides some simple facilities for
handling files. First of all, it allows you to name a group
of files by using file name patterns
containing the magic characters
"*" and "#". The "*" character
stands for any string of characters. For example, the pattern
"*.memo*"
stands for all the files which have the extension "memo", and the
pattern "*.BWL*" stands for all the files which have BWL as the first
three characters of the extension. The "#" stands for any
single character; for instance, "###.memo" stands for all
the files which have a three character main name and the extension
"memo". If you are
curious to see what a pattern expands into, you can type Xc to get it expanded.
If
you type a file name or a pattern to the Executive, and then type a TAB,
it will give you a list of all the files whose names start with that name. So,
for example, typing
>*.BwiTAB
will get you a list of all files which have an extension
starting with the characters BWL. You can get other kinds of lists
of file names using the DDS service described later, but this is
a useful quick and dirty facility.
Another useful thing to know is this: if you are in the
process of typing a file name to the Executive, and you type ESC, it
will add as many characters as it can to complete a file name.
If you type "T', it will give you a list of all the files which start with
what you have already typed; you can then go on and finish the
file name.
Here
is a summary of magic characters for getting file names expanded:
ESC completes the file name if possible; if not, completes as
much as it can, and flashes the
screen.
TAB shows
you all the file names which match what you have typed since the last blank,
and
erases what you typed.
like
TAB, but doesn't erase anything.
Xc retypes the command line with all
file name patterns replaced by the list of file names they
expand to.
There
are two mme simple commands for dealing with files. To delete a file, or a
group of files, type
>Delete Fl F2 ..CR
Warning: once
you have deleted a file, you cannot get it back. Proceed with caution. If there
is more than one version of a file, the one with the lowest version number gets
deleted.
To get the contents of a text file printed on the screen,
type
>Tvpe
If
the contents won't fit on the display, the Alto will show you as much as will
fit, then ask if you want to see more. If you do, just type a space; if you
want to stop, type "n" for no.
When the Executive is running, it displays two lines of
status information near the top of the screen. Included in
this information is the amount of space which is left for storing files.
This space is measured in disk
pages; it takes about 5 disk pages to store one page of text.
It is prudent to keep at least 150 disk pages available; if your disk has
fewer, you should delete some files, perhaps after sending them to
Maxc for archiving (see sections 8.5 and 9).
At this point you
know enough to use Bravo to begin creating and editing text. Bravo is described in its own
manual. You should start reading the Bravo manual, and not try to continue with this guide
until you have become familiar with the material in the first two sections of the Bravo
manual. The
remainder of this guide contains more information about the Alto which you won't need on the first day,
but will probably want in the first week.
5.
Recovering from disasters
There are various ways in which your Alto disk can become
damaged. If this does happen, the procedures described in
this section will almost always allow you to recover the disk, or at
worst will let you copy files from the sick disk to a healthy one. It is
probably a good idea to get some help with this if you are not
experienced.
Here are the symptoms of trouble:
You can't boot the disk and get to the Executive.
You are out of disk space, but you think you should have
plenty; in other words, some disk space has
apparently gotten lost.
You
get an error message from some service which says something about disk errors or
file errors, and perhaps recommends that you should run the Scavenger.
You
hear a funny buzzing noise from the disk for a couple of seconds, after which the
service you are using breaks in some way.
It may be that the
problem is caused by an incompatibility between the disk drive on which your
disk pack was written,
and the disk drive on which you are trying to use it. This is a likely cause of
your problems only if you have been moving the pack from one machine to
another, and if you notice that it works properly on some machines, but not on others.
If your problem is caused by disk incompatibility, the procedures described below won't do you much eood.
Instead, you should report the problem to the hardware maintenance staff, so
that the offending disk drive can be realigned, and make yourself a new disk
pack on a machine known to be in alignment_ You can transfer files from the old pack to the new one
using the procedure described in section 6.
The first step is to run a service called Scavenger. If your disk is healthy enough to let you
boot and use the Executive, you can just invoke the
Scavenger by typing
>Scavengera
If
it isn't, you can hold down the BS key
and the top two blank keys, and press the boot button (keep the keys
down until you see a fuzzy cursor in the center of the screen; this can
take up to 5 seconds). This will get you a copy of the Scavenger
over the Ethernet; after the cursor appears, it takes about 15
seconds more for the procedure to complete. If this doesn't work,
hold down just the BS key
and press the boot button; this should give you the dancing white
square of the memory diagnostic. If it doesn't, either your Alto's Ethernet
connection is broken, or your Alto has not been updated with the latest microcode
(the latter is unlikely after 1/1/77). Either find
another Alto without these problems, or load in a disk which is
still in good shape, invoke the Scavenger, and then unload the good disk and
load your sick one. The Scavenger will ask you whether you want to change
disks, and give you a chance to do so if you say yes. Then it
will ask you if it can alter your disk to correct errors; say yes.
The
Scavenger will now work for about a minute. As it runs, it may ask you whether
it is OK to correct "read errors". If they are
"transient" errors, answer Yes fearlessly; if they are "permanent"
errors, it is best to ask for advice from an expert. When the Scavenger is
done, it will tell you what it found. If it has succeeded in making your disk
healthy, you can go about your work. If it has deleted some
files whose contents you value, read the description of Extract
below. After you have retrieved anything which interests you from the
debris, delete the file Garbage.$ which the Scavenger leaves around. It is a
good idea to go through this scavenging procedure once a
month or so, just to keep your disk in good shape.
If things are still in
bad shape (i.e., you can't boot and run the Executive), the next step is to
boot again, this time
with the BS key and the top blank key held down. This should get you a fresh
copy of the operating system,
which will ask you whether you want to Install. You should say Yes, and go
through the Install procedure
described in section 2. If all goes well, you will then find yourself talking
to the Executive and can proceed normally.
If this doesn't work,
there is one more step to try. Boot again, this time with BS and the middle
blank key held down. This
should get you the FTP service described in section 9; use it to transfer the
files <Alto>Executive.run
and <Alto>SysFontal from Maxc. Then boot the Scavenger as described above
and run it again. If
this fails, you should consult an expert. If no expert is available, you can
boot FTP again, and use it to transfer files from your broken disk to Maxc or to a clean disk on
another Alto (made using the procedure described in section 2).
The Scavenger leaves
all the stuff which it wasn't able to put into a recognizable file on a file
called Garbage.$,
and it leaves a readable record of everything it did on another file
called ScavengerLog (unless it tells you that you have a beautiful disk). There
are two kinds of entries in ScavengerLog: names of files removed from the directory or
otherwise modified, and names of file paees which were put into Garbage.$. Such pages are identified by the serial number of the file, the page number of
the page, and the number of the page in the Garbage.$ file. The other ScavengerLog
entries allow you to find the serial number of a file which was smashed; the serial
number is printed as two or three numbers
separated by semi-colons.
To retrieve some pages from a
smashed file called Alpha, first look in ScavengerLog to find Alpha's serial number. Then look for a group of
pages with that serial number which were moved to Garbage.$. Make a note of the page number p in Garbage.$ of the first such page, and the number of pages a. Then type:
CR
>Extract Alpha p n--
and the desired pages will show up on Alpha. If it
was a text file, you can now start Bravo, Get it in, and see what you can make of it.
5.1 Reporting problems
If
your Alto itself is broken, obtain a trouble report form, fill it out, and
leave it in the proper place; procedures for doing this depend
on your location.
If
you have trouble with Bravo, report it using the procedure in section 4.3 of
the Bravo manual.
For other problems, consult your local expert.
lO ALTO
NON-PROGRAMMER'S GUIDE
6. Keeping up to date
When new versions of
the various services are released, they are normally announced by Maxc messages
to all registered Alto users (see section 8.6). You can obtain a new version of a service called Alpha as
follows:
Using FTP, attempt to retrieve <Alto>Alpha.cm. If this
succeeds, leave FTP and type to the Executive
>@Alpha.cm@fik
This will cause FTP to be invoked again, some files to be transferred
from Maxc, and perhaps
some other activity. When everything settles down, you will-have the new version.
If there is no <Alto>Alpha.cm, retrieve <Alto>Alpha.run. This
will be the new
version of the service. You don't have to do
anything else.
The best way to obtain a complete
set of new software, and clean up your disk at the same time, is to obtain a fresh disk, initialize it from the BASIC NON-PROGRAMMER'S DISK as described in section 2, and then copy the files you want to keep from
your old disk to the new one. To do this,
put the new disk in an Alto and start the FTP
service (section 9.).
Note the Alto's serial number,
in the top right corner of the screen. Then put the old disk in another Alto, and use DDS (section 5.1) to mark all the files you want to
keep. When you have done this, use the DDS Send to command, giving it the number of the Alto with the new disk in it, followed by a
#: e.g., 236# (you can use the name instead, if you know it). This will call in FTP and start it sending over all the marked files to
the new Alto.
An
alternative way to make a BASIC NON-PROGRAMMER'S DISK is to put the disk you want to initialize into an Alto, hold down the BS key and the top blank key, and push to boot button, as described in section
5. YOu will get a fresh version of the operating system, which will ask you if you want to
Install. Say yes, ask for the "long installation dialogue", and say that you want to erase a
disk. After a minute or so, you will have a clean disk with nothing on it except the
Executive and FTP. Use FTP to retrieve the files
<Alto>NewNpDisk.cm. Then
type
>@,NewNoDisk.cm@
This will automatically transfer
all the needed files from Maxc, and do any other necessary initialization. It takes about 20
minutes, and puts a significant load on Maxc, so use this procedure only when you can't
find the BASIC
NON-PROGRAMMER'S DISK. During the operation,
there will be an automatic Install of the operating system; answer its
questions appropriately.
There will also be an automatic initialization of Bravo, and you should do a Quit when it is finished.
7. More
about files
This section describes various things you will need to
know about the Alto filing system.
7.1 Version numbers
A file name normally has a version number, which
is a number that comes at the end of the name, preceded by an
exclamation point: for example, "Alto.Manual!4" is version 4 of the file
Alto.Manual. The basic rule for version numbers is this:
When you read a file, you get the one with the largest
version number (the current version),
unless you include the version number you want in the file
name.
When you write onto a file for which the current
version is n, a
new version n+1 is created, and becomes the current version, unless
you include the version number in the file name. Furthermore, if version n-1
was around, it gets deleted, so that just two versions of the file are
kept, the current one (with the largest version number)
and the next
earlier version.
For example, if version 4 is the current version
of the file Alto.Manual, there will probably be
"Alto.Manuall4" and "Alto.Manual!3" around. If you write
onto ''Alto.Manual" (e.g. by doing a Put from Bravo),
"AltoManual!3" will disappear, and "Alto.Manuall5" will
appear with the new information on it. "Alto.Manual!4"
will still be around unchanged, so you can get the old version back from there
if you need it. On the other hand, if you write onto
"Alto.Manual!4", that file will be changed, and no new versions will
be created.
If a file name doesn't have a version number, most
services will not make any new versions, but will just
write on the single version. Bravo is an exception; it always makes new
versions, unless you have turned off versions at Install time, If you don't like
the version feature, you can turn it off when you Install, by
asking for the "long installation dialogue" and answering the
questions appropriately. You can also change the number of versions
which are kept in this way.
7.2 DDS
There is a service called DDS which allows you to keep
track of your files and do various useful things
with them. It is very easy to use, since most of the commands are self-explanatory.
Be sure to start it up before going on with this section, and try out the various
facilities as they are described.
Like
Bravo, DDS needs
to be initialized whenever
you run the Scavenger, change your user profile, or find that it
isn't behaving well. You do this just as for Bravo, by typing
>DDS/icR
to the Executive when you call it. DDS takes about 12
seconds to start up normally, and about 30 seconds if you are
initializing it. Unlike Bravo, Dos remembers its state, and restores
the previous state whenever you start it. You can also use initialization to
force it back to the original initial state. To get out of DDs,
point at the word Quit in the upper left corner of the screen
and click YELLOW. Or
you can just type SHIFT-SWAT.
Whenever Dos is doing something, and not
listening to the keyboard, it displays an hourglass in the cursor.
When you see the hourglass, you shouldn't expect any response to
your actions:
wait until it goes
away.
The
DDS screen
is divided into four windows. From top to bottom, they are: a command window, a control window, a filter window and a file window, which are separated
by horizontal lines across the screen. The file window, at
the bottom of the screen, is a Bravo-style window in
which DDS will tell you various things
about your files. The control and command windows contain menus: if you point to a menu word
and click a mouse button, something suggested by that word will be
done.
The bottom window starts out with a list of your files,
which are initially sorted by the time they were written. This
window has a scroll bar exactly like Bravo's. When the cursor isn't
in the scroll bar, you can use it to select or mark files; commands like delete
work on the marked files. The RED (left or top) mouse button marks a file, and BLUE (right or bottom) unmarks
it. Marked files are displayed with an arrow in the left margin. If you hold down
the button and move the cursor around (not too fast), all the files it passes
over will be marked (or unmarked). You can also mark or unmark all
the files which are displayed by moving the cursor to the
right until it turns into a box containing the word ALL, and
then using RED or BLUE.
Just
above the files is the filter window.
The two lines labeled Selspec and Context contain filters
which decide which file names to display. A simple filter is just like a file name
pattern in the Executive; it can include *'s and #'s, and it allows only file
names which match the pattern to be displayed. To see all the
files, you can just use * as the filter: note that the
Selspec is initialized that way. You can also type more complicated filters,
using and, or, not and parentheses: the Context is initialized to one
such complex filter.
The two filters act together, and a file name must
pass both of them to be displayed. The idea is that the Context can be used to
filter out a lot of things you almost never want to see,
and the Selspec can provide fine control. Note that the Context is
initialized to suppress all the standard system files.
To change a filter, point at the text of the filter with
RED. It
will turn black. Now type the new filter, which will replace the old one
as soon as you type the first character. End your typing with CR or ESC; the
latter appends a * to the filter. DDS will immediately update the file
window to reflect the new filter. If you type DEL instead, the old filter
will be restored.
Above the filter window is the control window, which contains a
list of sort words and
a list of show
words. If you select sort words (with RED) they
turn black and move to the left; you can unselect them with BLUE. Moving
the cursor down into the file window will get the list of files sorted
according to the sort words which are selected. Usually, you only want
to select one sort word. The YELLOW button reverses the direction of sorting (indicated
by the arrow next to the word) when it is clicked with the cursor over a sort word.
DDS is
initialized to sort on time written; that is why the sort word written is
black. Try turning written off (with BLUE) and
sorting on name. Now reverse the direction and sort again. Now turn off name and sort on extension.
The show words say what properties of the file will be
shown along with the name. You can turn options on with RED and off with BLUE, just
like sort words. The file display won't be updated until you
move the cursor down into the file window. The marked show word
limits the display to marked files. Note that DDS is initialized with written
and size (the number of disk pages in the file) turned
on. Try some other show words.
Finally. at the top is the command window. Commands act
on marked and filtered files only, and should be
self-explanatory. A command must be confirmed with ESC or CR before it
takes effect. Some commands take other parameters, which you should type before
the ESC or
CR. The
typing appears in a black region just above the commands;
sometimes
DDS will
supply a default value, which you can override by typing something else.
You can mark some files, and then change the filters so
that the marked files are no longer displayed; they will still
be marked. They will not, however, participate in a command. If you
later change the filters so that they are again displayed, they will still be marked,
and now they will participate in a command.
Here is an example which illustrates several features: it
deletes all the files whose names end in $ (these are usually
the files on which Bravo leaves old versions of files you have edited,
if you have file version numbers turned off). Point at the Selspec filter and
click
RED;
it will
turn black. Now type j* Ca; this will display all the
files whose names end with S. Now put the cursor in the file window, and
use RED in the
ALL bar
on the right to mark all the files. Finally,
select the delete
command and type ESC.
There are many options for initializing DDS. They
are all set up in a standard way in the user profile on the BASIC NON-PROGRAMMER'S DISK, but
you can change them by editing the [DDS] section of the
file User.cm. Detailed instructions on how to do this can be found
in the DDS reference
manual, together with a lot of additional information about DDS itself.
This manual appears as DDS.ears on the Maxc <AltoDocs> directory (see section
11), and can also be found at the back of the Alto User's Handbook.
7.3
Copy
To copy one file to another, e.g., Old to New, say
>Copy New 4-
Old don't
leave out the spaces
The "4-" is to remind you of the direction the copying is
done.
7.4
Dump and Load
These services give you a way to package up a number of
files into a single, so-called dump file. You can then transport the
dump file around as a unit, and later recover one, a few, or all of the files
from it. This is especially useful when you want to send a group of files to
Maxc for storage or archiving.
To make a dump file, type
>Dump
alpha.dm fl f2
Here
"alpha.dm"
is the name of the dump file: by convention it has the extension
"dm." You can list as many files as you want to be dumped. Often the
* feature of the Executive is useful here.
To get files back from a dump file, type
>Load/v
You
will get a list of the files in alpha.dm. and after each one you will be
asked whether you want it loaded or not. If you leave out the
/v all the files which don't already exist will be loaded; if
you say /c instead, all the files will be loaded whether or not they are already
on your disk.
7.5 CopyDisk
The
simplest use of the CopyDisk service is copying the contents of one disk pack
to another on an Alto equipped
with two disk drives; it is described in section 2. CopyDisk can also copy the
contents of a disk pack from one Alto to another over the Ethernet. To use it in this mode, you need two Altos; in the
example below they are called Banjo and Flash. Put the disk you want to write onto into
one Alto (Flash), and start CopyDisk. If you want to copy onto a blank disk, which won't have an Executive and
therefore cannot be
booted from, you can start CopyDisk by holding down the BS
and ] keys, and pushing the boot button. After some delays, as described
in section 5. the CopyDisk service will be running.
The
first thing it does is to ask you "Copy from: ". Here you type the
name of the Alto from which you want to copy, followed by a CR.
If you don't know the name,
you can type the serial number
(displayed in the Executive"s status lines), followed by a #. The dialogue then proceeds as follows:
Copy from: Banjo
Copy to: DP0a- the digit zero, not the letter 0.
Check after copying: Yes
Copy from Banjo to DPO with checking on [ confirm ] Yes
Waiting on Ether ...
Next, go to the other Alto (Banjo), put in the disk you
want to copy, start CopyDisk and proceed as follows:
Copy from: DPO—
Copy to: Flash
Check after copying: Yes
Copy from DPO to Flash with checking on [ confirm Yes
Now the
copy should proceed. When it is done, the source Alto will ask "Do you
want to make another copy of the
original disk?". You can answer No, and it will return to the Executive. The target Alto will say
"Waiting on Ether ...". and you can boot it and say Quit to the Executive.
8.
Communicating with Maxc
Many uses of the Alto
require you to communicate with Parc's large shared computer, which is called Maxc. To make
any use of Maxc, you must first obtain a Maxc account and password; to do this, see the CSL laboratory
manager's secretary.
Before trying to use
Maxc from your Alto, you should first tell the Alto your Maxc account name and password. If you have
given your Maxc account name to Install as the owner name for your disk, however, the
Alto already knows it, and if you gave your Maxc password as your disk password, it knows that too
and you can skip to section 8.1. Otherwise,
you can give the necessary information by typing to the Executive:
>Loginal
The Login service will now ask
you for your Maxc name and password. Type in each one in turn, ending each with a CR or space. Note that it assumes your Maxc acount
name is the same as
your disk owner name; if this is the case, you can just type CR to confirm it, and go on to give your password. If
it isn't, type DEL, and then give the Maxc name you want to use. Once you have done
this Login, your Alto will automatically identify you to Maxc whenever necessary. If you boot your Alto, it will forget this
information, and you must Login
again.
Note that the Login
service only records your Maxc name and password; it does not connect you to Maxc. If you don't do a Login, both Chat and FTP will
automatically ask
you for the Login
information when they first run, and will record it just as Login does.
If you wish, you can
supply a password for your disk when you Install (see section 2). If you do this, you will have to type the password whenever you boot the
Alto. but it will automatically
be used as your Maxc password, unless you override it with a Login command. The
password is stored on your disk in encrypted form, so that your Maxc password cannot readily by
compromised to someone who paws around on your Alto disk.
8.1 Chat
You
can use your Alto as a Maxc terminal through the Chat service. Just type >Chatfa
If all goes well, you will see
the message "Connected to :", followed by some numbers, at
the top of the
screen, and a message from Maxe at the bottom of the screen. If Chat
has trouble getting
connected to Maxc, it will tell you its problem after trying for a few seconds. This usually means that Maxc is broken; you
might try again in a few minutes.
If you have forgotten
to Login to your Alto, Chat will ask you for your Maxc name and password. It will then record
this information, just as though you had given it to Login, so that you won't have to supply it again unless you
boot the Alto.
When Maxc types more
than a screenful at you, it will pause after every screenful and "ring the bell", which
causes Chat to display a large DING at the top of the screen. After you have had a chance to read the screen, striking
any key on the keyboard will get Maxc
to
produce the next screenful. If you type ahead to Maxc, this
feature is suppressed.
Maxc has its own
Executive, and a large array of services called subsystems. The next few subsections contain enough information about how to use
Maxc to satisfy your routine needs.
Chat
keeps a record of your conversation with Maxc on a file called
Chat.scratchScript. You can read it with Bravo after a Chat session, just to see what happened, or
perhaps to copy things out of it into other files, print it, or whatever. There are two funny things about this file
which you need to know about
The file is not
erased when you start a new conversation. Instead, the typescript of the new conversation starts at the
beginning of the file and continues for as long as the conversation lasted. The
end of the conversation is marked by the characters <_> after which you
will see the remnants of
the previous conversation.
The
typescript file is only 20,000 characters long. If your
conversation is longer than that, the
typescript will wrap
around to the beginning. It is possible to make the file larger by editing the
[CHAT] section of the user profile
(the file User.cm) in the
obvious way.
8.2 About
Maxc
Maxc has its own Executive and file
system, which are thoroughly documented in the Tenex Exec Manual. That manual was written primarily for programmers,
and contains a large amount of information
not needed by casual users of Maxc. In the hope of keeping you from having to read the Tenex Exec Manual, the
next few paragraphs contain a summary
of basic procedures for dealing with Maxc.
In order to do anything useful on
Maxc, you must be logged in. The details of this procedure will normally not concern you, since Chat
will take care of them automatically. When
you are finished with your Maxc session, however, you should log out by
giving the command
@Logoutak
to the Executive. (Note that Maxc types an
"@" when it is listening for commands, just
as the Alto types a ''>".) After a few seconds, you will get
a farewell message from Maxc. Then you can exit from Chat and get back to the Alto Executive by typing SHIFT-SWAT (hold down the left-hand shift key and hit the
blank key in the lower right corner of the keyboard).
If you expect to
use Maxc again within a few minutes, you can save a little time and some Maxc resources by not logging out. This
notifies Maxc that you expect to be back soon. If you don't return within a few minutes, Maxc will
log you out automatically. If you don't expect to be back soon, it is considerate to log out, since you use up
space on Maxc while you are logged in.
8.3 Maxc files
Maxc has a file system
somewhat like the Alto's, but the procedures for finding out about your
Maxc files are rather cumbersome. You will want to store files on Maxc for
several reasons (all of which
are explained in more detail below)
so
that other people can copy them easily, using the File Transfer service (see
9.);
so that others can obtain hardcopy easily, using
the Ears subsystem on Maxc (see 8.4);
so that they
can be archived on magnetic tape (see 8.5).
Maxc file names
look very much like Alto file names, but they have one more part: a directory.
Also, the version number is
always present, and is preceded by a semi-colon rather than an exclamation point.
The format is
<directory>name.extension;version
Each Maxc user has a directory, named by his Maxc user
name, and you can reference files in some other directory
simply by prefixing the directory name to the file name, as illustrated.
There is a protection system, not described here, which allows a user to
control which other users can read or write his files. The usual
setting of the protection, and the one you will get
automatically if you don't say anything special, allows all Xerox users to read
the file, but prevents anyone except the owner from writing it.
When you put a file onto Maxc, if there is already a file
with the same name, the new file is added, with a version
number one bigger than the old one, just as on the Alto when the file
version number feature is enabled. However, old versions are never deleted automatically.
When you reference a file, you get the one with the largest version number
if you don't specify the version explicitly,
just as on the Alto.
The ESC feature for
completing a file name works on Maxc more or less as it does on the Alto.
You can list the names of your Maxc files with
@Dirfa
If you want just the files with a particular main name or
extension, you can say
@Dir activitv.*gi or
@Dir *.reportCR
but
these are the only uses of * which will work. To list another user's directory,
say @Dir <user>fl
You can get more detailed information about your
files (length, date written, etc.) with
@Dir21 note the comma
@@vCR
@@CE
If
you want to print or otherwise manipulate this list, read the Chat typescript
into Bravo and treat it like any other
piece of
text.
You can delete one or several Maxc files, just as on the
Alto, with
@Del fl f2
and
*s will also work here, just as in the Dir subsystem described above. To delete
all the old versions of your files, say
@Delvergi
answer
the two questions Yes, and type a CR when you are asked for the "file
group." It is a
good idea to do this once a week or so, since old versions can pile up and
waste a lot of space.
To find out how much space you are using on
Maxc, type @Dskal
One
Maxc page is equivalent to about five Alto pages.
8.4 Hardcopy on Maxc
If you have a file, say TripReport.ears, in
"Ears" or "Press" format (see section 10 for an explanation
of these formats), i.e., ready for printing, you can get it printed by typing @Ears TripReporta
If you want 6
copies, say
@Ears
TrinRenort,a note the comma
@@Copies 6CL @@cji
This is mainly useful for printing files on other
directories, which other people have left there to make it convenient
for you to print them. If the extension isn't "ears", you have to
type it as part of the filename.
You can get Bravo to produce an Ears file by using the E
option in the Hardcopy command. You should give the file the extension
"ears." Then you can send it over to Maxc using the File
Transfer procedure described in section 9.
8.5 Archiving
Maxc provides facilities for archiving
files onto magnetic tape, where the cost of storing them
is negligible. You can get an archived file back within a day with no effort,
and within a few minutes at the cost of some inconvenience.
To
archive one or several files, type
@Arch f filel file2 ...--CR
The
files will be archived onto tape within a day or two. After this has been done,
they will be deleted from the disk automatically, and you will
get a message notifying you that the archiving has been
done.
Maxc keeps track of your archived files in an archive
directory which you can list exactly like
your regular Maxc directory, using the Interrogate command rather
than the Directory command. If the listing is of just one file, Maxc
will ask you whether or not you want it retrieved
from the tape. If you say yes, the file will appear on your disk within a day,
and you will get a message to that effect. If you need the
file right away, see Ed Taft or Ron Weaver.
8.6 Messages
You
can send and receive messages on Maxc using two subsystems called Sndmsg and
Msg. To send a message, type
@Sndmsc,C2
and
fill in the To:, Cc:, Subject: and Message: as they are requested. You can edit
the message with the following control characters; this
editing is rather clumsy, however, so you should type the message as carefully
as you can.
Ac to backspace one character (not BS, unfortunately)
Qc to delete a whole line
Rc to
retype the current line
Sc to
retype the whole item
DEL to
abort the whole thing
CR to
terminate everything except the Message
Zc to
terminate the Message.
After
Zc type a CR. Maxc will report success as it sends the message
to each destination. You can make a list of people on a file,
say Csl.msg, and send a message to all of them by
typing
BC CSI.MS2C-- as part of the To: or Cc: lists.
There is a set of useful destination lists on the
<Secretary> directory; they all have the extension "msg", so
you can get a list of them with
@Dir <secretary>*.msga
To
get on a distribution list, send a message to Jeanette Jenkins.
You
can copy a file, say Meeting.notes (perhaps prepared with Bravo, but don't use
any formatting, and put in carriage returns yourself, rather than relying on
Bravo's automatic
ones), into the message by typing Bc
F Meeting.notes-C1-1.
To read your mail, type @msgCR
Soon Maxc will type a summary of your newly arrived mail,
and then a <- symbol. Notice that the messages are
numbered. You are now talking to Ivlsg; it has a rather complicated command
language which you can learn about by typing "?" after the
<- symbol. Here is enough information to get by on.
To see message n, type
<-Type
message
To
see the next message, type LF; to see the previous message,
type BS. To
see the current message again,
type T ESC. If
you want to save the message, after it has been typed, Get the Chat
typescript into Bravo.
You
can delete a message by typing
ll_R
>Delete
message
The current message can be deleted with >Delete
message ESC
It is a good idea to delete messages after reading them,
unless they reflect pending business. By keeping your
message file short, you will find that Maxc responds much faster,
and also you will be able to get a quick summary of pending business by listing
the message headers (From:, Date:, Subject:). To do this,
type
<-Headers of messages MCR
where for M you can say
All messages
Not examined messages
From nameC-1
Subject texta CR
 m-n‑
m-n‑
To answer the message you just typed out, type <-Answer
message ESC
 It will ask you where to send the answer, and
you
It will ask you where to send the answer, and
you
From
to send the answer to the sender, with All to send the answer to
everyone who got
You can also get into Sndmsg from Msg by typing
<-SndmsgCLEi
When
you have finished sending the message, you will be talking to Msg again.
Finally, two useful things:
To
stop Msg in the middle of typing the response to any command, type Oc;
if it was waiting at the end of a page, you will also
have to strike another key.
To
exit from Msg, type: <-Exita
 Every
now and then you should clear <-Move All messages
Every
now and then you should clear <-Move All messages
to file 8Dec75.msg.a [new file]
-C-ii using the current date in the file name
<-ExitCE.
@Arch
f 8Dec75.msga
You can always retrieve
the messages if you need them. If you do want to read messages from
a file like the one created with the Move just described, you can tell Msg to
read that file by typing
<-Read from file 8Dec75.msga [old
version]cg‑
9. File transfers
You can transfer files from one Alto to another, or from
an Alto to Maxc, using the File Transfer Program, or FTP for
short. Like DDS, this program has a fairly elaborate set of features,
which are described in its manual. You can print this manual from <AltoDocs>Ftp.ears,
and you will also find it at the end of the Alto User's Handbook. This
section tells you enough about FTP to take care of all ordinary needs.
After starting FTP, you will see three windows on the
screen; from top to bottom, they are the server window,
the user window,
and the Chat window.
Most interactions with FTP involve only the middle window; note the blinking
vertical bar there, which shows where you can type. The first
step is to type the name of the machine you want to talk to. Usually
this is Maxc, and you should just type
*Maxca
In a second or two
you should get back a response like
Maxc
Pup Ftp Server 1.06 30-Jun-76
When
Maxc is broken, there will be delay of about a minute, before FTP gives up; you
can give up sooner by striking the middle blank key (opposite
CR). If you want to talk to another Alto, you can type
its name, if you know it, or its number followed by a #:
*Banioak
 *326#C-a
A
similar message should come back. Before doing this, you should make sure that
the other Alto is running FTP, since your Alto will only wait
one minute for it. You can get a list of all the Alto 'owners,
names and numbers from the Maxc file <System>Pup-Network.txt.
Now
you can retrieve a
file from the remote machine (Maxc, or the other Alto), or store a
file into it. To retrieve, you type
*R
etrieve remote file Example as
local file Exampie_cR
As
in the Executive, you can just type enough of the command to identify it
uniquely, and then a space; unlike the executive, FTP
supplies the rest of the command name automatically. You then
type the Maxc (or remote Alto) file name, folowed by a space. FTP
will then suggest a local name for the file. If you like it, you can just type
CR. Otherwise, you can type some other name, as in the
following example:
*R
etrieve remote file Example as local file Dummy-C1-
During
the transfer, the cursor will flip its two black squares back and forth every
time it transfers a block of the file, so you can tell how it is
progressing from the frequency of flips.
To store a file on your local Alto into the remote
machine, you type
*S tore local file Example as
remote file Example-CB‑
or
*S
tore local file Example as remote file Dummy—
again
depending on whether or not you want to use a different name.
You can do as many Retrieve and Store commands as you
want. When you are done, type *p_uit
and
you will be back talking to the Executive.
If you are not logged in, and are talking to Maxc rather
than another Alto, FTP will ask you for your Maxc user
name and password when you do the first Retrieve or Store. Like Chat,
it will save the information so that you won't have to provide it again until
you boot the Alto.
If you intend to do a lot of
transfers to a Maxc directory other than your own, you can give the command
*Dir ectory OtherDira
to make <OtherDir>
the default directory for Maxc names; this saves typing <OtherDir> in front of each name. You can also do
*Con nect to directory OtherDir Password xxxxx2-
which works just like the Maxc Connect command. The password
is not displayed when you type it, of course.
 You can get a list of the Maxc
files which match a file name pattern with the command *List
You can get a list of the Maxc
files which match a file name pattern with the command *List
 which works just like the Maxc
Directory command. It is quite slow, however, and there is no way to interrupt it except to
SHIFT-SWAT out of FTP.
which works just like the Maxc
Directory command. It is quite slow, however, and there is no way to interrupt it except to
SHIFT-SWAT out of FTP.
At the bottom of the screen is the
Chat window, in which you can talk to Maxc exactly as you do with Chat. You can
move the cursor down into the Chat window by striking the bottom unmarked key
(the SWAT key); to
get back to the middle window, strike the middle unmarked key (on an Alto 2,
the highest and lowest
unmarked keys on the right,
respectively). In the Chat window, after typing Maxca,
you can Login to Maxc and do whatever you want. This window doesn't
offer all the conveniences of Chat itself, but at times it is nice to be able to switch very
quickly between transferring files and giving commands to Maxc.
When you start FTP on an Alto, it
is normally ready to act as a remote machine or server, in addition to accepting commands as described above. If you don't say
anything special, it will allow any other machine to retrieve files, and to store new
files, but not to overwrite an existing file. You can change these defaults by starting FTP with
Ftp/X
where X can be: Nothing to prevent
any such transfers; Protected to allow retrieving only, but no writing; Overwrite to allow an existing
file to be overwritten. Any server activity is reported in the server windown
at the top of the
screen.
10. Pictures
There are currently three major services for drawing
pictures on the Alto:
Markup: good for pictures involving images,
free-hand drawing or painting. Markup is also useful for
adding pictures to a text document produced by Bravo; these
pictures can come from Draw or Sil, or they can be drawn
by Markup itself.
Draw: good for pictures which just contain lines, curves and text;
Sil: good for forms and pictures with only
horizontal and vertical lines.
At the moment only the first two are suitable for general
use. Each has its own manual, copies of which can be
obtained by printing <AltoDocs>Markup.ears and Draw.ears (see section
8.4). You will also find these manuals in the Alto User's Handbook.
You can compose the various parts of a document with
Bravo, or with any of these picture-drawing services,
and then put together the complete document with a service called PressEdit.
This service can combine two kinds of files which describe pages of a document:
Press files
and Ears files.
Markup, Draw and Sil can all produce Press files, and
Bravo can produce Ears files. You will find an explanation of how to use
PressEdit in
the
next section. Warning. the
resulting Press file will be about as big as all the input files;
be sure you have enough disk space.
The
input to PressEdit must be a Press or Ears file. Markup automatically produces
Press files, but the other services require extra steps to make
the right kind of file for PressEdit.
For Bravo, use the Ears option on the Hardcopy command to
get an Ears file. This file will be on your Alto disk, like any other
file. If the Bravo file was named "Example.bravo",
the Ears file should be named "Example.ears".
For Draw, use the Press command to get a Press file.
For
Sil, use the Nppr service to get a Press file, which is always named
"Sil.press". You should rename it to something reasonable.
In all these cases, the resulting Press or
Ears file cannot be
converted back into Bravo, Draw or Sil form. You should therefore do all
the work you can in these systems before making a Press or Ears
file.
The output of PressEdit is
a Press file, and you can do the following things with it:
1) Print
it on the Ears printer from your Alto, by typing to the Executive >Print Example.pressCE
Currently this is done through Maxc, and takes a
while. if you type /s
immediately after a
file name, the file will be saved on your Maxc directory in Ears format. if you
type n/c before a file
name, n copies will be printed. Thus
>Print 5/c Example.press/.s
2) Send
it to Maxc with FTP, and then print it on the Ears printer by
typing
@Ears
Example.pressal
When doing this, you can make several copies if you wish,
as described in section 8.4. In addition, you will be asked if you
"want to save the Press conversion?" You should
do this if you expect that a number of other people will want to print the file
later, since it requires quite a lot of Maxc resources to print a Press file.
If you do save the Press conversion, you will be asked for a
file name; choose the name Example.ears if the Press file was
Example.press. The resulting Ears file can then be printed by
typing
@Ears Example.earsat
with much less Maxc computing. If you save the
Ears file, you should delete or archive the Press file, so
as not to consume too much Maxc file space. Note: you can also save the Ears file
with the Print
service, as described earlier.
3) Send
it to the 3100 Alto in room 2064 and print it on the 3100 there. The advantage
of doing this is that pictures made by Draw will be much prettier; the drawback
is that the 3100 is slower, and the procedure for printing is only semi-automatic.
To print on the 3100, you should start FTP on your Alto, go to the 3100
Alto, run FTP there,
and retrieve the Press file from your Alto. Then follow the
instructions in the notebook labeled Press to get your file printed.
4) Look
at it with Markup, and possibly make changes. Read the Markup manual to find
out how to do this. You can make substantial changes to the document with Markup,
but the procedure is rather laborious, and you cannot transfer any of the changes
back to the Bravo, Draw or Sil files you started with. Therefore, it is best to
get all the pieces of the document into final form before assembling it and marking
it up.
The use of PressEdit for assembling
documents has one major advantage: the resulting complete document
can be left of Maxc for printing by anyone who needs a copy. If you are
producing a document for large-scale printing outside, on the other
hand, it is probably easier to assemble it by hand than to go through all this ritual.
10.1 PressEdit
To convert an Ears file foo.ears to a Press file foo.press:
>PressEdit
foo.press F foo.earsa
To extract pages 3 and 17 from a Press file long.press, and put them in
short.press:
>PressEdit
short.press F long.press 3 17Cg
To extract pages 5 through 12 from foo.ears, and put them in short.press:
>PressEdit short.press 4- foo.ears
5 to 12CR
To add fonts Logo24 and Helvetical4 to a.press:
>PressEdit a.press a.press
Logo24/f Helvetical4/fLE
Here the arguments on the right hand side of the
arrow may be given in any order.
To
make a blank, one-page Press file containing all three faces of TiniesRontan10:
>PressEdit Bla nkTimes.press F Ti mesR oman 10/f TimesRomanl0i/f
TimesRoman 1 Ob/fgl
To
append to the end of chap3.press all the Press files with names fig3-1.press,
fig3-2.press, fig3-3.press etc:
>PressEdit chap3.press f
chap3.press fie3-*.presses
Cautiorr. when
you combine files with PressEdit, try not to use different sets of fonts, or the
same fonts in different orders. This will result in proliferation of font sets, making the
file more bulky and
creating other minor sources
of inefficiency.
11. Documentation
and software distribution
Documentation for all the
standard Alto software can be found on the Maxc <AltoDocs> directory. As a rule, each major
piece of documentation appears as an Ears file which can be printed by the Ears subsystem
on Maxc. Short documents are available on files with the extension "tty"; these
can be copied from Maxc to your Alto and read with Bravo, or they can be printed with
@Corw foo.tty
Ipt:cR [OK]
You can do
@Dir <AltoDocs>*.ears or *My
on Maxc to see what is available.
Current versions of all the
standard Alto software are stored on Maxc in the <Alto> directory. The procedures for
obtaining current versions are explained in section 6.
BRAVO
by BUTLER W. LAMPSON
Bravo Manual
Table of Contents
Preface 28
1. Introduction 29
2. Basic
features 31
2.1 Moving around 31
2.2 Changing the text 32
2.3 Filing and Hardcopy 34
2.4 Miscellaneous 36
3.
Formatting 37
3.1 Making pretty characters 37
Looks during typing
3.2 Paragraphs 38
Hints
3.3 Formatting style 41
Emphasis
Section
Headings
Leading Indenting Offsets
3.4 Forms 44
3.5 White space and tabs 44
3.6 Page formatting 45
Page numbers
Margins
Multiple-column
printing
Line numbers Headings
4.
Other things 50
4.1 Some useful features 50
4.2 Windows 51
4.3 If Bravo breaks 52
4.4 Arithmetic 53
4.5 Other useful features 54
Buffers
Partial
Substitution
Magnification
Control
characters
4.6 The user profile 56
4.7 Startup and quit macros 57
4.8 Diablo and Ears hardcopy 57
Samples of standard fonts
Preface
This manual describes the Bravo system for creating,
reading and changing text documents on the Alto. It is supposed to
be readable by people who do not have previous experience with
computers. You should read the first four sections of the Non-Programmers Guide to the
Alto before starting to read this manual.
You
will find that things are a lot clearer (I hope) if you try to learn by doing. Try
out the things described here as you read.
Material in small type, like this, deals
with fine points and may be skipped on first, or even second, reading.
I would appreciate any comments which occur to you while
trying to use the manual. In particular, I would like to
know what you found to be confusing or unclear, as well as anything
which you found to be simply wrong.
This manual is written on the assumption that you have the
user profile, fonts and other Bravo-related material from the BASIC NON-PROGRAMMER'S DISK. If
this is not the case, some of the things which depend on that stuff
will not work the same way.
There is a one-page summary of Bravo at the end of this manual. It is intended
as a memory-jogger, not as a complete specification
of how
all the commands work.
Bravo was designed by Butler Lampson and Charles Simonyi,
and implemented mainly by Tom Malloy, with substantial contributions from
Carol Hankins, Greg Kusnick, Kate Rosenbloom and Bob Shur.
1.
Introduction
Bravo is the standard Alto
system for creating, editing and printing documents containing text. It can handle formatted text, but it doesn't know
how to handle pictures or drawings; for
these you should use Draw, Markup
or Sil.
When
you start up Bravo (do it now, by saying Bravo/ea- to the
Executive), you will see two windows on the screen, separated by a heavy horizontal
bar. The top one contains three
lines with some useful introductory information; it is called the system window. The bottom one contains a copy of the material you are reading, which was
put there because of the
"/e" you typed to the Executive. If you had omitted the
"/e", as you do when using Bravo normally, the bottom window would be empty, except for a single
triangular endmark which indicates the end of a document. In the bar separating the two windows is the name of the document in the lower window.
As you do
things in Bravo, the first two lines of the system window will give you various
useful pieces of information which may help you to understand what is going on
and to decide what you should do next. Usually, the top line tells you what you
can do next, and the second line tells you what you just did, and whether
anything went wrong in doing it. Make a habit of looking at these
two lines while you are learning Bravo, and whenever you are unsure of what is happening.
No
matter what is going on in Bravo, you can stop it and get back to a neutral
state by hitting the DEL key. You can leave Bravo and get back to the
Executive by typing QuitCR
The
characters which you type (Q and CR) are underlined in this example; the characters which are not underlined are typed by Bravo. This
convention is used throughout the manual. Notice that you only type the first character of the Quit
command; this is true for all
the Bravo commands.
Each
Bravo window (except the top one) contains a document which you can read and change. Usually you read the document from a
file when you start Bravo, and write it back onto a file after you have finished changing it. Later,
you will find out how to do this (see section 2.3). It is possible to have several windows, each containing a
document; this too is explained
later on (see section 4.2).
Bravo
is controlled partly from the keyboard and partly from the mouse, the small white object with three black buttons
which sits to the right of the keyboard. As you push the mouse around on your working surface, a cursor moves around on the screen. Pushing the mouse to the left moves the cursor to the left,
pushing the mouse up (away from you) moves the cursor up; and so forth. You should practice
moving the mouse around so that the cursor moves to various parts of the screen.
The
three buttons on the mouse are called RED (the top or left-most one, depending on what kind of mouse you have), YELLOW (the middle one) and BLUE (the bottom or right-most one). They have different functions
depending on where the cursor is on the
screen and what shape it
has. Don't
push any buttons yet.
Mouse lore:
You
will find that the mouse works better if you hold it so that it bears some of the weight of your hand.
If the cursor
doesn't move smoothly when the mouse is moving, try turning the mouse upside down and spinning the ball in the
middle with your finger until the cursor does move smoothly as the ball moves. If this doesn't help, your
mouse is
broken; get it fixed.
You
can pick the mouse up and move it over on your work surface if you find that
it. isn't positioned conveniently. For instance, if you find the mouse running
into the keyboard when you try to move the cursor to the left
edge of the screen, just pick the mouse up and set it down further to the
right.
2. Basic
features
This section describes the minimum set of things you
have to know in order to do any useful work with Bravo.
When you have finished this section, you can read the other parts of
the manual as you need the information.
2.1
Moving around
Move the cursor to the left edge of the screen
and a little bit below the heavy black bar. Notice that it appears
as a double-headed arrow. It will keep this shape as long as you stay near the
left edge, in a region called the scroll bar. if you move it too far right, the shape will
change. Keep the cursor
in the scroll bar for the moment.
Now push down the RED (top or left) button and hold it down.
Notice that the cursor changes to a heavy upward arrow. This indicates
that when you let the button go, the line opposite the cursor will be
moved to the top of the window. Try it. This is called scrolling the
document up.
Next push down the BLUE (bottom or right) button and hold it down. Now
the arrow points down, indicating that when you let the button go,
the top line on the screen will be moved down to where the
cursor is. Try it. This operation takes a few seconds, so don't get
impatient. Practice scrolling the document up and down until you feel
comfortable with it. It is useful
to know that if you don't move the mouse, scrolling with RED and BLUE are symmetrical
operations: one reverses the effect of the other.
You may have noticed that the text on the screen doesn't
fill up the window, but that more text appears when you
scroll up. The reason for this is that in addition to space on the screen,
Bravo needs space inside itself (in the Alto's memory) to display lines of text
on the screen. When a line has only a few characters, it doesn't
take up much internal space, but when it runs all the way across the page, like
the lines in this document, it takes a lot of internal space. When
Bravo runs out of internal space, it stops displaying text and leaves the
rest of the window blank. You can tell that there is more text in the document
(i.e., that you aren't seeing the end), because when
Bravo gets to the end it displays a triangular endmark as the
very last thing to mark the end. If you don't see the endmark at the
bottom of the displayed text, you can be sure that there is more
text in the document which isn't being displayed.
If you keep the cursor in the scroll bar, near the left
edge, and hold down YELLOW
(the middle mouse button), you will see the cursor
change into a striped right-pointing arrowhead. Think of it as
a thumb, and the entire left edge of the window as the pages of a closed book,
corresponding to your whole document (not just
to what is displayed). If you stick the thumbnail into the book and flip
it open, you will find yourself someplace in the book. If the thumb is near the
middle, you will be about in the middle. If it is all the way
at the top, you will be at the beginning; if all the way at the bottom, you
will be at the end.
The tip of the arrowhead acts like the thumbnail, and
letting go of YELLOW is
like flipping open the book. You will also see another
striped arrow, enclosed in a box. This one is called the bookmark; it points to your current location in the
document. After you let up YELLOW, if you hold it down again without moving the
mouse, the thumbnail and the bookmark should coincide
exactly, making a solid arrowhead; this happens because the thumbing
operation moved the document exactly to the place indicated by the thumbnail. To
move forward a little, push the thumbnail down a little below the bookmark and
thumb again; to move back, push the thumbnail up a little above
the bookmark. To get to the beginning, push the
thumbnail up until the arrowhead overlaps slightly the horizontal bar
at
the top of the window. Try thumbing your way through the document until you
feel comfortable with it. Also try thumbing and then scrolling
up and down.
2.2
Changing the text
In order to make a change in the text of your
document, you have to: say where you want the change made, by making a selection;
say what you want done, by giving a command.
You
always make the selection first, then give the command. If you change your mind
about where you want the change made, you can always make
another selection. Making a selection is just like
pointing with a pencil: it doesn't have any effect on the document. Only
commands can change the document. You never have to worry about getting rid of
a selection, since it never does any harm. If you make a
selection, and then give a command that doesn't require any
selection, that is perfectly all right; the needless selection will be ignored.
You make selections by pointing with the mouse and
pushing one of the buttons. To try this out, move the cursor
into the region of the screen where the text of the document is displayed.
Notice that the cursor is displayed as an arrow which points up and slightly to
the left. Point the arrow at a character (any character)
in the document, and click RED. The character you pointed at should be underlined; if it
is, you have just selected it. If it
isn't, look nearby and see if some
other character is underlined. if you find one, then that is the one Bravo
thought you were
pointing at Experiment until you feel confident that you can point
easily at characters.
You should note that each selection erases the previous
one: there is only one selection at a time, and it is the most recent
one. Also, you can make a selection at any time, except when
you are in the middle of a command. Once you have started a command, you must either
finish it normally, or abort it by striking DEL, before you can make another selection.
Something useful to know: if you hold RED down, you can move
the cursor around and the selection will follow it. The selection won't
freeze until you release RED (or move the cursor out of the text
area). Try this too.
Now try a selection using YELLOW instead of RED. Notice that instead
of underlining a character, Bravo now underlines a whole word. A
word is defined as consecutive letters and digits, or consecutive
punctuation characters. For convenience, apostrophe is counted as a letter.
Also,
a number containing a decimal point is a single word.
There is one more thing to learn about selecting text:
how to select more than one character or one word. To do this,
first select a character with RED. Then point to another character and
click BLUE; Bravo
will underline all the characters between the one you selected with RED and the one you
pointed at with BLUE.
This is called extending the selection. Try holding
down BLUE and
moving the cursor around. The selection will change continuously so
that it includes the characters between the one you originally selected with RED and the one
you are pointing at now. As before, when you let up the button, the selection
will freeze. You can change the extension as many times as
you want by using BLUE
over and over; Bravo will remember
the original selection you made with RED until you make another one.
Finally,
try selecting a word with YELLOW and then using BLUE to extend the selection. Notice
that the end of the selection will be a word also.
Space, TAB and carriage return (CR) characters in the document simply appear as
white. space on the screen, just as they do on paper. You can,
however, select them like any other characters. Try it. You
will notice that not all the white space on the screen can be selected;
in fact, the space on a line after a CR, and the space to the left of the left margin, cannot
be selected. Bravo's handling of white space is discussed in detail in
section 3.5.
Now that you know how to say where you want a change made,
it's time to make a change. Select something (for
instance, a word). Now type D (for Delete). The word you selected is
deleted from
the document, and the selection moves over to the character after the original
selection. The rest of the text is adjusted to make up for the deleted
material; if necessary some words may be brought up from the
next line to fill up the one which contained the deleted
material.
You can undo the deletion by typing U
(for undo). Try it; you will see the stuff you deleted reappear,
and it will be selected again, just as it was before you deleted it. Do several
deletions, followed by undos, until you are sure you know what will happen. Try
deleting larger pieces of text by extending your
selections. Be sure not to move the selection between doing the
Delete and the Undo.
Delete and Undo are commands. Like all Bravo
commands, they are given by typing just the first letter of the
command name. You can type the letter in either upper or lower case.
To add new text, select something in front of which you
want the new text to go (if you want it to go at the very end of the document, you can select
the endmark). Then type I (for Insert). You will see that a blinking
caret appears just before the selection. This marks the place
where the new text will go. Anything you type will appear where the caret is,
and as you type each character, the caret will move over to make room for it.
Try typing a few characters, and notice that the rest of the
text is automatically rearranged to make room for the new
stuff.
If you strike the wrong key while typing, you can erase
the mistake by striking the BS key (on the right side of the keyboard). You can
erase as many typed characters as you like
using BS. You can also
use Ac (hold down the CTRL key and type A) to erase a
character; it works just like BS, and may be more convenient to type with your left
hand, if your right hand is on the
mouse. To erase
typing on a larger scale, you can use We (hold
down the CTRL key
and type W) to erase a word and its following spaces or punctuation
characters. When you have typed as much as you care to, hit
Fsc to finish the insert. Notice that the caret disappears, and that the inserted
material is selected. You can undo the insertion with Undo. Then you can undo the
undo and get the insertion back. Try it.
Sometimes it is more convenient to insert after a
selection, rather than before. You can do this with the Append
command (remember that you just type the A). Except for where the new
material goes, Append is exactly like Insert.
If you want to change one word into another, or correct a
typo, you have to delete some text and insert other text in its place. This can
be done by a Delete followed by an Insert, but it is more
convenient to use the Replace command, which combines these two functions into
one. Replace can also be undone.
Whenever Bravo first displays the blinking caret, you can
insert a copy of
some existing text rather than typing in new text. You do this by
making another selection, called a copy selection, instead of typing. The copy
selection is made exactly like an ordinary selection, and
you can even use the scroll bar to move around in the document in order to find
the text you want to copy. You can distinguish a copy
selection from an ordinary one by its dotted underline, which
contrasts with the solid underline of an ordinary selection.
You can change your copy selection as many times as you
like. When you are satisfied with it, type ESC, and a copy of the
copy selection will be inserted in place of the blinking caret.
You can't do anything else while you are making a copy selection, except to
scroll the document.
A copy selection can be used to move text from one place to
another: first copy the text, and then delete the
original.
There is one more useful thing to know about insertion.
If you just type an ESC
for an insertion, without making
a copy selection or typing anything else, a copy of the last thing you
inserted or deleted will be inserted. This is called repeating or defaulting an insertion; it
is very convenient for inserting the same thing in several places, e.g., a
dollar sign in front of several numbers. It also gives you another way to move
text: first delete it, and then insert it in its new
place by selecting the new place and typing Insert followed by ESC.
You now know all three ways of doing an
insertion: typing the
text, selecting some
existing text to be copied, or defaulting the previous insertion
by simply typing ESC.
These three ways of inserting text can
be used whenever a Bravo command needs some text. You will see
many references to "inserting text" as you read on.
Before going on to learn anything more about Bravo, you
should practice the Delete, Insert, Append and Replace commands,
and copy selections, until they are quite familiar.
2.3 Filing and
Hardcopy
Whether you use Bravo simply to read or browse through a
document, or to create or change it, you will need to fetch the document
from a file before starting, and to file it away again
afterwards if you have changed it. This section tells you how to do these
things.
To fetch a document from a file, give the Get command.
You will see the blinking insertion caret appear in the heavy black bar
above the window. Insert the text of the file name, usually by
typing it in, and ending it with an ESC just as for any other insertion. The
document will appear in the document window, and there will be a note in the
system window telling you how long it is. A Get will erase the
old contents of the window, if any.
To file a document away, give the Put command, and type
the file name as you did for Get. If the name you want
is already in the black bar, you can just type ESC to default the name.
It is also possible to edit the file name in the black bar, exactly like an
ordinary document. Put always files away the entire document,
regardless of what the selection is; when it is done, you will
see a note which tells you how long it is. Warning. If you quit from Bravo without
saving your document, you will lose any changes you have made. if this
does happen to
you, read section 4.3 on replaying to see if you
can still be saved.
If you Get a document from a file and Put it
back on the same file, Bravo will save the original on a backup file. Normally this will be
the old version of the file from which you did the Get, and
Bravo will make a new version for the Put (see section 4 of the Alto Non-programmer's
Guide for a discussion of file versions). If you have disabled version numbers
at Install time, however, the backup file's name will be the name of the
original file, followed by a "$". The backup file is
sometimes useful if you discover that some of the changes you
made are not to your liking after all.
You can do an "unformatted Get"
with the 2c command (type instead of Get);
this treats the formatting
information at the
end of each paragraph as ordinary text. The main use of 2c is for
patching up a file which has been damaged by hardware failure or cosmic rays. In particular,
if Bravo refuses to Get the file because "End of file not in Bravo format", you
can usually correct the problem by doing an unformatted Get
of the file, deleting the last line or two, and Putting it
back. Then Quit, restart Bravo and try again to Get the file.
To print a document, simply give the Hardcopy command; it
will print the entire document, regardless of what the selection is.
While doing the hardcopy, Bravo displays in the
cursor a count (modulo 10) of the number of pages it has processed; hardcopy
takes about 8 seconds per full page, like this one. After
sending the document to the Ears printer, Bravo will report
success. If there is a problem, Bravo will leave a note in the system
window. If the printer is not responding, Bravo will leave a note to that
effect, and keep trying. You can abort the Hardcopy by typing DEL, as always.
The hardcopy may fail
for several reasons. If there is an EFTP error, trying again will usually work.
If the problem is
that there is a character in your document which is in a font for which you
don't have the necessary
.ep file, Bravo leaves one of the offending characters selected, and puts it at
the top of the screen. You
can try again after retrieving the necessary file from the <Fonts>
directory on Maxc and initializing Bravo (see section 2.44. If you have a paee with so many different fonts
(usually more than 7 or 8) that it exceeds the 32k capacity of Ears, Bravo leaves the first
character of the page selected and at the top of the window. There is no remedy for this
problem except to simplify the offending page. See section 4.6 for more information about fonts.
You may want more than one copy of your
document. The Hardcopy command has an option called
Copies, which allows you to specify the number of copies you want; you type in
the number, and it will appear in the leftmost buffer in the system window,
much like a file name. You must give the Copies option right after the
Hardcopy command, every time you want more than one
copy.
If you compare the hardcopy of your document with Bravo's
display, you will see that although the text is identical, the hardcopy has
more words on each line, so that the two versions look quite different.
In order to see a nearly exact facsimile of the hardcopy on the
screen, you can give the command
Look hardcopy (note the lower-case h)
You are now in hardcopy mode on the screen. Until
further notice, Bravo will represent the printed version of your
document as faithfully as it can, by positioning each character on
the screen within one-half screen dot (about .007 inches) of its position in
the final hardcopy. The screen representation is 10% larger than
the printed one (to change this scaling, see section 4.5).
To turn off the hardcopy simulation, give the command
Look Hardcopy (note the upper-case H)
You can edit normally in hardcopy mode_ In fact, if your
document contains tables whose appearance is critical to
you, it is advisable to stay in this mode, because in the normal mode
text will take up much more space on the screen than it will in the final
hardcopy (if
you have such tables,
you should also read section 3.5 on white space and tabs). In
hardcopy mode it is
also possible to see exactly where lines will be broken,
so that you can insert hyphens by hand if necessary.
When Bravo is printing a hardcopy, it will start a new
page whenever it runs into the bottom margin (normally
1", but see section 3.6 to change it). It will also start a new page, after printing
the current line, whenever it sees the character Lc (control-L) in
the text. This character is displayed as a lower case "L"
with an over-bar. You can't type it in simply by holding
down CTRL and
typing L, but instead you can type an L followed
by Sc. You do this during an insertion, not
as a command. The Le is treated just like any other character
during editing. There are a number of other facilities for controlling page formatting,
which you can read about in section 3.6.
The Hardcopy command
has options for printing on the Diablo printer, and for producing an Ears file
which can be combined with drawings into a larger printable document, or sent
to Maxc for •printing. These are described in section 4.8.
2.4
Miscellaneous
As you edit, Bravo keeps track of the
changes you make to the document. In doing this, Bravo consumes space in the Alto memory. During a long editing session,
it is possible to consume all the available
space, in which case Bravo will leave a warning note ("Core storage getting low") in the system window,
and will refuse to execute any more editing commands. If this happens, you should Put your document onto a file
immediately, and then Quit, restart
Bravo, and Get the document back from the file. Now you can continue with another editing session.
When you have finished editing one
document and have filed it away, you can Get another file, and continue working. It you are making
extensive changes, however, it is better to Quit and restart Bravo when you start to work on a new document. If you
do this, you are less
likely to provoke a bug in Bravo, and you will be able to recover from a crash
with the replay feature (section 4.3)
much more quickly.
The maximum size of a Bravo document
is 65,536 characters. Whenever Bravo Gets or Puts a document, it leaves a note
telling you how long the document was. When your document has reached 65,536 characters, you won't be able to add any
more text, and peculiar things may
occur if you do try to add more text. It is a good idea to split the document into two parts well before this happens.
If you type a
character which has no printable representation, Bravo will display it as a black rectangle. The best thing to do with such a
character is to delete it.
Depending on
exactly what Bravo is doing, the amount of text it can display on the screen will vary. You can always get the maximum amount of
text displayed by doing a scrolling operation;
if you scroll up with the cursor at the top of the scroll bar, the text won't
move, and Bravo will just display as
much more as it can. If you then give a command, some of the text may disappear from the screen, but you
can always get it to reappear by doing another
scrolling operation.
Bravo keeps copies within itself of
information in your user profile (see section 4.6) and in various files on your disk: font files (named *.al
and *.ep), and the files containing the Bravo system and its temporary storage (named Bravo.*). It refreshes
these copies whenever you start it up
with
>Bravo/ia‑
This is called initializing Bravo. It is
necessary to initialize whenever you get a new version of Bravo, change your user profile or any font file, or run the
Scavenger. Initializing is just like
starting Bravo up normally, except that it takes about 30 seconds. If you are in any doubt about whether something has changed since the last
time you initialized Bravo, or if
your Bravo is crashing with messages which refer to disk or file errors, you should initialize Bravo by
starting it with Bravo/i.
You now know enough to edit
unformatted documents. Take a rest.
3. Formatting
This section describes the Bravo facilities for
creating formatted text and pages. It you are not interested in
formatting, you don't have to read it. if you are interested, be sure to read
sections 3.3 and 3.4, where you will find a lot of good advice.
Bravo normally describes character sizes and distances on
the page in points. A
point is a unit of distance used in the printing industry; there are 72 points
per inch. Thus 36 points is 1/2 inch, and 18
points is 1/4 inch. In many cases, you can also specify distances in
inches or centimeters, as described in section 3.2.
3.1 Making pretty characters
Bravo allows you to say how you want your text printed:
in italics or bold face, underlined, in various sizes and type styles,
superscripted or subscripted, etc. You can change the way existing text is printed,
or you can say how you want the characters to appear as you are
typing them in. We will begin by describing how to change the looks of existing
text.
First, select the text you
want to mess with. Then give the Look command. This
command
has
a large number of options, each specified by a single letter, which is sometimes
followed by some additional information:
bold shift B to
un-bold
italic shift I to
un-italicize
-
to underline shift
- to remove the underline
‹- to subscript (text down 4 pts) shift
4- or t to superscript (up 4 pts)
0-9 to set the typeface
visible to display spaces, tabs shift V to stop
this.
and carriage returns
> to make letters upper case < to make letters
lower case
BS to overstrike with
the next character. E. g., shift
BS to stop overstriking
§ can
be made by starting with <> and doing
Look-BS
to the <. This can be repeated:
is <>1 with Look-Bs applied to both < and >.
Down followed by a distance (see below) Up followed by a distance to
to move the text down that distance. relative move the text up. Superscript
to the baseline. Subscript is Down 4. is Up 4.
CLR (the blank key to
the right of Bs) to restore the standard looks: font 0; not bold, italic,
underlined, visible, graphic, or overstruck; no up or down.
Try
a few. You can turn all these on and off independently, although you won't be
able to print a character which is both bold and italic with the
fonts on the basic disk.
The typeface is usually called the font. For Bravo, each different
size of the same style is a different font, but bold
and italic are considered to be in the same font. The choice of fonts
is specified by your user profile
in a way which is described later (in section 4.6),
but the standard choice provided on the basic
non-programmer's disk is:
0 Times
Roman, 10 pt. This is
the standard font.
1 Times
Roman, 8 pt.
2 XEROX logo (only the capital letters E 0 R and X)
3 Math,
10 pt. A large set of
mathematical symbols. No bold or italics on
hardcopy.
4 Greek,
10 pt. No bold or
italics on hardcopy.
5 Times
Roman, 12 pt:
6 Helvetica, 10 pt.
7 Helvetica, 8 pt.
8 Gacha,
10 pt. This is a
fixed-pitch font.
9 Helvetica,
18 pt. Only bold on hard-copy.
This is mainly for making
view-graphs, since it is a good size for that purpose.
You
will find tables at the end of this manual which give the correspondence
between ordinary characters and the Math and Greek fonts, and some
samples of the various fonts.
There is another Look option which is very
convenient. It is Look Same, followed by a copy selection. In
this case, what is copied is the looks, rather than the characters. This is the
way to get one piece of text to print in the same style as
another piece.
Like
most commands, Look can be repeated with ESC. This is useful if you want to change the
looks of several pieces of text in the same way. You can also undo a Look with
Undo.
You can find out what the looks of a character are by
selecting it and giving the Look ? command. Bravo will tell
you (in the system window) all the looks of the selected character.
LOOKS
DURING TYPING
When
you start typing, the looks which will be attached to the characters you type
are set to the looks of
the first character
of the selection
if the command is Insert or Replace;
the last
character of the selection if the command is Append;
the standard
looks otherwise.
To change the looks while you are typing text, use the CTRL key
instead of the Look command: hold down CTRL and
type the look you want. The only things described above which
you can't do this way are Look > and < (use shift lock for this), and
Look Up and Down; you can get the standard superscript and substript
offsets with r and *-, though. To restore the standard looks,
you can just strike the CLR key; it is not necessary to use CTRL in
this case. Overstriking works a little differently during type-in: typing CTRL-BS causes
the next character typed to overstrike the previous one.
Thus, you can type in 3t by typing first <, then CTRL-BS, and
then >.
3.2
Paragraphs
In addition to changing the looks of the
characters, you can also change the shape of the text: the margins,
space between lines, justification, centering, etc. The Bravo facilities for
doing this are based on the idea
of a paragraph.
A paragraph in Bravo is all the text between two CTRL-CR characters.
You can tell when you have one by selecting it. To do this, move
the cursor into the line bar, which
is between the scroll bar on the far left, and the text area. You can tell that
you are in the line bar, because the cursor will appear as a
rightward-pointing arrow. Once you are in the line bar, use the YELLOW button
to select a paragraph. Note that the cursor changes to a mirror
P symbol; it keeps this shape as long as the
selection is a paragraph.
The CTRL-CR which ends a paragraph carries the paraeraph looks
described below. It can also carry character looks, and if you are setting up a
standard paragraph, it is a good idea to attach to its CTRL-CR the character looks which you
want as the standard ones for the paragraph. Thus, for example, the CTRL-CR for a standard heading
like the one at the start of this section would carry the italic look. Of course,
this is just a convenience, and not essential; you can always set the character
looks during typein as described above, e.g. by typing is for italics.
The YELLOW button selects exactly one paragraph, so by looking at
what is underlined you can tell where the paragraph starts and ends.
Note that the second CTRL-CR (the one which ends the
paragraph) is counted as part of the paragraph; the first CTRL-CR is
part of the previous paragraph. You can use BLUE to
extend the selection
to several paragraphs.
To merge two paragraphs into one, just delete the CTRL-CR which
separates them. You will probably want to replace it with a couple of
spaces, or maybe with an ordinary CR. To break one paragraph into
two, insert a CTRL-CR; it is just like any other character, except that
you can't backspace over it.
If
you select a paragraph and then give an Append, Insert or Replace command, a
blank paragraph with the same looks as the selected one will
be created for you to type into.
To
change the looks of a paragraph, you can use some more sub-cases of the Look command.
Select the paragraph (or any text in it) first, and then say Look, followed by:
center; turns off justification shift C to
stop centering
justify (even right margin); turns off centering shift 1 to
stop justifying
nested to indent the whole paragraph (36 pts, shift N to un-indent
or 1/2 inch, more)
open up more white space in front of shift 0 to
close up the white space
the paragraph (12 pts, or 1/6 inch, more)
g
to open up half as much more white space in shift Q to close up the white space front
of the paragraph as Open does (6 pts more)
All
of these can be invoked during type-in; hold down the CTRL key
and strike the appropriate key, just as you do for character
looks.
In the following Look cases, d is a distance on the page, which can be
specified in several different ways, as described below. Distances
are measured from the left edge of the paper (except for Up
and Down, which measure from the baseline of the line of text). These looks
cannot be used during type-in.
Left
d to
set the left margin. The default is 85 points, or about 1.2 inches from the left
edge of the paper.
First d to
set the left margin of the first line. Use this to control indenting or un-indenting
of the first line. A Look Left
cancels a Look First, since it sets the left margin for all the lines of the paragraph.
Paragraph .d
to set the left margin of all the
lines except the first. A Look Left cancels
a Look
Paragraph, since it sets the left margin for all the lines of the paragraph.
Right
d to
set the right margin. The default is 527 points. Since an 8.5" x 11" page
is 612 point's wide, this results in 85 points, or 1.18", of
white space on the right. Thus, the default margins center the text on the
page.
X n to
set the space or leading between
lines. The leading should be at least 1 point (as it is in this
document). to avoid a squashed effect. If you want a less dense appearance,
try larger leadings. The default is 6pt, which gives double spaced text.
Y
n to
set the leading in front of the paragraph. The default is 12pt, which gives a blank
line between paragraphs. Note that Look Open increases the paragraph leading
by 12 pts, and Look Q increases it by half that, or 6 pts. Note that both line
and paragraph leading are suppressed for the first line of a page or column. Leading
must be less than 64 points.

a sequence of blanks a
distance equal to the width of that many blanks.
By typing a number n, as above, preceded by + or -. The distance specified
by n is
added to, or subtracted from, the current value of the
look being changed. Thus, to indent a paragraph by an
additional one-half inch, type Look Left +.5 ESC.
By making a copy selection in some other paragraph,
using YELLOW. The
value of the look being changed is read from
the selected paragraph (or character, in the case of
Up and Down) and displayed in the system window, in both points and inches.
By using BLUE to point to a place on the screen. The horizontal
position of the place you point at is displayed in the system
window. if you hold down BLUE and move around, the displayed position is updated
continuously.
By
using RED to
select a character. The horizontal position of the left edge of the character
is displayed in the system window.
By
typing \ (hack-slash, not /), which displays a default value for the look being
changed in the system window.
By just typing ESC,
which uses the value already in the leftmost buffer of the system window. This is useful if you want to read the
value of some property with YELLOW, and then abort the command with DEL and
copy the value to some other property; e.g., you might want to set the P margin to the
same value as a tab
stop.
You can select, point or default as many times as you
want, just as with an ordinary copy selection. Then you can
type a number, if you like. When the leftmost buffer in the system
window has the value you want, type ESC to complete the command. Of course, if you
get disgusted you can always type DEL to cancel the whole thing.
Note that the copy selection is a convenient way to find out the
value of a single paragraph look; after you
have
seen it, you can cancel the command with DEL. Also, pointing is a convenient way to measure horizontal
positions on the page.
Look All, followed by a copy selection, will copy all the
paragraph looks of the paragraph in which the copy selection
is made, to the paragraph containing the current selection.
If a paragraph is selected (using YELLOW in
the line bar; the cursor will be a P symbol
when a paragraph is selected), the Look
? command will display the paragraph looks in the system
window; if the selection is not a paragraph, the command displays character
looks, as described in the previous section. You may have to
scroll the system window to see all
the information. Note that it appears in a buffer
(see section 4.5) which is made current, and you can insert it into a document with a
default insertion.
If you have a paragraph whose left margin is less than the
default (normally 85 pts), any characters in the paragraph to the left of the
default marein will fall off the left edee of the window and will not be displayed. Try
settine a left margin to some values less than 85, and see
how this works. You can change the setting of the left edge of the window, so
as to make these characters visible on the screen, with the command
Window Edge d d is a distance,
which must be typed in and cannot be obtained by pointing. The distance d is the distance from the left edge of the page at which the
left edge of the window should be set. It should be
smaller than any paraeraph left margin if you want to see all the characters on
the left. For instance, if d is 0, the window
edee will be at the paper edge; if the text has the usual 85 pt margin, this
will result
in 1.2" of white space in the window (in addition, of course, to the white
space in the line and scroll
bars). The
default value for d is the default left margin.
HINTS
You can select several paragfaphs (using BLUE to
extend your selection) and apply the same Look command to all of
them. You can change the looks of every paragraph in the document
by doing an Everything to select the whole document before the Look. A Look command
involving a distance of the form +n
or -n adds or subtracts n from the look value for each selected paragraph.
Thus, Look Left +5 ESC
will indent each selected paragraph by five
more points.
If you use several different formats (e.g., for section headings
or for indented material) you can copy the formatting
from an existing example of a particular style to a newly created one
with Look All. Often it is convenient to put a set of sample paragraphs at the
head of your document, each containing one line which explains
what it is a sample of. Then you can split the window (as
described in section 4.2) and have the samples readily available to copy
from with Look All.
When you are setting up the format for a document, you
should put a few blank paragraphs (just CTRL-CRS) at
the end, and set the formatting on all of them to your standard
format (it is convenient to do this by copying the formatting from a paragraph which
already has your standard format). This might include indenting the first line
of a paragraph, setting the leading, leaving space
between paragraphs, justification, and even the
font.
Now when you add material to the document by inserting into one of these blank paragraphs,
you will automatically pick up all of the formatting you have preset. As you type
along, each time you use a CTRL-CR to start a new paragraph, it will acquire the
same formatting as the old one.
3.3 Formatting
style
This section is intended to provide you with some guidance
in using all the different ways Bravo gives you for
controlling the appearance of your document. Many of the rules are based
on the customs of the printing industry. There are two advantages to following
these customs:
they
are the result of many years of experimentation, during which many people have
tried to find out what looks -good on the page:
readers
are accustomed to seeing text presented in this style.
You will notice that some of the rules are contrary to
the usual practice for preparing documents on a typewriter.
There are good reasons for this: when you are printing with variable-pitch
fonts, italics, boldface, justification and precisely controlled leading, some
of the things which work well for fixed-pitch, single-font
documents are no longer appropriate.
EMPHASIS
Use
italics for emphasis in text.
You can also use boldface, but this is usually less desirable,
and it is better to reserve boldface for words which play some special role,
e.g., begin and end in computer
programs. You should also use italics for the names of
variables, e.g., "Suppose there are n items."
Don't use
underlining for emphasis; it is not compatible with the use of italics and boldface.
Use underlining only when you want a different kind of emphasis, e.g., to distinguish
the characters a user types from the ones the machine types, as is done in this
document.
Don't capitalize a whole word for emphasis. In fact, try
not to capitalize a whole word at all: it usually looks
terrible in a variable-pitch font because the capital letters are so much wider
than the small ones. If you have words which you think should be set in
capitals for some reason, try SMALL CAPITALS. In this example,
the S and C were 10 point (font 0), the rest of the letters 8 point
(font 1). Compare this with the appearance of FULLY CAPITALIZED
words and you will see the point.
SECTION
HEADINGS
In general, use left-justified
rather than centered headings, and don't use all capitals, for the
reasons just discussed. Here is a satisfactory list of styles for the headings
of successively larger portions of your document:
smallest Italic 18 pt paragraph leading
(Look Y 18, or Look Q if
your standard leading is 12 pts).
next Bold 24
pt paragraph leading (Look Y 24, or Look 0 if
your standard leading is 12 pts).
largest 12 pt bold 36
pt paragraph leading (Look Y 36, or Look 0 twice
if your standard leading is 12 pts).
Note that you can switch from the standard leading to the
1.5, 2 or 3 times standard leadings for headings during typein, using Oc
and Qc. For the largest units, you can center the
heading and/or use.all caps instead of, or as well as, switching to a 12 pt
font. It is best not to have more than three levels of heading,
but you can extend to four or five levels using these tricks.
Helvetica 18 bold (font 9 bold) is sometimes nice for chapter or document
titles.
Use
Look Keep 80 (see section 3.6) on headings to make sure that the heading
doesn't end up all by itself at the bottom of a page.
LEADING
The
standard printing fonts are designed in such a way that they need some extra
space between the lines to avoid a cramped appearance. You put
this space in with Look X, and you should use 1 pt for ordinary
single-spaced text. If you want a less dense appearance, experiment
with more leading. For double-spacing of the text, try Look X 6 (the default).
Use double spacing (Look 0) between paragraphs. When you
have indented material which is fairly short, try 6 pt
leading (Look Q), as in the example two paragraphs back. Don't use extra
carriage returns to get blank space between paragraphs. However, the maximum leading
you can specify is 63 points; if you need more (e.g., to leave space for a
figure) you will have to put in blank paragraphs.
Note that both line
and paragraph leading are suppressed for the first line of a page or column_
The height of a line of text (in points) is equal to the point size of the
largest font used in the line, provided there are no characters which have been
superscripted, subscripted or offset with Look Up or Look Down. If any character in the line is offset Up,
the minimum line height, including leading, is given by the font size of
the character, plus
its offset; i.e., characters offset Up are allowed to eat into the leading. If
a character is offset Down,
the largest such offset must be added to obtain the line height; i.e.,
characters offset Down are not allowed to eat into the leading.
INDENTING
Use Look nested to
indent material, and Look Nested to cancel the indentation. Note that this
also works when you are typing in. For example, if you type
citcric Here are three
points: cRcncFirst ..cR`Second ..cRcThird ..cRcNcNow
we continue ... the document will look like this:
Here are three points:
First ..
Second ..
Third
..
Now we continue ..
Use
Look First if you want to indent the first line of a paragraph, rather than
tabs. When you have a list of items, it is often nice to unindent
the first line by about 15 pts, especially if the items are
numbered. For example:
1. This
paragraph was formatted with Look Left 120, Look First -15, in order to make the
number hang out to the left.
2. To
get the first word of the first line to line up with the left margin on
subsequent lines, set a tab stop at that point (see section 3.5).
3. You can find out where
to set the tab stop by doing Look Paragraph, using a copy selection
to read the margin setting, and then aborting the Look command with DEL. In
this case, of course, the stop is at 120.
OFFSETS
UP
AND DOWN
Use
the smallest offset you can get away with for subscripts and superscripts,
since large offsets result in wide ugly spaces between the lines. The
offset used by Look t (superscript) and Look 4- (subscript) can be
defined in your user profile (see section 4.6); the standard user
profile sets it to 4 pts.
3.4 Forms
Although
Bravo will let you begin with a completely empty window and start typing into it,
this is a bad practice and
should be avoided. Instead, you should start out by Getting a template or form which will guide you in constructing the document
you want.
An
obvious example is a memo form, and you will find one on the file Form.Memo.
Start Bravo, and Get it into the
window: You will see that it has spaces for the sender, receiver, date and subject, and that these are filled in
with words which indicate what should go there. To fill in the form, select each of these words, and Replace it
with the proper text. Then do
the same with the MEMOBODY. When you are done, you have a completed memo which you can file under a suitable name
using Put.
Your
disk comes equipped with a few forms; you can see their names by typing form..rt
to the Executive. You
should construct your own forms for other kinds of documents which you find yourself creating frequently. As
you have seen in the description of Bravo's formatting features above, a form can contain a great deal of
information in addition to
standard text and spaces to be filled in. You will find that your life is
easier and your work is more
uniform and of higher quality if you use forms consistently, and take the trouble to carefully design a new one
when necessary.
3.5 White
space and tabs
When
you type on a typewriter, you can get white space to appear between characters
by typing spaces or TABs. You can get blank lines by typing carriage
returns. In Bravo, you can do
exactly the same things, with exactly the same results. Space, TAB and CR are characters which
are in your document exactly like "a", "b" or
"c". You can get Bravo to display them as special, visible characters by selecting the text in
which you want to see them,
and typing
Look visible (this must be a lower-case v).
To turn
off the display and just see the usual white space, type
Look Visible (this must be an upper-case V).
Normally
you don't have to type any CRs; Bravo
will automatically end a line when there is no room for the next word. You can force a line to end by putting in a CR; this is appropriate when you want to control the layout of the text precisely, as
in a table. Otherwise, don't
put in CRs.
You should use CTRL-CR to end a paragraph, as described in section 3.2.
Bravo
allows you to set up to 15 tab stops, which are named by the digits 0-9 and the
letters abcde. The tab stops
are paragraph looks, just like the margins; hence they can be different for each paragraph. You can set a tab
stop with the command
Look TAB t d
where
t is a digit or one of the letters abcde, and d is a distance
(see section 3.2).
When
you strike the TAB key during typein.
the caret moves to the next tab stop, just as it does on a typewriter, and a TAB character is added to the document. This TAB character will carry the name of the tab stop; this name won't change unless you
replace the TAB with a different
one. You can also name the TAB character
explicitly when you type it in, by holding
down the TAB key (as though it were a shift key) and striking
one of the keys 0-9 or
abcde. A named TAB character will
always make the following character print at the correspondingly named tab stop. If printing has already
passed that tab stop, Bravo will start a new line, and display a heavy black
rectangle at the end of the previous line, to warn you that something is wrong.
For example, suppose you have a line like this
Column 1 Column 2 Column 3
The tab stops are at 180, 265 and 400 points, and there
is a TAB between
each digit and the following C. If you now append some x's to the
digit 1 to get past tab stop 1, the result will look like
this:
Column
lxxxxxxxl
Column 2 Column 3
on the screen (the
black rectangle
does not appear in hardcopy). When you switch from normal
display mode to hardcopy mode, there will usually be more white space occupied
by the TAB, but
everything will continue to be positioned in exactly the same way. An advantage
of naming the TAB
explicitly when you type it is that you can move the caret to any column of a
table with a single key stroke, by
setting tab stops at each column, and typing the number of the column you want
with the TAB key held down.
You
can find out the name of a tab stop by selecting it and giving the Look ?
command. An unnamed tab is called a plain-tab.
As a convenience, you can set a
contiguous group of tab stops at equal intervals by using the command Look Table d d n
where the two d's are distances
which specify the left and right boundaries of a region, and n is the number of tabs
desired. For example,
Look Table 100 ESC 400 ESC 3
ESC
sets
tab stops 0, 1 and 2 at 100, 200.
and 300 points respectively.
For compatibility with old versions of Bravo, and with the
programmer-oriented tab conventions of the Alto and Maxc, you can set
unnamed or plain tab
stops spaced at equal intervals with the command
Look
TAB = d
where
the distance d specifies
the interval. If you don't set any tab stops, you get plain tab stops
spaced at 36 pts (this parameter comes from the user profile, and can be
changed: see section 4.6).
If
you put a TAB in a paragraph that has plain (unnamed) tabs, and then in later
editing add so many characters
before the TAB character that it gets pushed past the stop, it will
automatically move to the next tab stop. In other words, every time you edit the line, Bravo
behaves as though you had retyped it completely. For example, suppose you have a line like
this
Column
1 Column 2 Column
3
The tab stops are at 145, 205 and
265 points (i.e. an even spacing of 60 pts), and as before there is a TAB between each digit and the
following C. Now if you
add characters in front of the first TAB, like this:
Column lxxxxxxx Column
2 Column 3
all the columns move over.
Similarly, if you started with the second line and removed the x characters,
all the columns would
move back to the positions they had in the first line, since the x characters
overlapped a tab stop.
This can also happen when switching between the normal display mode and
hardcopy, since characters take up less space on the page in hardcopy. Of course, you can always use
Look hardcopy to see the document on the screen exactly
as it will be printed.
One final word about white space: Bravo has formatting
features, described in the section on paragraphs above, which allow you to
indent the first line of a paragraph, and to put blank space above
a paragraph, without using spaces, TABS or extra CRs. It is good practice to
use these features, since you can control the spacing much more precisely and
don't have to worry about having extra characters cluttering up
your document.
3.6 Page formatting
There are a number of features to help you in controlling
the layout of your document on printed pages. Unlike the
horizontal layout, the location of page breaks and the headings, page
numbers etc. for the most part cannot be displayed on the screen. There is,
however, a page
boundary command which allows you to see on the screen
where the page
boundaries will appear in the hardcopy. The command is
invoked by the LF key.
It assumes that the first character of the current selection
is the first character on a hardcopy page, and it moves the
selection to the first line of the
next page. By applying the page boundary command repeatedly, you can move
through the document, page by page (or column by column, if your document profile specifies multiple
columns; see below). Alternatively, if you know where one page break
is (perhaps because of a control-L in the previous line; see below), you can
start there. If you want to start at the beginning of the document,
you can use the Everything command to make the first character of the document
be the first character of the selection.
As a convenience, the page boundary command leaves the
original selection at the top of one subwindow, and the
first line of the next page as the third line of the next subwindow (which
it creates if necessary). Among other things, this makes it easy to do some
editing near the end of the page, and then reselect the
beginning of the page and repeat the command. Try it.
Normally, Bravo will start a new page when it
runs out of room on the current page, i.e., when the next line to be printed
would intrude on the bottom margin, or at the beginning of a paragraph if the
amount of space left before the botom margin is less than the paragraph's
keep value.. You can force a page break by including a control-L in
the text; the line containing the control-L will stay on the same
page, but the next line will start a
new
page. To type a control-L, type L Sc. You can also force a paragraph
to start a new page by giving it a keep property of 11". If you want
to position the paragraph precisely on the new page, give it a
vertical tab property as well.
You can exercise some control over where page
breaks occur with the command Look Keep d d is a distance
This
sets the paragraph property called keep, which has the following
meaning. During hardcopy, when printing of the paragraph is
begun. the amount of space left on the page before the bottom
margin must be at least the keep distance, or a new page will be started. For
instance, by setting the keep of a heading to the total height of the heading
(including its leading) plus the height of the first two lines of the next paragraph, plus
the paragraph leading, you can ensure that the heading will
never end up alone at the bottom of a page. Good values to
use, with standard fonts and paragraph leading as in this document, are 40 pts
on ordinary paragraphs and 80 pts on headings.
You can set the vertical position of a paragraph
precisely on a page using the vertical tab property, which is
set by the command
Look Z d d
is a distance.
When
a paragraph with a vertical tab is printed, its upper edge (including leading,
if any) will be positioned at the vertical tab value, measured
from the bottom of the
page (i.e., use 10.5" to put it .5" from the top). Unlike a
horizontal tab, which may start a new line, a vertical tab never
starts a new page; instead, it may cause overprinting. Vertical tabs are useful
for positioning headings and footnotes, and for precisely aligning text to meet
some physical constraint, such as a pre-printed form or a
window envelope. The first line of a
paragraph with a vertical tab will be printed on the
current page, even if it runs into the bottom margin (but not if
the paragraph also has a keep property which forces it off the page).
To remove a vertical tab, use the default distance; i.e., type Look Z \ ESC.
Vertical tab and keep properties are not visible on the
screen, but you can always use Look ? to find out whether a
paragraph has them, and what their values are.
Note that both line and paragraph leading are suppressed for
the first line of a page of column. If you want white
space in front of such a line 1, you can use vertical tabs, or introduce
a blank line in front of line 1, and adjust the leading of 1 to
compensate for the
height of the blank line.
The remaining aspects of page formatting can be
controlled by an optional document profile which
you can put at the very beginning of the document. The document profile is a
sequence of paragraphs, each of which must have the profile property.
This property is set and cleared by a Look command:
Look ; sets the profile
property Look
shift • clears it
A document profile
has the following form (this one is the profile for this part of this manual):
Page Numbers: Yes X: 527 Y: -.5" First Page: 37 Not-on-first-page
Private Data Stamp: No X: 3.5" Y: -.6"
Columns:
1 Edge Margin: .6" Between Columns: .4"
Margins:
Top: 1.3" Bottom: 1" Binding: -5
Line
Numbers: No Modulus: 5 Page-relative First Line: 1
Odd
Heading: Not-on-first-page
BRAVO MANUAL
Even
Heading:
Section 3: Formatting
Any of the lines may be omitted, and in general any of
the fields on a line may be omitted. Fields on a line
are separated by one or more spaces. Distances, shown in inches in
the example, may be given in points or centimeters, as described in section
3.2. X coordinates are from the left edge of the paper, Y
coordinates from the bottom; negative coordinates are measured
from the right edge or top of an 8.5" x 11" page.
Bravo's measurements on
the page are exact to less than .01". The Ears printer, however, can make
errors in positioning
the text on the page of as much as .25" in any direction. These errors do
not affect the relative positions of characters (e.g., the length of a line
cannot be affected) but they can cause the text to shift around on the page as a whole.
We now proceed to explain the various options.
PAGE
NUMBERS
The coordinates of the page number are the coordinates of
the upper right corner of the number. You can add Roman
to the line if you want Roman numerals for your page numbers,
and Uppercase if you want the Roman numerals in tipper case. If Not-on-first-page
is present, the page number is not printed on the first page of the document.
If First Page is not specified, it is assumed to be 1, and Not-on-first-page is also
assumed for both page nubmers and heading; i.e., there will be no page number or heading on page 1 in the default case.
The coordinates of the
private data stamp are for its upper right corner. Do not use a private data
stamp without proper
authorization. You will need to supply a password on each hardcopy to get the
private data stamp
applied; see the CSL laboratory manager's secretary to learn the password if
you have a legitimate need.
MARGINS
The top margin specifies the amount of white space at the
top of the page. The bottom margin specifies the minimum amount of white space
at the bottom of the page; a line will start a new page if any
part of it intrudes into the bottom margin. Exception: if a paragraph
has a vertical tab, its first line will be printed without regard to the bottom
margin, and it may be positioned without any regard to
the top margin.
If Binding appears, it is assumed that the pages are
eventually to be printed on both sides of the paper, with odd-numbered pages on
the right side of the resulting double spreads. Page
numbers of even pages will be reflected left-to-right; in the example, even
page numbers will have their upper left corner at X: .5" Y:
.5". The binding distance is the amount of extra margin to
be supplied on the inner side of the page, which abuts the binding.
This amount is added to all the X coordinates on odd pages, and subtracted from
all the X coordinates on even pages. For example, if you
want 98 pt (1.36") outside margins and 72 pt (1")
inside margins, use a left margin (Look Left) of 85 pt (the default), and
a right margin (Look Right) of 612 (8.51-85=527 (also the default) to center
the text
on the page. Then
use a Binding of 72-85=-13. In
general, this rule is
Let
d = (desired
outside margin + desired inside margin)/2
Look Left
Look Right 612 (8.5") - d
Binding: desired inside margin - d.
This rule will lead to a negative binding if the inside margin is less than the
outside
margin; that is perfectly all right.
MULTIPLE-COLUMN
PRINTING
The columns line is relevant only for
multiple-column pages. It says that the hardcopy should have the
specified number of columns, with the nominal edge margin (at both edges)
specified (.6" in the example), and the amount of space between columns
specified (.4" in the example). If the number of columns in
the example is changed to 2, the nominal horizontal layout of
an odd page will be:
.6" edge margin - 3.45" text, col 1 - .4" between cols - 3.45" text, cot 2 - .6" edge
margin
for a total of 8.5". The text is centered on the
page; if a Binding is specified, the text will be
displaced in opposite directions on odd and even pages, just as for
single-column text. The width of the text in the columns (3.45 in
this example) is determined by subtracting all the other space
from the 8.5" page width. If there are tic columns, the column width is
col width = (8.5" - 2*(edge margin) - (nc -1)*(between
cols))/nc
The text width and position specified above is
only nominal: the actual width and position is determined by
the specified left and right margins in the following way. The first column
is printed exactly as its left and right margins specify. The second column is moved
right by (col width + between cols) from what its left margin specifies (i.e.,
that amount is added to all its X coordinates). This means, for example, that
you can get a double-column
page with some text at the top which runs all the way across by setting the right
margin of the full-width text appropriately, and using a vertical tab to
position the first paragraph of the second column below the full-width text.
The appearance of the resulting page will
be
Full-width text ...........................................
first-col text second-col text
Note that to do this you must manually find the
end of the first column (easily done using the page boundary
command), and put a suitable vertical tab property on the first paragraph
of the second column.
A consequence of this laissez-faire approach to column
formatting is that you must supply the proper left and right
margins yourself. To keep the text within the nominal boundaries defined
above, the left margin should be greater than or equal to the edge margin
specified in the document profile, and the right margin should be
less than or equal to the edge margin plus the column width. The command Look \
will make it more likely that the document satisfies these
restrictions, by shifting all the left margins over by the difference
between the default left margin (normally 85 pts) and the
edge margin, and similarly shifting all the right margins over by the difference
between the default right margin (normally 527 pts) and the edge margin
plus the column width. Its effects can be reversed with Look shift-\,
until you Put the document then they are permanent. This command works well if your
text is straight prose, with no careful horizontal formatting. If
your text
is any more complex than that, you should plan on manually formatting it for multiple-column
printing, since the automatic facility is unlikely to do what you want.
The edge margin specified in the example, which would be
much too small for single-column pages, is good for double-column. It is also
desirable to reduce the top and bottom margins when you are printing double-column, e.g. to
.8" and .4" respectively.
When
you are printing more than one column, a Lc in the document starts a
new column rather than a new page. To start a new
page, use two consecutive Lc characters.
LINE
NUMBERS
If there is a line which says
Line
Numbers: Yes Modulus: n Page-relative First Line: f
every
nth line will be numbered, slightly to the left of the standard left margin.
Thus, if n is 5, the numbers
will be 5, 10, 15 If Page-relative appears, numbering starts over on each page;
otherwise it continues throughout the document. if First Line appears, the
first line
is numbered f, and numbering
continues from there; otherwise the first line is numbered 1.
HEADINGS
If a Heading line appears, it must be followed by a paragraph,
also with the profile property. which is used as the heading on each page. This
paragraph should have a vertical tab which positions it correctly (for
example, 10.5" for the heading on this page) and appropriate
margins, centering or whatever to produce the desired effects. It may have more than one
line. It is also possible to have separate Odd Heading and Even Heading paragraphs. If
Not-on-first-page is present, the heading will not be printed on the first page.
4. Other things
In this section you can learn
about a wide variety of other useful things Bravo can do. They
are described more-or-less in order of cost-effectiveness: the earlier ones
will probably give you more payoff per unit of effort to learn
them.
4.1 Some
useful features
This section describes a number of features which are easy
to learn and helpful to use. As always, it is a good
idea to try them out as you read about them.
You can select entire lines of the document by moving the
cursor into the line bar, which
is to the left of the text area and to the right of the scroll bar. You can
tell that you are in the line bar because the cursor will appear as a
right-pointing arrow when it is in the line bar. To select the
entire line pointed to by the cursor, use the RED mouse button. To extend
the selection, use the BLUE
button. Both of these work very much like selecting a
character and extending. The YELLOW button selects a paragraph; you can
read about paragraphs in section 3.2.
To put the current selection at the top of the screen,
say Normalize. To select the whole document, say Everything.
To insert the current date and time in front of the current selection, say Time.
Notice that it leaves just the time selected, so if you follow it
immediately with a Delete, you will be left with just the date. To
replace some text with the current date, select it and say Delete Time
Delete; be sure you understand why this works.
You can search
the document for the next occurrence of some text with
the Jump command. After you say Jump, you have to specify the
text you want to search for, and you do this exactly the way
you make an insertion: by typing it in (ending with ESC), by
making a copy selection, or by typing ESC to default to the same text which was used for the
last Jump (not the
last insertion or deletion). Notice that if you type in text, it appears
between the right-most set of curly brackets in the system window: this is
called the search key buffer, and it normally
contains the last text you searched for. The search starts with the
second line displayed in the window. If it succeeds, it brings the first
occurrence of the text to the top of the window; if it fails, a
note in the system window informs you. Jump does not affect the
current selection. The search ignores the looks of the characters.
You can substitute
one text for another using the Substitute command. It
will ask you (in the top window) for the information it needs. In
looking for substitutions it will examine only the text in the current
selection, so if you want to substitute throughout the document, do
an Everything first; this will make the entire document the current selection.
For reasons you don't want to know about, it is not a good
idea to do a Substitute in which the old text contains a CR.
Most Bravo commands can be repeated by simply typing ESC in command mode.
When you do this, Bravo uses the current selection, not the one
which the previous command used. For example, you can append a carriage
return after each of several words by selecting the first one and
Appending after it, and then selecting successive words and simply
typing ESC. Or,
you can search through the document looking for occurrences of a word
by Jumping to it once and then just typing ESC.
The Undo command will undo the action of most Bravo
commands which change the document, provided you haven't moved the
selection. You can only Undo the most recent command; it will
still work if you have scrolled, however_
The
f command will put parentheses around the current selection. You can put other
kinds of brackets around the current selection with the
commands L 1_, <, and
". The command expands the current selection as little as possible
to make it balanced with respect to parentheses. Again, the
3, 1, and > commands do similar things.
4.2
Windows
So far you have worked with a single document
in a single window. Bravo will let you work on several documents at
the same time, each in its own window. This is convenient if you
want to compare two documents, or copy something from one into another, say
from an address list into a letter. You can also have several
subwindows looking into the same document, which is nice
when you want to copy something from one part of the document to
another, or to check something on another page without losing your place.
At the top of each window, separating it from the one
above, is a heavy black bar. Inside this bar is the name of
the file for the document in the window; this name is set by Get and
used by Put. It can be edited like any other text. Subwindows, created only by
the split operation described below, are separated by
horizontal black lines. All the subwindows of a window are
looking at the same document, although usually at different parts.
If part of the document happens to be displayed in several subwindows, any
changes to it will appear in all of them, and so will the selection underline
or the insertion caret. Two different windows, on the other hand, are always
looking at different documents, and no change to one window can
affect the other. You can copy text freely from one document
to another with a copy selection.
Some commands, like Jump, Everything, Get, Put and
Hardcopy, work on the current window, which is the window containing the
current selection.
There are two commands for windows, one for creating and
re-arranging windows, and the other for destroying them.
Each has three options, selected by the three mouse buttons.
To create a new window, type Window, move the cursor so
that it marks the point where you want the new window
boundary to be, and hold down BLUE. The new window will appear. As long as you keep BLUE down,
you can move the cursor around and the top boundary of the
new window will follow it. When you let go of the button, the boundary will
freeze. Try it. The new window will be empty, but you can insert or Get into
it.
To split a window and create a new subwindow, type
Window, put the cursor where you want the split, and hold
down YELLOW. The
new boundary will appear, and it will follow the cursor until
you release YELLOW. It
is important to understand that after a split you have
the same document
in each subwindow. Scroll one of the subwindows so that some of the
same text appears in both subwindows, and select some of the common
text. Notice that the selection appears in both subwindows.
If you make changes to the document, you will
see them in both subwindows. This is very different from creating a new window
and Getting the same file into it; that is equivalent to
taking another copy out of a file cabinet.
To move a window or subwindow boundary, type Window, put
the cursor over the boundary you want to move, and hold down RED. The
boundary will follow the cursor until you let go of RED.
You can get rid of a window or subwindow by typing Kill,
putting the cursor in the doomed window, and holding down RED or
BLUE for
about a second. RED will
give the space of the window to the window above; BLUE will
give it to the window below. Kill YELLOW will clear the window; it
is equivalent to Everything Delete (except that you can't Undo
it).
In summary:
Window Kill
RED move
boundary give
space to window above
YELLOW split;
new subwindow clear
BLUE new
window give
space to window below
4.3 If Bravo breaks
When Bravo breaks or crashes, what usually happens is
that Swat gets called; the manifestation is a couple of seconds of whirring
from the disk, followed by a mostly blank display on the screen, with
the words Swat version xx at the top. It this happens, look at the
bottom of the screen, where there will be a more or less intelligible
message. In some cases this message may describe a condition you
can do something about, e.g. that your disk is full. Or it
may inform you of a parity error; if this happens repeatedly, you should file an
Alto trouble report to get
your Alto repaired (see section 5.1 of the Alto
Non-programmer's
Guide). A third possibility is some fairly meaningless message describing
an internal Bravo malfunction. In any case, after looking at the message you should
boot the machine. Then, if you want to recover your work, you can proceed as described
below.
Bravo makes a record of everything you do during a
session; the record is called the transcript. It
is useful for three
reasons:
If
Bravo crashes because it has a bug, the transcript can be used to report the problem
to the people responsible for fixing bugs.
If Bravo crashes because of a hardware failure of your
Alto, a power failure, you accidentally pushing the boot button, or
whatever. you can recover your work by replaying the transcript. In this case, the last few characters
you typed may be lost.
If you make a mistake, like deleting half of the document
you have been editing for several hours, you can replay the transcript up
to the error and then save the document.
You can do all these things using a system called
BravoBug. Thus,
>BravoBucr-CE
will
start replaying your transcript. As the replay proceeds, Bravo will report each
command, just as it does when you type a command in the
usual way. When it is finished, Bravo will say Ready, and
you can go on editing. It is a good idea to save your work with a
Put and start Bravo again.
Warning-. you can
only do a replay if you haven't started Bravo up again. Once you restart Bravo
normally, your chance
to replay is lost.
To report a bug in Bravo
and then do a replay,
type
>BravoBue/RCa
This will send over to Maxc all the files involved in the
bug, including the transcript, and then
start Bravo to do the replay.
You can control the replay, step by step, as
described in this paragraph. To stop a replay which is going on, type a space. As soon as the command
currently being replayed is finished, Bravo
will stop and tell you the number of the next command. At this point you can
type
Quick to make typed-in text go in all at once
during the replay, rather than one character at a time. This is faster, but you
don't get to see what is going on. Quick is the normal mode.
Slow
to make typed-in text go in one character at a time.
space to replay one more command. Note: only commands
which change the text or windows are recorded in the transcript, not scrolling
operations.
Proceed to continue replaying at full speed. You
can stop the replay again at any point
by typing a space.
Break
before command n to make the next Proceed stop before command n (of course, it will still stop right away if you type a space). This is
useful if you know that
the first 50 commands are good, but want to proceed more cautiously after that. Note that after a Bravo crash, the Swat
display usually tells you the number of the command during which the crash occurred.
Terminate
CR to terminate the replay. After terminating, you
can proceed to give ordinary
Bravo commands. Don't do this unless you are sure that you want to stop replaying.
You should
try replaying a Bravo session and using these commands, so that you feel comfortable with them. You will then feel much
more in control when you have a problem with Bravo or your Alto, or make a serious blunder while
editing.
4.4 Arithmetic
Bravo
incorporates a simple calculator, modeled after the Hewlett-Packard 35. The calculator has a stack with room for four numbers; while you are using it the top of the stack is displayed in the search key buffer, in
the lower right corner of the system window.
To enter a number in your
document onto the stack, select it and type \ (enter). To add a
number in your document to the top of the stack, select it
and type + (or which is the
lower-case character on the
same key). Similarly, you can subtract with multiply with * (or <-), and divide with /. The % command is
just like *, except that it divides the result by 100. After any of these operations, the top of stack is
the current buffer, which means that you can insert its contents in a document by defaulting the text of
the insertion with
ESC.
If you
want to type in a number instead of selecting it, just type the number, and end
it with one of the calculator
commands. The number will appear in the middle buffer while it is being typed.
You can
operate on the top two stack elements, rather than on the current selection and
the stack, by prefixing the
operation with the Calculator command. Thus, to compute (a + b) * (c + d), you
|
select a \ (enter)
select b ±
select c \
select d +
C*
|
Stack: a
Stack: a+ b Stack: c
Stack: c+ d
Stack: ( a+ b)* (c+ d)
|
a+ b a+ b
|
This also works for enter: Calculator \ duplicates the
top of the stack; if the stack was a
b c d, it
becomes a a b c.
There are a few more calculator commands which are
occasionally useful:
— exchanges the top
two elements of the stack: a
b c d becomes b a c d.
1' rotates the stack, bringing the second element to the top
and the top to the bottom: a b c d becomes b c d a. Four
repetitions of t leave the stack where it
was.
Calculator n
sets the number of digits after the decimal point to n. It is initialized to
2. All calculator
arithmetic is rounded.
Calculator Fixed sets the display to fixed point
(the normal mode). Calculator Scientific sets the display to scientific notation.
Calculator Engineering sets the display to engineering
notation.
Calculator
Radix n sets
the radix. n can
be a digit, or Binary, Octal, Decimal or Hexadecimal.
9.5 Other useful features
BUFFERS
The system window contains three pieces of text
enclosed in curly brackets. These are called buffers, and they are
used for a variety of purposes, some of which you have already encountered. The three buffers are numbered, as follows:
1 {last deletion} 2
{last insertion} 3
{search key}
One of the buffers
is always marked with a "*"; that one is the current buffer, and its contents
are usually what is inserted when you default a text insertion by simply typing
ESC.
Commands
which insert into buffers, like Jump and Substitute, default to the old
contents of the buffer being loaded. Get and Put default to the
file name already in the window.
The text in the buffers is always in visible mode, i.e.,
with spaces, TABS and
CRS shown
explicitly. Furthermore, TABS and CRS don't have their
usual effect of leaving white space, because there is no room in
the system window for these effects. Finally, if there is too much
text to fit in the space allowed for the buffer on the screen, the middle of
the text is replaced by an ellipsis (...).
You can force buffer n to be the current buffer
with the command Buffer n ESC.
You can set the contents of buffer n with the command Buffer n followed by typing or a copy selection.
PARTIAL
SUBSTITUTION
If
you want to substitute "that" for "this" you can use the
Substitute command described in section 4.5. If you want to
change some of
the occurrences of "this" to "that", however, it is
useful to know about the Find and Yes commands.
Find is exactly like Jump,
except that
the search starts from the end of the current selection,
not from the second line of the display;
the occurrence of the key which is found becomes the
current selection (Jump leaves the selection
unchanged).
Yes is equivalent to Replace ESC Find
ESC. So, to change some "this"es to "that"s,
proceed as follows:
select something before the
first place you want to start looking;
Find this ESC.
ESC to repeat the Find until you
get the one you want to change;
Replace that Esc;
Find ESC;
Now
at each point type ESC (i.e., repeat the Find) to make no change and go on to the next "this", or Yes to
make the same change you made last time and then go on.
MAGNIFICATION
You have already learned about Look
hardcopy, which shows you the document on the screen as it will
look when printed, but about HI% larger than the printed size.
If you want a different
magnification, you can use the command Look Magnify n,
where n is a single digit which specifies the amount of magnification
you want:
8 screen is 80% the size of the hardcopy
9 90%
0 100%
1 110%
(hardcopy just fits with a right
margin of 530)
120%
3 130%
4 140%
You can return to the
normal, non-hardcopy mode of display with Look Hardcopy, as usual. Once you have done a Look Magnify, a subsequent
Look hardcopy will use the same scaling.
At the
larger magnifications there won't be room on the screen for all of
the page unless the
right margin is less than 530, and the excess
will be chopped off on the
right. This makes
magnifications greater than 110% relatively useless, except for documents which
are narrower than a normal full-width page.
Depending on the
magnification, Bravo will choose an appropriately sized screen font from the list provided in your user profile (see the
next section) to represent each of your hardcopy fonts. There is no guarantee that a screen font will exist which is closely
matched to the hardcopy
font at the magnification you are using. In order to make the screen faithful to the hardcopy, Bravo forces each character to appear
on the screen as nearly
as possible where it will appear in the hardcopy. The maximum error is about
.007".
Normally,
Bravo formats the hardcopy display to match the hardcopy which will be
produced by Ears or some other xerographic raster-output printer. If you want
the hardcopy display to match the hardcopy
produced by the Diablo printer, you can say Look Magnify
Diablo n.
CONTROL
CHARACTERS
Note:
this section is mostly for programmers.
Bravo normally displays a control
character as the corresponding lower-case letter (or whatever) with an overbar.
If you turn on Look Graphic it will try to display the control character from the font (if there is something in
the font for it). This is a character Look, just like Look Visible.
You can't type a control character in
directly, but you can type the corresponding regular character, followed by a Sc, which converts the preceding
regular character into a control character.
4.6 The user profile and fonts
The file User.cm is your user profile, which contains information for various systems about how you want them to be set up for your use. The
information for each system starts
with the name of the system in brackets,
e.g. [BRAVO]. Then follow a series of
lines of the form
label: information
Bravo currently accepts three kinds of information
in the user profile: initial and quit
macros,
described in the next section, and
font definitions and default parameter settings, which are discussed here. Look
at your User.cm file now, to see how this works.
Each line of font definition tells
the number of the font (0 to 9)
the name and size (in points) of the hardcopy font
the name and size of one or more screen fonts which can be used to represent that hardcopy font on the screen. Bravo will choose the most suitable font from this list, based on the current magnification.
For example, the line
FONT:O TIMESROMAN 10 TIMESROMAN 12 TIMESROMAN
10
says that font 0 is to print as 10 pt Times Roman. The font will be represented on your disk by a file called TimesRomart10.er the
"ep" is the extension for hardcopy fonts. There will also be files called TimesRomanlOi.ep and TimesRomanlOb.ep
for the italic and bold versions of
the font, if you expect to use those.
The rest of the line says that font 0 can be represented on the screen by the screen fonts stored on
files TimesRoman12.al and TimesRoman10.31. Bravo will use the 12 pt version in display mode, and the 10 pt version if the
magnification is 110% or less. The
extension "al" is used for screen fonts.
There are no files for the bold or
italic versions of screen fonts,
because Bravo can construct them from the regular version.
In addition to all these .ep and .al files, there is
also a file called fonts.widths
which
contains information about the
widths of all the characters in the hardcopy fonts.
Current versions of all the Parc
fonts are stored on the Maxc directories <Fonts> and <Altofonts>, If you obtain new hardcopy fonts from these directories, you should also get yourself
a new version of <Eonts>fonts.wiciths; after getting new fonts, be sure to
initialize
Bravo.
The user profile also contains settings for default left and right margins
tab interval
Look nested parameters
default line leading (used by Look X) and
paragraph leading (used by Look Open, Look
Q and the default for Look Y)
standard offsets (used by Look t, Look and the default for Look Up and Look
Down).
You can
change all these settings by editing User.cm in a way which should be obvious; after doing this, be sure to initialize Bravo.
Except for the default margins, all these settings affect only the process of editing the document, and not the document
itself. in other words, once a Look nested, superscript or whatever has been done,
the margins, offset etc
have been set in the document and cannot be affected by subsequent changes in
the user profile.
4.7 Startup and Quit macros
This section is only for
programmers, and is not recommended
even for them.
You
can put into your user profile sequences of Bravo commands, called macros, to
be executed automatically when
you start up or quit from Bravo. Each macro is named by a letter. Startup macro x will be executed if
you start Bravo with
>Bravo/x .
Quit
macro x will be executed if you type an "x" instead of CR after typing Quit.
You can
see the format of a macro. definition by looking at your user profile. The command sequences are just like those which
Bravo writes into the transcript (the file Bravo.ts), and can be constructed by actually executing the desired
sequence of commands, and
then copying Bravo.ts to another file and copying the sequence out of that file.
There are two exceptions:
* in place of a selection
(which looks like {6,2,123,648}) means the current selection;
@n in
place of typed-in text (which looks
like 'text{) means the nth
parameter. For startup macros the parameters are strings on the
command line
separated
by blanks; the first one after Bravo/x
is numbered 1. For quit
macros, parameters 1, 2 and
3 are the three buffers, 4 is the file name for the
first window, 5 the file
name for the second window, etc.
These features are not guaranteed to work; use
them at your own risk.
4.8 Diablo and Ears hardcopy
To make
an Ears
file on your disk instead of sending your hardcopy directly to the Ears printer, use the Ears option to the Hardcopy
command. It will ask you for the name of the file; the recommended name is the name of your document,
wioth the extension replaced by
"cars". Once you have made this file, you can store it on Maxc, where
it can easily be printed (see
section 8.4 of the Alto Non-programmer's Guide), or you can give it to
PressEdit to combine it
with other files into a large
document (see section 10 of the
Guide). Warning. the Ears file is typically 50% larger than the document file; be sure
you have enough room on your
disk.
For both Ears and Diablo
printing, you can start printing at a specified page number with the Hardcopy
option
Start at page n
This is mainly useful for Diablo printing. There
will usually be a substantial delay while Bravo figures out where page n
starts.
To print on the Diablo printer, you can use the Diablo option to the
Hardcopy command. Before
doing this, be sure a printer is plugged into your Alto; when you plug or
unplug it, turn the Alto power off
first. This option has an
array of sub-options, which you can invoke when it pauses before printing each page. At the pause,
the system window says "Ready
to print page n", and the beginning of the text for page
n is displayed in the document window (if there is room in Bravo's
memory). You
can then say:
Repeat last page to prepare to reprint the previous page,
instead of the page which was going to be
printed next.
Continuous
print, to suppress the pause after each page; this is useful if you have continuous forms in your printer. You can still
stop the printing by typing
space during printing, as described below.
space to start printing the page which Bravo says it
is ready to print.
During
printing, you can abort printing of the current page at any time by typing a
space. You can then use the
options just described to restart the current page (with space) or reprint the previous page (with Repeat). If you
want to start at another page, use DEL to leave the Hardcopy
command, give another Hardcopy command, and use the Start at page tr option.
Font
5: Times Roman 12
ABCDEFHIJLMNOPQSTUVXYZ abcdefghijklmnopqrztuvwxyz !@#$%-&*()=1-Aill+f;:'",<>1?
ABCDEFHIJLMNOPQSTUVXYZ abcdefghijklmnopqrztuvwxyz !#$-&*( )..+11( .1{ }D;:r",.< )7?
ABCDEFHIJLMNOPQSTUVXYZ abcdefghijklmnopqrztuvwxyz !@#$%-&*()=+ \ILint;:mr< >1?
Font
9: Helvetica 18 (bold only)
ABCDEFGHIJKLMNO
PQRSTUVWXYZ
abcdefghijklmno
pqrztuvwxyz
!@#$%—&* ()-=+\(
[]{}(-4;:'",.<>/?
 Font 0: Times Roman 10
ABCDEFGHIJKLMNOPQRSTUVWXYZ
abcdefghijklmnopqrztuvwxyz
!@#$%-&*()---.+Ail )4- t::"'-<>/?
ABCDEFGHIJKLMNOPQRSTUVWXYZ
abcdefghijklmnopqrztuvwxyz !@#$%_&*( )-=+\/t j/ .>/?
ABCDEFGHIJKLMNOPQRSTUVWXYZ
abcdefghijklmnopqrztuvwxyz
!@#V70-84*0-=+
\ ID{ >1?
![Text Box: Font 7: Helvetica 8
ABCDEFGHIJKLMNOPQRSTUVWXYZ abcdefghijklmnopqrztuvwxyz !@#S%-&•( I[]{}
ABCDEFGHIJKLMNOPQRSTUVWXYZ abcdefghijklmnopqrztuvwxyz !@#$%-&' = + LI,- <>1?
ABCDEFGHIJKLMNOPQRSTUVWXYZ abcdefghijklmnopqrztuvwxyz
!@#S%-8,' -=+ 100 4- t;:'"-0/?](15a-AltoHandbookOCR_files/image010.gif) Font 6: Helvetica 10
Font 6: Helvetica 10
ABCDEFGHIJKLMNOPQRSTUVWXYZ
abcdefghijklmnopqrztuvwxyz
!@#$%-&*0-=+\1Eiti";:-,.<>/?
ABCDEFGHIJKLMNOPQRSTUVWXYZ abcdefghijklmnopqrztuvwxyz !@#$%–&'0-=+\11H)
ABCDEFGHIJKLMNOPQRSTUVWXYZ
abcdefghijklmnopqrztuvwxyz
!@#$%-&*()-=+\ID{},-I;:'",.<>/?
|
Font 8: Gacha
10 (fixed pitch, no bold or italic)
ABCDEFGHIJKLMNOPQRSTUVWXYZ
abcdefghijklmnopqrztuvwxyz
!@#$%-&*( )—+ \ I NO"; -on
|
Font
2: Logo 24
XEROX
|
Delete selection During
type in:
 The following make a new paragraph if
a paragraph is selected
The following make a new paragraph if
a paragraph is selected
Insert <text> before selection Append
<text) after selection Replace selection by <text>
<text> can be
typed or selected. ESC gets the current buffer. Buller n ESC makes buffer
Backspace
character with BS or ctrl-A Backspace word with ctrl-W
Separate paragraphs with ctrl-CR Enter ctrl-Cchar> as
<char> ctrl-S Enter TAB n as n with TAB held down
n current.

 Get to read in
a file
Get to read in
a file
 ctrl-Z for unformatted text
Put
to write out a file
File
name goes into bar above window
 Copies n Ears tile
CR to do it
Can edit file name
like any other text_


|
MISCELLANEOUS
|
Undo works on most recent command
ESC repeals most recent command, using current
selection. Everything
selects whole document.
Normalize moves current selection to top of window.
[ e ' " put indicated brackets
around current selection.
) -I I i extend current selection to closest matching
brackets.
LF takes current selection as top of page. and moves selection to top
of next page.
|
DEL
cancels what you are doing. Out CR exits
from Bravo
Time
inserts current date and time. But ler
123 <text> sets buffer and
makes it
current. ESC instead of
<text> just makes it
current.
|


 Window -RED to move boundary Kill RED to merge with window above
WINDOWS YELLOW to
spur (make new subwindow) YELLOW
to erase contents. leave the window
BLUE to make nevi window BLUE to merge with window below
Window Edge
<Oslo-ice> acts the leil edge of the window 31 the specified point on the page;
the default is 85 pt.
 Jump <text> starts search at
second line, doesn't move selection
Jump <text> starts search at
second line, doesn't move selection
SEARCHES Find
<text> starts search alter current selection. moves selection to the
string bound
Substitute <text> for <text> - works on the current
selection. Usually you want to do Everything first. Yes is equivalent to Replace ESC
Find ESC; use Yes when you want to confirm substitutions.
 >Bravobug
will start a replay. ' allavobug/F1 will report a
bug to the Bravo mairilainers first. Then replay.
>Bravobug
will start a replay. ' allavobug/F1 will report a
bug to the Bravo mairilainers first. Then replay.
REPLAY Space will stop the
replay and show you the number of the next command. You can then type:
Slow to slow down typein Space to replay one more command Break n to slop before
command n
Quick to speed
it up Proceed to continue
replay lull speed Terminate CR to stop
replaying
Operators are a=
- ii, / \(enter). Art operator as a
command combines the selection with the top of slack.
ARITHMETIC Also: '-
exchanges x and y Calculator,
with options: Fixed operator to operate on x and
y
You
can also type a number, followed by an operator. The stack is just
like the one in a Hewlelt-Packard
calculator.
I rotates the
stack Scientific 0-9 ID set ragas
atter decimal rat
 Ell<pileQf int] Radix
n to set the radix (isti lor her)
Ell<pileQf int] Radix
n to set the radix (isti lor her)
MARKUP
by WILLIAM M. NEWMAN
Markup User's Manual
Table
of Contents
1.
Introduction 60
2.
Things to know before you start 60
3.
Use of Markup 61
How to obtain
Markup 61
How
to start Markup 61
The mouse 61
The menu 62
The
top row of menu symbols: freehand drawing 62
The second and third rows:
line drawings 63
Text 63
Image
areas 64
Erasing and inserting image
areas 64
Retrieving from memory 65
Images and text 65
Changing the grid 65
Inversion and fast erasing 66
Rotation and scaling 66
Image files 67
Turning the page 67
Finishing 67
Camera
Input 67
4.
Markup Techniques 68
Disk space 68
Use of existing
illustrations 69
For faster copying 69
Recovery from a full disk 69
Printing 70
Ears hard-copy 70
SLOT/3100
hard-copy 70
Examples 71
1.
Introduction
Markup is an Alto program for document illustration. Its
basic purpose is to permit you to add illustrations to an
existing formatted text document. It can also be used to prepare visual
aids, and to manipulate illustrations prepared with other illustration
programs, such as DRAW.
The purpose of this manual is to explain how to
use Markup. Effective use of Markup involves three different
kinds of issues. In the first place, there are things you must know before you start to use Markup;
then there are the individual commands of Markup, and their
effects, which you must learn; finally, there are a great many 'tricks' that
you will find useful if you make extensive use of Markup. This
manual is concerned mainly with issues of the first two
kinds, those that you will need to
understand in order to use Markup. The final section of this manual
discusses some of the 'tricks' that fall into the third category.
2.
Things to know before you start
Markup manipulates dots. The
commands in Markup are almost all oriented towards helping
you to manipulate the dots that
make up the picture on the screen. With enough patience and
skill, you could use Markup to build entire pictures out of individual dots, as
if you were a Pointillist painter. On the assumption that
you don't have the time for this, Markup gives you more
powerful commands for manipulating whole collections of dots. Thus
you can with a single command lay down a straight line of dots, or an entire rectangular
area. Even after you have used one of these commands, the picture remains a collection
of dots, each of which can still be individually modified.
Markup treats dots and text
separately. Markup knows how to deal with text: it will accept
formatted text from Bravo and other such programs, or simple text strings
placed with the mouse. Text is, however, treated differently
from dots. You use different commands to manipulate the
two different types of information.
Markup is for marking up documents.
In other words, Markup expects you to provide the initial
document for marking up. If you don't have anything with which to start, Markup
will provide you with something analogous to a single
blank sheet of paper. If you do have a document from which to start,
Markup will let you add more pages to it. Basically, however,
Markup expects you to provide a document as a starting point.
Markup works
with Press files. In the
world of the Alto, there are many different sorts of file
formats: Bravo files, Ears files, Draw files and plain ordinary text files.
Most of these are for use with a specific program -- Bravo
files with Bravo, Ears files for printing on Ears, and so on.
Press format is rather different: it is supposed to be suitable for all kinds of
program, whether text editors, page composition systems, printers or
illustrators. As time goes on, we expect more and more of our
programs to deal solely in terms of Press files. Markup is the first of these.
The implications of the use of
Press files are as follows:
1. Any document to be illustrated with Markup must be converted
to Press file format.
The PressEdit program is useful for this purpose. To
convert an Ears format file
FOO.EARS, generated with Bravo, to Press format, type: >Pressedit foo.press foo.earsa
2.
Once in Press format, the
document will be in the form of separate pages, each corresponding to a page of
the final printed document. It will no longer behave like a continuous scroll, as in Bravo.
3.
Any illustrated document
generated with Markup will also be in Press format, and must be printed by a process that accepts Press files.
Examples of systems that will print Press files
are the EARS subsystem on Maxc, and the PRESS program
for the SLOT/3100.
3. Use of Markup
This
section of the manual starts by explaining how to get hold of a copy of the
Markup program, and how to get the
program running. It then covers each of the commands of Markup, one by one.
How to obtain Markup
The program
you need is called Markup.run, and is to be found on the <Alto> directory
on Maxc. A copy of Markup.run
is usually included with the other programs on the BASIC NON-PROGRAMMER'S
DISK. If your disk does not
include a copy, transfer it from Maxc by means of the FTP program,
as follows:
>Ftp
maxc r <alto>markupsun How
to start Markup
Simply type "Markup", followed by L—R. Markup
will ask you for names of the input and output
files. If you omit the input file name, and type only CR, Markup
will supply a one-page blank Press file;
if you omit the output file name, Markup will assume that you just want to
play, and do not want to generate any output for printing. For convenience, you may type both file names on the command line:
>Markup InputFile OutputFile-CR.
Markup
takes several seconds to get started. Eventually the display screen will go
blank, the first page of
the input file will appear, and the cursor will change to a small cross. Markup is now ready for your use.
The mouse
The mouse is the most important
input device to Markup. Its three buttons are used throughout in a consistent
manner:
RED button (top or left-hand): use of this button
generally results in the addition of information to the document.
YELLOW button (middle): this button invariably controls the
display of the command
menu that you use to select your
next command.
BLUE button (bottom or
right-hand): use of this button generally results in the removal of information from the
document.
There
are exceptions to these rules, which are noted below wherever they occur.
As a minor but important point, it should be understood
that the so-called "ball mouse", with the three
large buttons arranged from left to right, is much less satisfactory for use with
Markup than the older-style mouse with three bar-shaped buttons, arranged from
top to bottom. The old-style mouse can be moved much more
smoothly than the ball mouse, and this is essential for
some of the freehand drawing operations of Markup.
The menu
Whenever you press the YELLOW (middle) switch, one row of
the command menu appears. You may move the mouse around with this switch
held down, and select the menu symbol corresponding to the
command you want -- the cursor symbol will change as you move from
one menu symbol to the next. If you move up or down, more rows of the menu will
appear. When you have selected the command you want, release the switch, and
the menu will disappear.

Figure 1. The Markup
menu.
The complete menu is shown above. The four rows of six
symbols constitute the principal commands of Markup. Below
these symbols are the names of the fonts available to you for adding
text to your illustrations (the choice of fonts depends on the fonts defined in
the input Press file). Above the menu are the names of other
Press files containing images that you can add to your
illustrations. To the left and right are the numbers of the other pages in
the document, and the symbols "+" and "quit" for adding more
pages and for leaving the Markup program when you are finished.
 The top row of menu
symbols: freehand drawing
The top row of menu
symbols: freehand drawing
The
top row of the menu contains six different "brushes" for freehand
drawing. When you select one of these six, you can
"draw" by pressing down on the RED (top or left) button, and
holding it down as you move the mouse; dots will appear
as long as you hold the
switch down. The pattern of dots laid down matches the
shape of the brush, except in the case of the two left-hand
brushes in the top row, which are surrounded by broken circles to make
them easier to follow.
The BLUE (bottom or right) switch is used for erasing, in an
exactly analogous manner to the
RED switch.
As long as the BLUE switch
is held down, any black dots over which the cursor passes will
be changed to white.
 The second and third rows: line
drawings
The second and third rows: line
drawings
The
middle two rows of the menu are devoted mainly to line-drawing brushes. When
these are selected, use of the RED switch dispenses black dots in straight line segments,
and the BLUE switch
does the same with white dots. The upper of the two rows is for use when only
horizontal and vertical lines are required; the lower row will also draw lines
at 45 degrees. Four different line thicknesses are provided,
measuring 1, 2, 4 and 6 screen units across.
In contrast to the freehand drawing brushes, these
brushes do not dispense dots in a continuous
stream. Instead, a short straight segment is laid down every time the cursor is
moved to the next intersection of an invisible grid. Thus
if you press and release the RED switch, nothing will happen; if you press, and then move
the cursor about 1/4 inch,
a line segment will appear. As you move the mouse further, a
connected sequence of line segments will be laid down, following the path
of the cursor as closely as the grid will allow. Note that as long as the
switch is held down, the corners of connected lines are filled
in neatly; if you lift the switch between line segments, however, the corners
will look messy. To rectify this, you can redraw the line segments
that meet at the corner in question.
At the start, Markup sets the line drawing grid to 16x16
Alto screen dots. If you are a novice,
you will find this relatively large spacing convenient, but for many purposes
it is too coarse -- 8x8 is a more
useful setting. The command for changing the grid setting is described
below.
Text
To add text to your picture, simply type it. You need not
position the cursor before you type, for Markup expects you
to position the text afterwards. While you type, the text will appear wherever
the cursor happens to be. During type-in, ac or BS erases the most
recent character typed, and DEL or either the YELLOW or BLUE mouse
switch erase the whole string. When the text is complete, position the
cursor where the center of the text string should go, and
press on the RED switch.
The original text will disappear from the screen, and
will reappear, centered about the cursor position.
Text is positioned in this way to the nearest half-grid
unit. If you want to position it more accurately than that, do
not release the RED switch
immediately, but hold it down and move the mouse in the direction
you would like to move the text. You will have to move through
a small "dead zone", and then the text will begin to move, somewhat
more slowly than the cursor. If you move the mouse beyond a certain
distance, the text will disappear altogether. This is useful,
for it allows you to change your mind about inserting the text.
Text may also be erased, using the BLUE switch. To do this,
you must first select the "text brush", i.e. the
T-shaped symbol in the lower right-hand corner of the menu. When you point at a
string of text and press on the BLUE switch, the text will he erased. It may now be
inserted elsewhere with the RED switch. Only the text brush and the text-and-image brush
(see below) can be used to remove text. It is not always possible to erase text
created
with other programs,
such as Bravo or
Draw.
Markup "remembers" the text you erase, or type
in and insert, and allows you to insert this text any number
of times. In between insertions, you may draw with the freehand and line-drawing
brushes, change fonts (see below), and move to other pages of the document.
You may add text in any of the fonts in the font
portion of the menu. To select a font, press the YELLOW switch
and move the mouse down until the font menu appears; lift up when the cursor is
within the appropriate font name. You may change the font of a piece of
text in this way: erase it, switch
fonts, and insert it.
Image
areas
Markup provides a number of commands for
manipulating rectangular image
areas on the screen. You can erase an
area, insert its contents somewhere else, rotate the image, make a mirror
image, and scale it up or down. You may read in images from files on your disk,
and may scan images in using a TV camera. You have the
option, when erasing or moving an image area, of taking the text within the area
too.
In order
to use all these commands, you must understand that Markup can
"remember" image areas, in much the same way that it
"remembers" text. Thus when you erase an area, it
doesn't vanish forever, but goes into Markup's memory; when you give the
command to insert an image, it is the image in this memory that gets
inserted. The fact that you can't see
the image in Markup's memory is sometimes inconvenient;
but there is only one display on the Alto, and Markup uses
it just to show you what's on the page.
Erasing
and inserting image areas
There is a small open square symbol in the bottom row of
the menu: selection of this symbol allows you to erase
and insert image areas. To erase, you must indicate the rectangle
to be erased, by tracing out a diagonal of the rectangle. Position the center
of the cursor at one corner of the rectangular area, press down
with the BLUE switch,
move to the opposite corner, and lift up. As you move the mouse, the
area you will erase is shown by inverting
its contents, i.e. by turning black dots white and white
dots black. Note that the boundaries of the area are constrained to the
nearest grid lines.
If, during the erase operation, you change your mind or
realize that you started in the wrong place, simply retrace
your steps until the black inverted area disappears; you can then
lift up with no side-effects. If you should lift up, and erase some priceless
gem of an image, there is a special command to put it back exactly
where it was (see below, retrieving
from memory).
To insert an image, select the image area symbol in the
menu. Then press down with the RED switch, and whatever image is in Markup's memory will be
added to the displayed page. Thus an image can be moved by selecting
the image area command, erasing it and then inserting it in its
new position.
When you press the RED switch to insert an image, Markup shows you the
boundary of the rectangle where the image will be added. You
may keep the RED switch
down and move this rectangle around until you are satisfied,
and then lift up. If you decide you don't want to add the image
at all, move the cursor to the edge of the screen, so that the rectangle disappears;
you may now release the switch without causing insertion.
Markup includes a
"feature" to help you position images exactly where you want them --
until this feature was provided, it was very
difficult to align parts of an image with the picture on the
screen. The feature allows you, before erasing an image area, to
copy a small square region of the image into the cursor; this is
done by selecting the image area command, positioning the
cursor over the area of interest, and pressing the BLUE switch
down and up without moving the mouse. Now you may erase the area. When you try
to insert it with the RED switch, the cursor will show you where the area
of interest will appear, and you can align it appropriately before
lifting the
RED switch.
Images with dimensions 4 4
The third row of the menu includes a symbol made up
from four arrow-heads: this symbol can be selected for image
manipulation with dimensions. The command operates in all respects
exactly like the image-area brush, except that dimensions are shown. During erasure,
two numbers are displayed near the cursor, indicating the size of the area selected for
erasing. During insertion, the two numbers show the displacement of the image from its
original position when erased; this is useful for bar charts etc. Measurements
are given in screen dots (1/80 inch each).
Retrieving
from memory
The symbol at the right-hand end of the second row,
depicting an arrow emerging from a bucket, can be selected to
retrieve the image, or string of text, from Markup's memory. Whatever was last
erased, whether a text string or image area, will be replaced on the screen in
its original position, and will be expunged from Markup's memory.
This command is useful now and again: for example, to copy an
existing text string, you can erase it, insert it at
the new position, and retrieve from memory to put back the original text.
Images and
text
At the left-hand end of the bottom row is a
symbol made up of the image area and text symbols combined. If this
symbol is selected, text and image areas can be manipulated together. This command is very useful for moving
entire illustrations.
The image-and-text command works in a similar fashion to
the image area command: the BLUE switch is used to define the rectangular area
to be picked up, and the RED switch is used to insert the image and
text in the desired position. As in the image area command, a rectangle
shows where the information will be inserted; also the same cursor alignment feature
is available. Images and text may be moved between pages by erasing
them, selecting another page, and inserting them; this is useful
for adding existing illustrations to a text document, and applies
to pure images and pure text as well as to combinations of the two.
The only unusual feature of this command is its criterion
for picking up text. Any text strings placed on the page
with the aid of Markup will be picked up provided they lie within the boundary
of the overall enclosing rectangle. Formatted text from Bravo, however,
is picked up only in units of a paragraph at a time -- it is not possible to
pick up part of a paragraph and leave the rest. This is sometimes
useful, for it means that you can pick up an illustration
without accidentally including part of a nearby text paragraph.
Changing
the grid
The
symbol resembling a number-sign, next to the image-and-text symbol, can be
selected in order to change the grid spacing. This command uses
the BLUE mouse
switch for size
changes,
and the RED to change the grid
alignment. Either switch, if pressed, will cause
lines of dots to appear on
the screen showing the horizontal and vertical grid spacing.
To
change the grid spacing, press down on the BLUE switch. Two numbers will appear near the cursor, showing the horizontal and vertical spacing. As the mouse is moved,
the spacing will change. It can
be adjusted to as high a value as you like, and to as low as 5 units in each direction, independently in the two
directions. Note that 45-degree lines cannot be drawn if the horizontal and vertical spacings are different.
You may
wish, after changing the grid spacing, to make sure that lines drawn with the
new grid are aligned with those drawn previously. To do this, you may have to
change the grid alignment,
using the RED switch. When the RED switch is held down, two numbers show the coordinates of the grid "origin";
you can think of these numbers as defining the position of the "squared
paper" on which the grid is drawn". With the aid of these numbers, plus the dots showing the grid itself,
it is usually possible to get things lined up.
Inversion and fast erasing
The
bottom row includes a command symbol made up of a black box together
with an open box. This command
provides two functions. With the RED switch, image areas may be inverted, i.e. black dots turned white and vice versa. With the BLUE switch, fast
erasing can be done, at the expense
of retrieval from mistakes -- once the dots have gone, they can't be retrieved or inserted elsewhere. If you
should ever need to erase a large area rapidly, you will find this command saves you many seconds of waiting.
Rotation and scaling 9:]
Once an
image has been erased and stored in Markup's memory, it can be manipulated in a
number of ways, using the one remaining command symbol on the bottom row yet to
be described -- the one
consisting of two open boxes. This command differs from all the others in its use of the mouse switches: both
switches cause the image to be inserted. The RED switch is used to scale the image, to rotate it
through multiples of 90 degrees, and to make mirror images of it. The BLUE switch is used to rotate the image through arbitrary angles.
When you press down on the RED switch, a double
cross appears, marking the "origin" for
scaling and rotation. You
may now choose between the various functions available, by
moving
the cursor in various different directions. As shown below, the
upper right
quadrant is used for
scaling, while the two adjacent quadrants provide mirror-imaging, and


 the lower-left quadrant provides 180-degree
rotation. If the cursor is positioned directly above or directly to the left of the origin, the image
will be inserted rotated 90 degrees anticlockwise, while if it is directly to the right or below, the image
is rotated 90 degrees clockwise.
In every case, a rectangle shows the position where the image will be inserted;
in the case of scaling,
tick-marks are placed at intervals of half the size of the original.
the lower-left quadrant provides 180-degree
rotation. If the cursor is positioned directly above or directly to the left of the origin, the image
will be inserted rotated 90 degrees anticlockwise, while if it is directly to the right or below, the image
is rotated 90 degrees clockwise.
In every case, a rectangle shows the position where the image will be inserted;
in the case of scaling,
tick-marks are placed at intervals of half the size of the original.

 mirror about vertical axis
 scaling
900 anticlockwise :11F. 90° clockwise
mirror about horizontal axis
Figure
2. Control of scaling
and rotation by quadrant.
Pressing down on the BLUE switch
also displays the double cross origin, and when the mouse
moves, three small dots show the positions of the other three corners of the
rotated image. Rotation
is zero when the cursor is directly to the right of the origin.
In both cases, the image will appear when the mouse
switch is released. To prevent any insertion, simply return the cursor to the
vicinity of the displayed origin and release the switch.
Image files
Images may be stored in Markup's memory either by
erasing them from the displayed picture, or by reading them in from Press files
stored on the disk. The names of the files that you can
access in this way are shown above the main menu, and you read them in by moving
the cursor so that it coincides with the name of the image you want; when you
lift the YELLOW switch,
the image is placed in Markup's memory, whence it can be inserted, rotated
or scaled as described above.
Markup selects images for inclusion in the menu at
initialization time, by scanning your disk directory for files with extension
".press", and then checking to see which of these include
an image on the first page. A maximum of 20 such images may be included in the menu.
You may inhibit the construction of the image file menu by invoking Markup thus:
>markup/n
InputFile OutputFilega
Turning the
page
The numbers to the left and right of the main menu may be
selected in order to turn to other pages of the document. Markup's memory is
not affected by page turning. The "+" symbol creates a fresh blank page.
There is no command for erasing a page, but if all the text
and dots on a page are erased, Markup will delete the page from the document
when it writes out the output file.
Finishing
When you have finished using Markup, select the word
"quit" to the right of the page number display in the menu.
Markup will think for a while, and then return you to the Alto
Executive.
Camera
input
The menu contains a few blank spaces, including two on
the third row. However, if you happen to use an Alto with a
TV camera attached, a special symbol will appear on this row, depicting a
square with a round hole in it. This symbol controls the use of the camera for scanning
in images.
Before you select the camera command symbol, you should
define a rectangular area of the screen into which to scan
the image; do this by erasing an area with the image-area or fast-erase
brushes. Then when you select the camera command, the normal screen picture will
disappear, and you will see instead the view through the camera lens, with an
area of the required size highlighted within a black border. You
can move the border around until it encloses the desired
image, and then press the RED switch to scan the image onto the page and
return to the normal display. The mouse may be moved while the RED switch is held down,
in order to make accurate adjustments to the position of the border.
The camera hardware performs what is known as thresholding on
the image -- dark areas are made black, and light areas white. The
resulting image quality is not always perfect. To improve it, you
can adjust the threshold
level while the camera image is visible, by pressing
the BLUE switch
and then moving the cursor up and down: upward movement will darken
the image, and downward will lighten it, at a rate proportional to the cursor's
horizontal position.
Use of the TV camera unfortunately involves learning how
to switch it on, and how to adjust the various knobs on
the camera control box. This is best understood by watching someone
else do it.
4. Markup Techniques
This section is for serious users of Markup, who want to
learn how to produce good-quality illustrated documents with
the minimum of effort. The list of techniques described here is by no means exhaustive.
After all, Markup is really a 'box of tools' for manipulating the image
on the screen, and there are no well-defined limits to the utility of these
tools. Each tool has an explicit purpose, like 'line-drawing' or
'area manipulation', but there are generally several other
useful things you can do with each tool; for example, you can erase with
the line-drawing brushes in order to 'square off' an irregular black area. The
more you use Markup, the more techniques and strategies for
illustration you will learn.
This section deals with two sorts of technique: those for
managing your document as a whole, and those for
creating the individual illustrations. Document management techniques
are discussed first.
Disk
space
The first thing you must understand before trying to
illustrate a large document (i.e. a document with more than half a dozen
illustrated pages) is that Markup consumes large quantities of disk
space. As a rule of thumb, you should make sure there are at least 100 free
pages on your disk for every
illustrated page of the document. Thus if you intend to put
illustrations on 12 pages, you should have 1200 free pages before you start.
The exact amount you will need depends on the size of the
illustrations: if you intend to put just a few tiny images on
each page, in the same manner as this manual, then your disk space requirements
will be much less.
The reason for all this caution is that Markup cannot he
relied upon to recover gracefully if it
runs out of disk space, unless it runs out after you have 'quit'. Whenever you
turn to a different page, Markup checks to see if you have 100 or
more disk pages available; if you do not, it writes out the pages you have
created or modified so far, and quits to the Executive. This is
not fool-proof, for it is still possible for you to spend three hours illustrating
twenty pages, and then run out of disk space while working on the twenty-first,
leaving you with no means of recovering your lost work.
When you 'quit', Markup goes through a cleaning-up
operation, combining the new versions of the pages you have created or
modified with the original versions of the pages that have not been changed.
This, too, consumes disk space in large quantities, but if Markup
fills up the disk during this operation, or quits when it
finds fewer than 100 disk pages, there is a simple recovery procedure
(see below, Recovery from a full
disk).
For reasons such as these, it is generally worthwhile to
split large documents into a number of separate Press files, and
combine them only when all illustrations are complete. This is easily
done with the PressEdit program (see <AltoDocs>PressEdit.ears). Each
separate
Press file should include no more than six to ten
illustrated pages.
Use of existing illustrations
Documents must often be edited many times before they are
ready for distribution. Markup has been designed to allow you
to prepare the illustrations for such documents on a
separate Press file or files, and then to combine them with the text. You may
also use illustrations prepared with other programs, such as Draw,
Nsil and Flyer.
This technique amounts to the preparation of one or more
Press files that form a portfolio of illustrations for inclusion in the document.
It is generally more convenient if each Press file page contains
just one illustration. lf, however, you are sure that a certain group of two
or more illustrations will be placed on the same page, then you will save time
by keeping them on one page of the portfolio.
The PressEdit program is again the means
whereby the formatted text file, in Press or Ears format,
is combined with the portfolio file or files. Once the files have been
combined, you can commence [he rather tedious operation of copying
illustrations from the portfolio pages to the appropriate
text pages using the image-and-text brush. Make sure that, at the end,
nothing is left on the portfolio pages, so that they will be
expunged from the file when you write it out.
Use of
Draw output
Press files generated with the Draw program may be used
as input to Markup. You may define curves with Draw, and then read the
resulting Press file into Markup, in order to add image
information or text.
Although Draw allows you to add text to the curved pictures
you draw, it is often more convenient to omit the text at the Draw stage,
and add it with Markup. If you include text in the Draw file,
you will find the resulting picture very slow to edit with Markup, particularly
if you mix several fonts.
For faster
copying
Markup uses a rather out-of-date method of copying image
areas, which means that this operation is sometimes rather slow. In particular,
if the grid is not set to a horizontal spacing of 16, with the
origin at zero, then images will be inserted very slowly. Before you start copying illustrations from the portfolio to
the text pages, therefore, make sure that the horizontal spacing and grid origin are at 16 and zero. For
ease of vertical alignment, however, you may set the
vertical spacing to a smaller value, such as 8, without affecting performance.
Recovery
from a full disk
If Markup exhausts disk space during during a page turn or
the 'quit' operation, it prints a message on the screen
telling you what to do. In essence, Markup saves all the new and modified
pages of the document on a Press file called MARKUP.SCRATCH, and this allows you
to reconstruct the desired output file.
The most difficult part of this operation is to figure out
which pages are included in MARKUP.SCRATCH. You may use
Markup itself to help you here, but with caution, for Markup
erases MARKUP.SCRATCH
and creates a new version. Therefore you should copy
MARKUP.SCRATCH to
a file with another name (such as FOO.SCRATCH), and look at this new file
with Markup. When you have figured out which pages this file contains, you can
use PressEdit to put together the required document out of
this and the original file. Before doing all this, you must of
course delete some files from your disk, so as create more space.
Printing
There are now two ways in which you can print the Press
files produced by Markup. One of these is with Ears --
this method is not guaranteed to print your document, but it will handle
most diagrams. Ears output is, because of its speed, more convenient when
multiple copies are required. The other method of printing
involves the SLOT/3100;
you can print any Press file from Markup on
this printer, but you must yourself go to the Alto that controls the printer,
and run the Press program to print the file. The SLOT/3100 produces very
good quality hard-copy when it is properly adjusted.
Ears
hard-copy
To
print a Press file on Ears, you must be running the Executive. The simplest
method is the following:
>Ftp Maxc s/s FileName
Ipt•CR
 This
command invokes the FTP
program, and sends the Press file to "Ipt:" on
Maxc. Another way of doing the same thing is to transfer the
file to Maxc with FTP,
and then log in to Maxc and type the
following:
This
command invokes the FTP
program, and sends the Press file to "Ipt:" on
Maxc. Another way of doing the same thing is to transfer the
file to Maxc with FTP,
and then log in to Maxc and type the
following:
@Ears FileName
This
command gives you all the normal options (number of copies etc.), as described
in section 8.4 of the Alto Non-programmer's Guide.
SLOT/3100
Hard-copy
To print your file on the SLOT/3100, you must
first send it, with the aid of FTP, to an Alto equipped with a SLOT/3100 printer.
Instructions for printing are provided in a binder near the
printer. Follow them.
DRAW
by PATRICK C. BAUDELAIRE
Draw Manual
Table of contents
 Introduction
1. Using
the menu
2. Drawing
a curve
3. Text
3.1 Text input
3.2
Text positioning 3.3 Menu command
4. Redrawing
and rewriting
5. Moving,
copying, transforming
5.1
Selecting 5.2 Translating 5.3 Copying
5.4 Transforming:
rotation and scaling
5.5 Transforming:
stretching, slanting, symmetry, etc
6. Deleting
7. Refreshing
8. Undoing
9. Use
of the mouse buttons 9.1 Defining a point
9.2
Pointing
10. Saving
and retrieving pictures
11. Printing
12. Fonts
13. On-line
documentation
14. How
to run DRAW
15.
Summary of commands 15.1 Menu commands
15.2
Keyboard commands
Appendix A: Mouse and keyboard terminology Appendix
B: Arrow head font
Appendix
C: Examples
Introduction
DRAW is
an interactive illustrator program for creating pictures composed of lines,
curves and text captions. All the illustrations in this document
have been created with DRAW.
Appendix C shows a few interesting examples.
Illustrations are drawn on the Alto screen with the help
of the mouse (the reader not familiar with the use of this device should
consult Appendix A which explains standard keyboard and mouse
terminology).
Three types of actions are usually necessary for
creating and altering pictures:
- Selecting
an operation or command
to be executed by DRAW. Most commands are selected by
clicking in a command menu area of the screen. Some commands may also
be typed on the keyboard.
- Defining
points in
the picture wich govern the drawing of a line, of a curve, or the modification
of the picture. These points are
specified with the help of the mouse in the picture area
of the screen.
- Selecting
the brush to be used for drawing a line or a curve in the
picture, or selecting the font to be used for writing a caption. Brush and font
are also selected by clicking in the brush menu area or the font
menu area of the screen.
As just mentioned, the DRAW screen
is divided into a number of areas:
 1
1
message area

 r - -
r - -
 brush menu
 picture area

 font menu
C.------------------------------------
caption area
The picture area shows the current state of the
illustration being composed. The menu areas contain symbols which serve
to identify commands, brushes and fonts that may be selected.
The caption area is used to show typed captions destined to be added to the illustration.
Finally, the message area is used by DRAW to display informational, error or prompting
messages to the user.
 1.
Using the menu
1.
Using the menu
The menu is organized in three parts:
 Brush selection
•
 The "paint
brush" used for drawing lines and curves may be changed by
pointing in this area. The size and the shape of the brush may be changed
independently. There are four different brush sizes (on the left side of the
menu) and four different brush shapes (on the right side
of the menu). Brush selection may be done at any time, regardless
of the current selected command. This is done by clicking the
chosen brush size and chosen brush shape.
The "paint
brush" used for drawing lines and curves may be changed by
pointing in this area. The size and the shape of the brush may be changed
independently. There are four different brush sizes (on the left side of the
menu) and four different brush shapes (on the right side
of the menu). Brush selection may be done at any time, regardless
of the current selected command. This is done by clicking the
chosen brush size and chosen brush shape.
The current brush is shown here.
|
d6 1
X
A
T
|
Command selection
All commands involving display interaction are in the
central area of the menu. Each is represented by a small
ideographic symbol. A command is selected by clicking the
corresponding symbol. DRAW indicates which command is selected by changing the shape of the
cursor to match the command symbol.
|
|
|
|


 Font selection
One of four text fonts (numbered from 0 to 3) may be
selected by clicking the corresponding font number. The current font
is shown on a black background. Font selection may be done at any
time, regardless of the current selected command.
When
pointing at the menu, you may click any one of the three mouse buttons.
A
few additional operations, which do not involve display interaction, are
invoked by control keys. They never affect the current selected
command.
2. Drawing a curve
A curve is defined by a
number of special points, called knots, distributed along its trajectory. The density of knots is generally a function of the curvature
of the curve. If the
curve is not closed, its end points will be the first and last knots. For instance,
a curve looking like this:
could be defined by these 5
knots (shown as big dots):
In order to draw a similar curve, first select the command
+. Then using the RED button, click down 5 knots
at these approximate positions:
Then terminate
the drawing command by hitting the ESC key (at
the top left corner of the keyboard), or by selecting a new command. The
appearance of the curve depends on which brush is currently selected, for instance:
•
•
|
One single knot makes a dot, two knots make a line:
|
|
|
n •
|
|
|
|
In
order to make a smooth closed curve, select the menu command G:), and then
specify the knots by clicking RED:
C4
Of course, you need to define at least three knots. Here
are some examples:

When
defining knots, you may edit your input: delete the last knot with CTRL A, start
over with DEL.
To
obtain a smooth regular curve, it is better to distribute the knots evenly along
the curve. It is not usually necessary to specify many knots
unless you want a particularly sinuous curve. For sharp
bends specify more knots. In the extreme, two or more overlapping
knots will make a cusp.
2 3 2
1 V 4 1see 3
3. Text
3.1 Text input
Text captions are added to an illustration by
typing on the keyboard. The caption being typed is displayed in the
caption area located at the bottom right corner of the display area.
Delete characters with the a key.
To start over hit the RETURN key
and type again.
To put the text caption into the picture, invoke the text
command by either hitting the RETURN key
or clicking the caption area itself. As a result, a short section of the text caption
becomes the cursor and the text buffer is closed: the caption is displayed on a black
background. This means that further keyboard input will start a new caption.
You may now repeatedly deposit copies of the text
caption in the picture area by clicking the RED mouse button. If
part of the caption lies outside the picture area, the text is not displayed
but is shown as a striped rectangle of the same size. The very last deposited copy may
be erased with either CTRL A or
DEL.
This
is an example
This is an example This is an example
XEROX
XEROX XEROX
The text font may be changed at any time, using the lower
area of the menu. The caption area and cursor are updated
accordingly, but text already deposited in the illustration is not affected.
3.2 Text positioning
The truncated portion of the caption which appears as a
cursor is used for easier positioning of the caption in the illustration. In
order to allow either centering or alignment of a caption, the
portion displayed may be either the beginning,
the middle or
the end of
the caption. The effect is accomplished by setting the appropriate text
positioning mode with CTRL T, as
illustated below. The
options are: center, left, right,
top
and bottom.
The initial mode is center.
This is an example
3.3 Menu command T
If
the central section of the caption is blank, or if the characters are too
large, it may not be practical to display a portion of the
caption as the cursor. Then it is probably
preferable
to use the T-like pointing symbol T. This
is done by selecting the text command in the menu area (rather than by typing _RETURN or by clicking the caption
area). Except for the cursor, the effect and operation of this
command are as described earlier: point at some position in
the illustration and click RED.
The position of the caption relative to the clicked point
is a function of the text positioning mode. For example, if the mode is left, the clicked position will
become the left edge of the caption:
-r
left
positioned caption
Similarly
for other positioning modes:
|
Centered caption
|
T
Right positioned caption
|
4. Redrawing and rewriting
The shape of curves cannot
be changed. However you can redraw a curve using a different
brush. Select the menu
command with a brush-like symbol a. Redraw a curve, using the current
brush, by pointing at the curve and clicking RED:
 Remember that the
current brush may be changed either before or after selecting the command
a.
Remember that the
current brush may be changed either before or after selecting the command
a.
With the same command, you may also rewrite a text
caption in a different font:
The menu command with the
scissor-like ideogram d6 has a similar function. It is used to make
dashed curves and dashed lines. It has no effect on text.

It is also used for the inverse operation.
5. Moving, copying, transforming
You may copy and move lines, curves and text. Lines and
curves, but not text, may also be transformed in various
ways: rotated, scaled up or down, stretched, etc. You must first select
the objects to which these operations are to be applied.
5.1
Selecting
First
get from the menu the selection command D. All previously selected objects, if any, are
unselected. Using RED, click all the objects to be
selected. Selected text is shown on a black background. Selected
lines and curves exhibit a little square symbol.

5.2 Translating
Selected objects may be translated with the
command 4. Using RED, click
twice
with the
tip of the arrow symbol 4
to specify a source point P1 and a target point Q1. The translated objects
remain selected.
|
|
|
|
Qi
|
The translation is defined uniquely by the length
and orientation of the vector PiQv
Therefore the two points
may be arbitrarily positioned relative to the selected objects.
5.3
Copying
The command
* is for making translated copies of the selected objects. It operates in the same fashion:
|
|
,E8
|
5.4 Transforming: rotation and
scaling
The command A is used to apply a similarity transformation,
i.e. an arbitrary combination of rotation,
scaling and translation.
The transformation is
specified by four points (say P1, P2,
Q1 and Q2). First define some dimension PIP, of the original
object, and then define the corresponding dimension Q1Q2
of the
transformed object. The transformed objects remain selected. Text is treated in
a special way: it is simply repositioned, by transforming the left-top corner
of the text caption.
To be
more precise, the transformation is defined uniquely by the mapping of the
source vector P1P2
into the target vector Q1Q2. The four points may
be arbitrarily positioned.
Notice that there will be no rotation if P1P2
and Q1Q2 are parallel, and no scaling if P1P2
and Q1Q, are of
equal length. Section 9.1 gives details for specifying such constrained
transformations.
 The
command i is used in a similar fashion to make transformed copies of
selected objects.
The
command i is used in a similar fashion to make transformed copies of
selected objects.
5.5 Transforming: stretching,
slanting, symmetry, etc
An other pair of commands
permit more complex transformations. The command executes a general affine transformation,
which is an arbitary combination of translation, rotation,
scaling,
stretching, slanting, symmetry and more. To be precise: an affine transformation is a linear
transformation
which preserves parallelism; a linear transformation preserves colinearity of
points; non-affine linear transformations include perspective projections.
The transformation is specified by six points (say, in the order of input P1, P2, P3, Q1, Q2 and Q3). It is defined by the mapping of the source triangle PIP,P3
into the target triangle Q1Q2Q3,
as illustrated here:


As shown above, text is
treated in a simple way: it is merely repositioned. Like the 4-point transformation (¨ and
I), the 6-point transformation comes in two versions: A
(transform) and (copy
and transform).
For best results, P1P2P3
and Q192Q3 should be real triangles, i.e the
three vertices should
not be colinear. Particular effects
are obtained by carefully choosing the shapes and the sizes of the two triangles (see section 9.1). Here
are some examples:
|
|
|
|
|
+
slanting
|
+
|
|
|
I I I
I I I
I
I I I
1 1
1
symmetry
|
|
|
+ +
|
|
|
|
|
+
|
+
|
6.
Deleting
To
delete lines, curves and text, select the menu command X. Then, using RED, click
at the objects to be deleted.
The keyboard command CTRL D will delete selected objects. Therefore, CTRL E followed by CTRL D will delete the whole picture.
7. Refreshing
After deleting
an object, the screen may not accurately represent the illustration, and will
need to be refreshed. The
inaccuracies result whenever one of several overlapping objects is deleted: a portion of an other object may also
be erased. These effects do not affect the illustration itself, but only its current representation on the display.
A new refreshed picture
may always be obtained by hitting the TAB key. This is a relatively fast operation which, like any other keyboard command, may be
executed at any time.
8. Undoing
There
is a limited "undo" command for operations which are destructive or
simply not easily invertible: delete, translate and transform. The command is CTRL u. It will undo the
effects of the following commands:
CTRL D X * A
You may undo up to several
levels of delete,
translate and transform operations. The depth
is a runtime
variable which depends on availability of free storage.
9. Use of the mouse buttons
In the
previous sections, only the use of the RED button has been described. Although all mouse buttons are equivalent in the menu area, they have
various interpretations when used in the picture area. The mouse buttons are used in one of two modes, depending on the command.
9.1 Defining a point
With
the following commands: + T the
mouse is used for defining
a point in the picture area, namely a knot of a curve, the position of a text caption, or the geometric parameters of a
translation or a transformation. The point is defined by clicking one of the mouse buttons. Each button
has a different function:
RED yields the exact location
pointed at by the cursor. Click with the tip of 4 A the
center of + G3 , the bottom of T.
YELLOW yields
a point only if the cursor is in
the vicinity of an object. Then it will be the nearest point on the nearest curve, or the center of the nearest
caption. The main applications
are:
connecting
curves: end knots of
a curve or a line may be positioned on some other line or curve
positioning
arrow heads (Appendix B): using text positioning mode center, arrow
head
characters may be positioned at the end point of a curve or a line
constrained translation: in order to do a translation precisely
in a given direction (e.g. horizontally or vertically), construct a temporary
line along this direction, and specify the translation points on this line
BLUE is used to position a point on a grid. The
grid which may be displayed and erased with the keyboard
command CTRL G. Useful
applications are:
vertical and horizontal lines
text alignment
left
justified centered


 text text1•11n11•n•n

 right
right
justified
text
9.2 Pointing
With the commands d6 X q , the
mouse is used for pointing at lines, curves and text captions. All
buttons are equivalent. They may be used in two different ways, for designating
either one single object
or several objects enclosed inside some rectangular area.
Pointing
at one single
object is simply done by clicking, that is to say pointing in
the vicinity of the object and quickly
depressing and releasing the button.
|
|
|
button down & up
|
|
|
10. Saving
and retrieving pictures
DRAW uses
its own format for picture files. The recommended file name extension is DRAW.
Two keyboard commands are provided for reading and
writing picture files:
CTRL W followed by a file name,
terminated by ESC or
RETURN, writes
the whole picture
onto the file. So:
CTRL W PICTURE.DRAW RETURN
CTRL R, followed by a file name,
terminated by ESC or
RETURN, reads
in a picture from the file and adds it to the current picture.
Thus
a file "notebook" of elementary pictures may be constituted and
utilized for composing complex pictures from simpler
elements.
The DRAW file format is also accepted by the spline editor FRED (see
documentation on <GR-DOCS>FRED.EARS). Therefore FRED may also be used to
create pictures to be incorporated in DRAW illustrations. However FRED ignores
text and curve brushes, and need only be used for making
complicated curves requiring careful editing.
11.
Printing
DRAW pictures
may also be printed and merged into documents. For that purpose, DRAW outputs
one single page PRESS file
(the recommended file name extention is PRESS). The command
is CTRL P. For
instance type:
CTRL P PICTURE.PRESS RETURN
Pictures
may be printed on EARS
or on the 3100 PRESS printer. Printing on EARS is
done automatically through MAXC: simply use the command file PRINT.CM that DRAW generates
(it will
transfer the file to device LPT: via FTP). After your DRAW session,
type:
@PRINT.CM@ RETURN
 You
will obtain much better pictures with the 3100 PRESS printer. However, in this
case, the operation is manual: you have to transfer the PRESS file
to the PRESS printer
Alto and run the program PRESS.
You
will obtain much better pictures with the 3100 PRESS printer. However, in this
case, the operation is manual: you have to transfer the PRESS file
to the PRESS printer
Alto and run the program PRESS.
For
merging a picture PRESS
file into an other document in PRESS format,
use MARKUP and
PRESSEDIT (see
section 10 of
the Alto Non-programmer's Guide).
12.
Fonts
Fonts to be used with DRAW must satisfy standard naming
conventions (e.g. HELVETICAl2B). Furthermore, for better printing
results you should use coordinated Alto/EARS fonts.
DRAW currently uses a
default font set which is read in when the program is started:
HELVETICAl2
(standard size) HELVETICAl2B (bold)
HELVETICA8
(small size) ARROWS10 (see Appendix B)
You
may change fonts with the command CTRL F, followed by a font number (0 to 3), followed
by a font name. For instance, change font 3 with:
CTRL F 3
LOG024.AL RETURN


 You
may also release a font and reclaim the corresponding storage space, by
omitting the file name:
You
may also release a font and reclaim the corresponding storage space, by
omitting the file name:
CTRL F 3
RETURN
13.
On-line
documentation
DRAW comes
with a 13 page on-line manual (an abstracted version of the present
documentation).
The manual is activated and disactivated with CTRL ?. Consecutive
pages
are obtained by hitting the LF key.
When viewing the manual, the current picture is
automatically saved and restored. The first page of the manual is
a packed summary of all the commands. Therefore you may take
a quick look-- so to speak--
at this summary at any time, without losing your
picture. A printable version of the summary may be
found on
<ALTODOCS>DRAW-SUMMARY.EARS.
 14. How to run DRAW
Get
the file package <ALTO>DRAW.DM and unpack it with the Alto
program LOAD. It contains the following files:
DRAW.RUN: this is the illustrator,
MANUAL1.DRAW to MANUAL13.DRAW: 13 pages of on-line
manual, default fonts (see above),
CIRCLE.DRAW: contains a carefully done 8-knot closed
curve which impersonates a circle very well (look at it in sections 2 and
5.5).
If
you only need the program DRAW.RUN, the current version may simply be obtained
from the directory <ALTO>.
To run the program, type:
DRAW RETURN
Because
of a current shortage of memory storage, it may be good practice to release the
fonts you will not be using (see section 12).
Terminate
with CTRL Q.
15. Summary of commands
15.1
Menu commands
The most commonly used menu commands may also be invoked
from the keyboard. Tt allows faster interaction for the experienced
user.
menu equivalent action
command keyboard
command
 ESC
ESC
Ef3
X CTRL X
0 CTRL
S
CTRL Z
CTRL C
 •
•
T
text buffer
draw curves & lines
draw closed curves & lines
redraw curves & lines, rewrite text
dash/undash curves & lines
delete
select
translate
copy & translate
transform (4-point)
copy & transform (4-point)
transform (6-point)
copy & transform (6-point)
15.2 Keyboard commands
CTRL
A delete last mouse input
(applies to: + EDT*4•ii A
start over
(applies
to: ± T**•i A
delete
characters in caption area CTRL T change text positioning mode
|
TAB
CTRL G
|
refresh the picture display/erase the grid
|
|
|
CTRL D delete current selection
CTRL E select everything
CTRL
U undo
(applies to: CTRL
D X4-• A)
CTRL W CTRL R
CTRL P
CTRL F
CTRL ?
LF
CTRL 0
write a picture file (DRAW format) read a picture
file (DRAW format)
write a PRESS file
change font n
enable/disable on-line
manual get next manual page
quit
Appendix A
Mouse and keyboard terminology
The
mouse
The three mouse buttons on
a mouse are labeled RED, YELLOW and BLUE. The
physical arrangement of the buttons depends on the model:

The most common interaction with the mouse is the click:
the mouse is first moved over the table until the cursor,
which follows the mouse movement, is positioned at the desired spot
on the screen; then a button is depressed and raised in one motion. Commands
described in this manual usually call for clicking a particular mouse button,
for instance: "point at a screen position and click RED".
The mouse may also be used to bound a rectangular area
which the user wishes to define: first position the mouse at
one of the corners of the rectangular area and depress a mouse button;
then move the cursor to the opposite corner and release the depressed mouse button.
The trajectory of the cursor between the two corners of the rectangle thus
defined is unimportant.
The
keyboard
In
this manual, keyboard keys are given in underlined small size capitals, e.g. Q.
The special dark colored keys are identified by their
keyboard label:
TAB, CTRL, SHIFT, LF, DEL, BS. RETURN
The
CTRL and SHIFT keys are used similarly to the
shift key on a typewriter. For instance, CTRL A
means: depress the CTRL key;
depress and release the A key; then release the CTRL key.
Appendix B
Arrow head font
There
is a special font of arrow heads for use with various illustrator programs (MARKUP, DRAW, SQL). The Alto and EARS
versions are: <ALTOFONTS>ARROWS10.AL and
<FONTS>ARROWS10.EP.
The arrow heads come in
8 directions, 4 sizes and 2
styles:
The keyboard mapping is as follows:
-
the
arrow heads occupy the left 8 keys of each row;
-
direction = counterclockwise, from left
to right:
* • V
4 • I A
- size = row: A top
row
A
A
A bottom row
-
style = lower case & upper case:
"SHIFT VP" is
- reference key: "v" is • (however, "<" is A ...)

|
|
|
|
|
|
|
|
|
um._
CoreM
|
CCDs
|
|
11111111111 _
-L,
|
log
|
|
|
|
|
|
|
|
|
|
|
|
|
|
|
|
|
|
|
|
|
|
|
|
|
|
|
|
|
|
|
|
|
|
|
|
|
|
|
|
|
|
|
|
1972
73 74 75 76 77 78 79 1980
 AC6
AC6
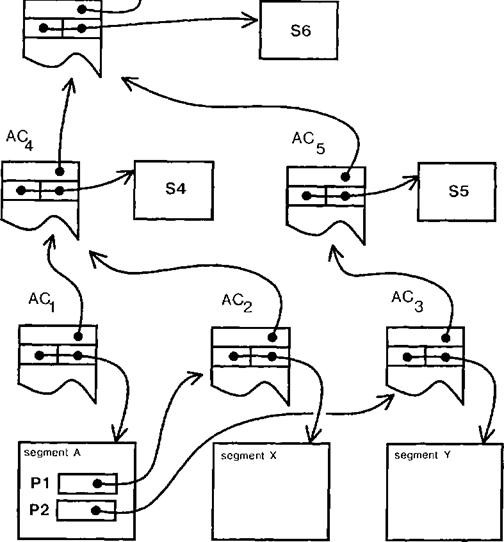
|
Reseau NPL
LONDRES
|
Reseau ESRO
|

 TVT 6000
 Iris 50

 PARIS
PARIS
 RENNES
Mitra 15
 LYON Iris 45
Iris
80
GRENOBL
Iris
80
IBM 360
CII
10070
TOULOUSE
|
|
q ordinateur
n Concentrateur Mitra 15
·
Noeud
Cigale Mitra 15
|
|
RESEAU CYCLADES1
|
|
|
XEROX
Telecommunications
Guide & Directory
DDS
by L. PETER
DEUTSCH
DDS Reference Manual
Table of Contents
0. The mouse and cursor 104
1.
The display 104
Ll The viewspec area 104
L2
The filter area 106
1.3 The data area 107
1.4 Marking files 107
2.
Commands 109
2.1 Internal commands 109
2.2 External commands 110
2.3 Error messages 111
3.
User profile 112
4.
The command line 114
The Descriptive Directory System (DDS) is
a front end for the Alto file system that provides substantially
greater flexibility than the TAB and "?" features in the Executive. In addition
to file names, DDS can
display file lengths, creation-read-write dates, and contents.
This reference manual describes release 1.12 of DDS.
0.
The mouse and cursor
1.1 The viewspec area
The three buttons on the mouse are called RED (left
or top button), YELLOW
(middle button), and BLUE (right or bottom button).
Most mouse-controlled actions in DDS happen as soon as you depress the
mouse button: these are described below using phrases like "RED does
xxx", meaning "As soon as you depress RED, xxx happens." Some
actions require depressing a button and then releasing it:
phrases like "clicking RED does xxx" mean "If
you depress RED and
then release it, xxx will happen." Careful reading, or a little experimenting,
will familiarize you quickly with the distinction.
The cursor changes shape according to its location on the
display and according to how DDS is interpreting the buttons. Generally speaking, when the
cursor is circular, RED
selects what you are pointing at in some way, and BLUE deselects
it. When the cursor assumes the shape of an hourglass, DDS is busy doing
something and is not listening to the mouse buttons.
1.
The display
Like Bravo, DDS divides the display into a command area at the
top, and one or more windows below. Currently DDS just supports a single
window. A heavy black bar separates the command area from the
window. Section 2 (below) describes the command area.
The window has three parts, separated by lighter
horizontal bars:
1) The
top part is the view specification area, or viewspec area for short. It contains a set of keywords that describe what
information is to be displayed for the files being examined in this
window, and a set of keywords that describe how the displayed
files are sorted.
2) The
second part is the filter specification area, or filter area for short. It contains
a pair of expressions which together determine what set of files is being examined
in the window. View and filter specification are completely independent: each
can be changed without
affecting the other.
3) The main part of the window is the data area, which
actually displays a set of files. The names are always displayed: other
information is controlled by the viewspecs.
1.1 The viewspec area
There are 9 keywords in the viewspec area that control
what is displayed:
created the
date when the file was created
written the
date when the file was last altered
read the
date when the file was last read
referenced the date when the file was
last referenced (i.e. the most recent of
"created", "written", and
"read")
|
size
length address
contents pagemap
|
the size of the file in disk pages
the length of the file in bytes (characters)
the hardware address, in the form directory-pointer: (SN1,SN2)!VN @ virtual-leader-address
the contents of the file (in octal, if a binary file)
the disk addresses of all pages of the file, with a "*" before each address which is not adjacent to the preceding one
|
If the keyword is displayed
white-on-black, the corresponding information is displayed in the
data area, otherwise not.
There
are 6 keywords that control other aspects of how the data are displayed:
(marked) if turned on, DDS only displays marked files
(see sec. 1.4 below)
(small) if turned on, DDS uses a smaller font
for the data, which allows more data to appear on the screen (see sec. 3
below for how to tell DDS
the name of the font)
(packed) if turned on, DDS displays several files per line if possible (not
implemented yet)
(times) in conjunction with "created",
"written", "read", or "referenced",
shows the time of day as well as the date
(browse) if turned on, then
when "contents" is turned on, DDS only displays the first 5 lines
of text files and the message "*** binary file ***" for binary
files, instead of the complete contents of the file.
(chart) if turned on, changes the data display
to be a chart made up of boxes in which the height of the
box is proportional to the file length. (Try it -- you'll like it.)
When
the cursor is positioned over a keyword name, RED turns the keyword on; BLUE turns the
keyword off. When the cursor is over the word "Show:" at the upper
left of the keywords, BLUE turns all keywords off.
There are currently 8 keywords that control
sorting of the data:
 alphabetic order by name (upper and lower case
letters are equivalent) alphabetic order by extension
alphabetic order by name (upper and lower case
letters are equivalent) alphabetic order by extension
the
corresponding date and time
the date last referenced
the
file length
the file's serial number (not of general interest)
The keywords which are displayed white-on-black are those
actually used to sort the data area. They are displayed in
the order most- to least-significant criterion, e.g. "extensions" followed
by "namet" means sort by extension first, then sort files with the
same extension by name. Following each keyword, whether active
or not, is an arrow which indicates whether the sort is to be in
ascending (upward arrow) or descending (downward arrow).
When the cursor is positioned over a sorting keyword
name, clicking RED turns
the keyword on and adds it to the list of white-on-black
keywords actually used for sorting; clicking BLUE turns
the keyword off and removes it from the list; clicking YELLOW inverts
the direction of the arrow, regardless of whether the
keyword is in the list. When the cursor is over the words
"Sort by:" at the left of the sorting keywords, BLUE turns off all sorting
criteria.
Since sorting may take a long time and it is
easy to request sorting by accident, you can abort sorting at
any time by typing any character. Be sure the cursor is not in the data area when
you do this: if it is, DDS
may start
the sort over again!
Whenever the cursor moves into the data area, regardless
of whether any mouse buttons are down, DDS repaints the display to be as specified by the
viewspecs if the viewspecs have changed since the last time
the display was repainted.
1.2 The filter
area
The
filter area contains two expressions which defines what subset of the directory
will actually be displayed in the data area. These expressions are built up
from name patterns which are similar to those recognized by the
Alto Executive. More precisely, a name pattern is a sequence of characters
which may contain "*"s and "#"s: "*" matches any sequence
of characters in a name (including no characters at all), "#" matches
any single character. Upper and lower case letters are not
distinguished. Note that DDS deletes the final "." from file
names. Here are some examples of name patterns and what they match:
*.BC All files with extension BC
(or bc, bC, or Bc).
*.B All files with extension
B.
*.B* All
files whose names contain the string .B -- this includes all files
with extension Bsomething, but
also includes files like
TH
IS.BI N A R Y.THAT.
All
files whose extensions consist of B and one more character. All
the files in the directory.
 You can build up more complex expressions using
the words parentheses. Here are some examples of such expressions
You can build up more complex expressions using
the words parentheses. Here are some examples of such expressions
LPD* and not *.temp All files beginning with
extension
temp.
 *.memo
or *.memo$ All files
with extension memo or
*.memo
or *.memo$ All files
with extension memo or
(*.BT or *.BS) and
not X* All files with extension BT or
beginning
with X.
The upper expression in the filter area is called the
selspec; the lower one is called the context. (The two together are
simply called the filters.) Only files which satisfy both expressions
will be displayed. The idea is that if you are going to be working on memos, for
example, you can set the context to "*.memo" and use the selspec to
further select within this set. As another example, if there is
some set of files you want not to see (like "V), you can
set the context to "not *$".
To change the selspec or the context, point at it, or at
the word "Selspec:" or "Context", and
click RED or
YELLOW. This
will cause it to change to white-on-black. As soon as you start
typing, the old text will vanish and what you type will appear white-on-black
in its place. Eventually you must type one of the following
three things before you can point anywhere else or select any
commands (see sec. 2 below):
CR confirms
the change, and repaints the display to reflect it.
ESC is
equivalent to *CR, i.e.
it adds a * to what you have typed and then
confirms the change.
DEL aborts
the typein and restores the old selspec or context expression.
See
section 3 below for how to get the selspec and/or context initialized
automatically to something other than "*" when you
first enter DDS.
The third line of the filter area is a message of the
form "nnn files
are selected, of which mmm are
marked" where nnn is
the count of files selected by the current filter and mmm is the count of those which
are marked (see 1.4 below). If there are marked files not selected by
the filter (again, see 1.4), the message "there are kkk files marked but not
selected" also appears. While DDS is sorting data, the
message Sorting ... appears in this area in place of the
file counts.
1.3 The data area
As mentioned above, whenever the cursor moves into the
data area, DDS regenerates
the display if necessary to conform to the current viewspecs.
The left edge of the data area is a scrolling bar which
works the same way as in Bravo: clicking RED scrolls
up, clicking BLUE scrolls
down, and clicking YELLOW
jumps proportionately to the
vertical location in the window. A hollow arrow in the left margin shows
where in the list you are positioned: if the arrow is at the top, you are at
the beginning of the list; if the arrow is at the bottom, you
are at the end. The idea is that if you were to move the cursor
to this arrow and click YELLOW, the list would stay positioned just
as it is.
If you are
positioned at the beginning of the list of selected files, DDS displays the
message BEGIN
at the head of the list; if not, DDS displays
if
-------------------------- nnn files not shown ---------------
indicating
the position within the list of the first file actually shown on the screen
(e.g. "2 files not shown" means the first file on
the screen is actually the third in the list). Similarly, if the last
file shown on the screen is actually the last file in the list, DDS displays
 END
------------- 1r
END
------------- 1r
below it.
A vertical strip at the right edge of the data area will
be used in the future to control the formatting of the screen
into windows. Currently the cursor changes shape when it is in this
area, but the buttons have no effect. Another vertical strip just to the left
of this one is used for mass marking and unmarking of files: see the
following section.
1.4 Marking files
DDS
provides a facility for marking any set of files for
later processing by commands such as <Delete>, <Send
to Maxc>, etc. Marked files are displayed with a small dark arrow in the
left margin, and a count of how many marked files are in the current selected
set is maintained in the filter area. When the cursor is in the data area of
a window, other than
the
right or left edge areas, the mouse buttons control marking and unmarking of individual
files: RED marks
the file on whose line the cursor resides; BLUE unmarks the file. When the
cursor is in the vertical strip about 1" in from the right edge of the
screen, the cursor changes to the word ALL, and
the buttons mark and unmark files en masse: clicking RED marks all the files
selected by the filter; clicking BLUE unmarks all the files.
Note that files may be marked even though they
are not selected by the current filter, i.e. marking is
associated with the file rather than the display. (If this proves confusing it
will be changed.) The count of "files marked but not
selected" in the filter area lets you know when there are marked files not selected by the current selspecs.
Since marking or unmarking individual files occurs as
soon as the button is depressed, you can hold down RED or BLUE and
slide the mouse (slowly) in the vertical direction to mark or
unmark a group of adjacent files
The marked file counts in the filter area are adjusted
as soon as a file is marked or unmarked, but if the
"marked" viewspec is on and you unmark a file, you must scroll the data
to get the unmarked file(s) deleted from the display.
2.
Commands
The command area at the top of the screen consists of four parts:
1) A
header with the DDS version
number, time of day, and count of free disk pages;
2) A
type-in area, where typed characters appear;
3) An
error message line;
4) A
menu of commands,
each command being enclosed in angle brackets <>.
When the mouse is in the command menu area, RED selects a command
for subsequent execution: the selected command is displayed white-on-black, and
any previously selected command is deselected. BLUE deselects
the currently selected command and selects the default command <Quit>.
Typing ESC or
CR finally
initiates the command: you can freely select or deselect commands, type and
edit your type-in, change viewspecs, etc. up to that moment.
For commands which do not require type-in, you may also initiate the command by
clicking YELLOW with
the mouse in the command menu area. The cursor takes the shape
of a circle with a cross when this is allowed, and a circle with a dot when it
is not.
Some commands require or allow type-in before the final ESC or CR. You may type at
any time. All typed characters are
accumulated in the type-in area just below the header until the
ESC or CR. CTRL-A (or BS), CTRL-W, CTRL-Q, and
DEL are
available for editing as in Bravo. DDS displays
a vertical bar when it is waiting for your typing, and of course you can
"type ahead" while DDS is processing a command. However, as for selspec and
context changes (sec. 1.2), once you have started to type, you
must either confirm the command with ESC or CR, or abort with DEL, before you can
select another command or another place to type (selspec or context).
When you have selected a command with RED, then when you
release the button, DDS
may display something in the type-in area which is a
default for that command. If you want to execute the command with
that default type-in, you can just confirm it (with ESC, CR, or
YELLOW); otherwise,
the default disappears as soon as you start typing, just like the old selspec
or context.
In the description of commands below,
"something" following the command name means that
DDS expects
you to have typed something before the final ESC or CR that initiates the
command; "optional-something" means you may
type something or not. To help you remember, all the commands
that require type-in end with "...", and those which allow but do
not require type-in end with "[...]".
Many commands operate on a set of files: they use precisely
those files which, at the time you type the final ESC or CR, are both selected
(i.e. match the selspec) and marked. "Filename-1
filename-n" in the descriptions below refer to these files, which are also
called the "designated" files.
DDS presently
has two classes of commands: those which leave you in Dos after execution (internal
commands), and those which send you back to the Alto Executive (external commands).
For external commands, DDS
saves away a command line so that if something
 goes
wrong, you can execute the command again by typing @Dds.cm@g-K to
the Executive.
goes
wrong, you can execute the command again by typing @Dds.cm@g-K to
the Executive.
2.1 Internal commands (those which
leave you in DDS)
<Put on file ...>
"filename" writes on the file named "filename" (in text
form) the contents of the window. DDS also writes a header with
your name, the disk name, and the date and time. The default
for "filename" is "Dir.Lst", an arbitrary name which DDS
supplies so you don't have to make one up.
<List on file ...>
"filename" writes on the file named "filename" (in text
form) the names of the designated files, separated by blanks.
This makes it easy for you to make up an @-file for the Executive by
adding a command name to the front of this file. The default for
"filename" is "Dir.Cm", an arbitrary name which DDS
supplies so you don't have to make one up.
<Delete> deletes the designated files. There is
presently no way to un-delete files, so be careful: the count
of marked files in the filter window is a good clue as to whether you are deleting
more than you want. You can stop a <Delete> at any time by typing any character:
of course, some files may already have been deleted. DDS changes the "free
pages" count at the top of the screen as it deletes
each file.
<Rename as ...> "filename" requires that
there be exactly one designated file, and changes its
name to "filename". If there is already a file named
"filename", <Rename> gives an error message and
does nothing else.
2.2 External commands (those which
leave you in the Executive)
<Quit>
leaves DDS gracefully. SHIFT-SWAT is also safe whenever DDS is awaiting input
(i.e. not in the midst of sorting, deleting, etc.).
<Bravo/[...]> "optional-switches"
gives control to Bravo in the following way:
If there are no designated files, DDS effectively
executes "Bravo/switches".
If there is more than one designated file, DDS gives an
error message and does nothing else.
If there is a single designated file and you did not type
anything, DDS effectively executes "Bravo/N filename", i.e.
instructs Bravo to read in the file. If there is a single
designated file and you did type in switches, DDS executes "Bravo/switches
filename".
<Gears/[...]> "optional-switches" executes
"Gears/switches filename-1 filename-n",
i.e.
prints the designated files.
<Send to Maxc directory <...>>
"directory-name" sends the designated files to the directory named
"directory-name" on Maxc, using FTP. The default for directory-name
is the user name on your Alto disk. If you accept the default, Dos assumes you have already done a Login
in the Executive to supply the password; if you supply some other
directory-name XYZ which requires a password, FTP will prompt
you with a message asking you to type in the password for XYZ at
that time.
<Send to ...> "name" sends the designated
files to the Alto whose name is "name", using FTP. "Name"
may be anything acceptable to FTP, i.e. an Alto name, an Alto number, etc. The
default for "name" is Maxc, which is not really very useful.
<Execute
...> "command" constructs a command line formed from
"command" and the names of the designated
files, and then executes the command line thus formed by either
jumping directly to the subsystem or returning to the
Alto Executive. (If there are no designated files, DDS
produces an error message "No files are marked" and does nothing else.)
The command line is formed in the following way:
., .
If "command" does not contain any
"characters, the command line is just
"command" followed by the names of the
designated files. For example, if files Alpha and Beta are
designated, <Execute ...> "Bldr/L" would execute the command line
"Bldr/L Alpha Beta". "String" may contain blanks, so for
example <Execute> "Bldr Foo/S" would execute "Bldr
Foo/S Alpha Beta".
If "command" does contain a "*", DDS divides
"command" into 3 parts "sl s2*s3", where s2 is the part of
"command" extending backwards from the "*" to the first
preceding blank (or the beginning of "command"). Then the command
line is "sl s2fls3 s2f2s3 ..." where fl, f2, etc. are
the names of the files. For example, if Alpha and Beta are
designated, <Execute ...> "Bldr @*@" would execute the command
line "Bldr @Alpha@ @Beta@". (If this seems confusing or useless,
don't worry about it too much -- some future version of DDS may
find a better way to provide this facility.)
2.3 Error messages
Non-fatal error messages appear in bold characters just
below the type-in line. Such messages always
abort the current command and reset the command to <Quit>, but they do not
change the state of DDS in any other way. The message disappears as soon as you
type any character.
Fatal errors cause DDS to call Swat. When this happens,
the screen changes completely and a heading like
"Swat.21 (August 28, 1976)" appears at the top; the error message
itself appears at the bottom of the screen just above a "#". Fatal
errors are never supposed to happen, but if one ever
does, summon a DDS expert. If none is available, write down the message
and what you were doing at the time, and then type CTRL-K. This will throw you out
of DDS and back to the Executive.
3.
User profile
DOS examines
the user profile (User.Cm) during initialization to obtain the names of the fonts
which will be used to display various things, and other rarely-changed
information. Just as Bravo's section of User.Cm begins with
[BRAVO] and then follows the format of OPTION:STRING, DOS looks for [DDS]
and follows the same format for its entries.
The entries which DDS recognizes in User.Cm fall into two classes.
"Initialization-only" entries are those which DDS only
consults when you ask it to do a full initialization (by using
the FULLINIT: Yes
entry in User.Cm, or the /l switch
in the command line, both described below). "Ordinary" entries
are those which DDS looks
at every time.
The names of the "ordinary" entries are:
FONT: fontname
- specifies the name of the normal font (used for the command window, the
file count line, and the data area).
BOLDFONT: fontname
- specifies the name of the bold font (used for error messages, the viewspec
and selspec display, and the headings on the data area).
SMALLFONT: fontname
- specifies the name of the small font (used for displaying data when
the "(small)" viewspec is turned on).
SMALLBOLDFONT:
fontname - specifies the name of the small bold font.
usERTYPE: type - lets DDS know what kind of user you are. If type is NON-PROGRAMMER, DDS doesn't
provide the "pagemap" and "address" viewspecs. If type is WIZARD, DDS provides
some extra features for debugging which are not described in this document.
WINDOWS: Yes - enables you to use
some experimental facilities for splitting the screen into
multiple windows in a Bravo-like manner. These facilities are not documented, not fully debugged,
and not recommended.
RAMOK: Yes
- tells DDS to
use the RAM on your Alto. If your Alto is a standard one, this will
make DDS run
about 30% faster; if not, DDS may not run faster, and may not run at all. Try it once
(or use the /R switch
in the command line as described below) and see what happens.
FULLINIT: Yes
- tells DDS to
scan the whole Alto file directory each time it starts up, and reinitialize
the selspec, context, etc. from the "initialization-only" entries in
User.Cm (possibly overridden by the command line: see sec. 4). FULLINIT: No
- tells DDS to
update its knowledge of the world from Sys.Log (an incremental record of file
activity since you last ran DDS), and restore the selspec. context,
etc. to what they were when you last left DDS. The default is FULLINIT: No which leads to much
faster startup.
The names of the "initialization-only" entries
are:
SELSPEC: expression
- specifies the initial value of the selspec when you enter DDS. if
there is something illegal about the expression, Dos just uses
"*" for the initial selspec, as though there were no SELSPEC entry
in User.Cm.
CONTEXT: expression -
specifies the initial value of the context when you enter DDS.
SHOW: list
of viewspecs - allows you to initialize the viewspecs. Use commas between,
viewspecs if there is more than one.
SORT BY: list
of sorting keywords - allows you to initialize the sorting order. Each keyword
may be followed by "T" for ascending order or "<-" for
descending order (neither means ascending order). Use commas
between keywords if there is more than one.
A word about fonts: if FONT is not specified in
User.Cm, DDS uses the standard system font
SysFont.Al. If BOLDFONT
is not specified, DDS fabricates a boldface version of the normal
font, whatever it may be. If SMALLFONT is not specified, the "(small)"
viewspec has no effect. If you specify a font name and there
is no file by that name, Dos just
ignores that entry in User.Cm.
4.
The command line
Just
typing Dds to the Alto Executive will activate DDS in its normal way, in which
various aspects of its behavior are controlled by entries in
User.Cm if present. However, you can override User.Cm by typing
switches following the name DDS to the Executive. Here are the
switches currently implemented:
 equivalent to FULLINIT: Yes
in User.Cm. overrides (cancels) FULLINIT: Yes in User.Cm. equivalent
to RAMOK:
Yes in User.Cm. overrides (cancels) RAMOK: Yes
in User.Cm. equivalent to WINDOWS: Yes in User.Cm. overrides
(cancels) WINDOWS: Yes in User.Cm.
equivalent to FULLINIT: Yes
in User.Cm. overrides (cancels) FULLINIT: Yes in User.Cm. equivalent
to RAMOK:
Yes in User.Cm. overrides (cancels) RAMOK: Yes
in User.Cm. equivalent to WINDOWS: Yes in User.Cm. overrides
(cancels) WINDOWS: Yes in User.Cm.
causes DDS to write some
statistics in a file Dds.stats. Not currently of general
interest.
causes
DDS to
write some data regarding disk activity in Dds.stats. Not
of general interest.
These switches can be
combined, e.g. Dds/l/R causes both full initialization and use of the RAM.
Switches may be either upper or lower case.
If
DDS is
doing a full initialization (either because FULLINIT: Yes appears in User.Cm or
because you said Dds/l), you may also supply initial selspec and context
strings in the command line, and these will take precedence
over those in User.Cm, if any. Unfortunately, the Alto
Executive makes it a little inconvenient to include *'s in these strings,
and you can't have blanks in them at all. To include a *, you must type '*,
e.g. to start up DDS and specify alpha* as the selspec, you must type
Dds/I
alpha'*
to the Executive. To specify beta* as the selspec and *.cm
as the context, you must type Dds/I beta's '*.cm
FTP
by DAVID R. BOGGS EDWARD A. TAFT
FTP Reference Manual
Table of Contents
|
1. Introduction
2. Concepts and terminology
3. Calling the FTP subsystem
4. The FTP display 4.1 Directing keyboard
input to the User and Telnet windows
5. Keyboard command syntax 5.1 Keyboard commands
6. Command line syntax 6.1 Command line commands
7. Telnet
8. File property defaulting 8.1 File types
8.2 Byte-size
8.3 End-of-line conventions
9. Abort and error messages
10. Server options
11. Command line examples
|
116 116 118
118
118
119
119
122 122
124
124 124
124
125
126
126
127
|
1. Introduction
FTP
is a Pup-based File Transfer Program for moving files to and from an Alto file system.
The program comes in 3 parts:
1) An
FTP Server, which listens for file transfer requests from other hosts,
2) An
FTP User, which initiates file transfers under control of either the keyboard
or the command line, and
3) A User Telnet for logging
into a remote host using the Pup Telnet protocol.
This program replaces Ethermca and the previous Alto
subsystem called FTP, both of which are now obsolete. It is not compatible with the older
FTP. Compatible Pup-based FTP progams are currently implemented
and supported on Altos, Novas, and Maxc.
2.
Concepts and terminology
Tranferring a file from one machine (or "host")
to another over a network requires the active cooperation of
programs on both machines. In a typical scenario for file transfer, a human
user (or a program acting on his behalf) invokes a program called an "FTP
User" and directs it to establish contact with an "FTP
Server" program on another machine. Once contact has been established, the
FTP User initiates requests and supplies parameters for the actual
transfer of files, which the User and Server proceed to carry out
cooperatively. The FTP User and FTP Server roles differ in that the
FTP User interacts with the human user (usually through some sort
of keyboard interpreter) and takes the initiative in user/server interactions,
whereas the FTP Server plays a comparatively passive role.
The question of which machine is the FTP User and which is
the FTP Server is completely independent of the direction
of file transfer. The two basic file transfer operations are called
"Retrieve" and "Store"; the Retrieve operation causes a
file to move from Server to User, whereas Store causes a
file to move from User to Server.
The Alto FTP subsystem contains both an FTP User
and an FTP Server,
running as independent processes. Therefore, to transfer files
between a pair of Altos, one should start up the FTP subsystem
on both machines, then issue commands to the FTP User process on
one machine directing it to establish contact with the FTP Server process in
the other machine. Subsequent file transfers are controlled
entirely from the FTP User end, with no human intervention required
at the
Server machine.
Transferring files to or from Maxc involves establishing
contact with an FTP Server program that runs all the time on Maxc. Hence,
one may simply invoke the Alto FTP subsystem and direct its
FTP User process to connect to Maxc.
In the descriptions that follow, the terms
"local" and "remote" are relative to the machine on
which the FTP User program is active. That is, we speak of typing commands to
our "local" FTP User program and directing it to
establish contact with an FTP Server on some "remote"
machine. A Retrieve command then copies a file from the "remote" file
system to the "local" file system, whereas a Store
command copies a file from the "local" file system
to the "remote" file system.
Furthermore, we refer to "local" and
"remote" filenames. These must conform to the conventions
used by the "local" and "remote" host computers, which may
be dissimilar (for example, Alto versus Maxc). The Alto FTP knows nothing about Maxc
filename
conventions or vice versa.
The Alto FTP subsystem also includes a third process, called a
"User Telnet", which simulates a Maxc terminal in
a manner exactly analogous to the Chat subsystem (though lacking
some of its refinements). By this means, one may conveniently log in to Maxc so
as to perform operations not directly available via the basic file transfer
mechanisms. While logged into Maxc, it is even possible to run
"PupFtp", the Maxc FTP User program, and direct it to establish
contact with the FTP Server
in your own Alto. You should probably not try this unless
you really understand what you are doing, however, since the terms
"local" and "remote" are relative to Maxc rather than to
your Alto (since the FTP
User program is running on Maxc in this case),
which may be confusing.
3.
Calling the FTP subsystem
A number of options are available when running FTP. The program decides
which parts of itself to enable and where user commands will
come from by inspecting the command line. The general form of the command line to
invoke FTP looks
like:
>Ftp[/<Server switches>]
[<Host name> [<command list>] iCR
The square
brackets denote portions of the command line that are optional and may be omitted.
Server switches, explained below, control the operation of the server. The
first token after the switch-list, if present, is assumed to be a <host
name> (a discussion of which appears later in the description of the
"Open" command). The User FTP will attempt to connect to the
FTP Server
on that host. After connecting to the server, if a <command
list> is present, an interpreter is started which supplies
commands to the User FTP. When the command line is exhausted,
FTP returns
to the Alto Executive. If no <command list> is present, an interactive
keyboard command interpreter is started.
4.
The FTP display
In addition to the standard system display window (the
top inch or so), a window is created for each part of the
program that is enabled during a session. When FTP is
started, the system window displays the release date of that
version of FTP, the
current date and time, and the machine's internetwork address.
If the FTP Server is enabled, it opens a window below the system
window and identifies itself. If a User FTP subsequently connects to this Server, the
User's network address will be displayed. The name and length of each file
stored or retrieved by the Server is logged in this window.
The Server is not enabled when FTP is being controlled from the command
line.
The
FTP User
opens the next window down and identifies itself. The command herald is an
asterisk.
The User Telnet opens the bottommost window, identifies
itself, and waits for a host name to be entered. The Telnet is not enabled when
FTP is
being controlled from the command line.
4.1
Directing keyboard input to the User
and Telnet windows
The bottom two unmarked keys control which window gets
characters from the keyboard. Hitting the unmarked key
to the right of the right-hand SHIFT key directs keyboard input to
the Telnet window. A blinking cursor will appear at the next character
position. Hitting the unmarked key to the right of the RETURN key
directs keyboard input to the FTP User window. If the FTP User is waiting for type-in, a blinking cursor
will appear at the next character position.
5.
Keyboard command syntax
FTP's interactive command interpreter presents a user
interface very similar to that of the Alto Executive. Its
command structure is also very similar to that of PupFtp, the Maxc user FTP program.
The standard editing characters, command recognition features, and help
facility (via "?") are available. When FTP is waiting for keyboard
input, a blinking cursor will appear at the next character position.
5.1 Keyboard commands *Open <host name>gg
Opens
a connection to the FTP
Server in the specified host. FTP permits only one
user F-rp connection at a time. In most cases the word
"Open" may be omitted: i.e., a well formed <host
name> is a legal command and implies a request to "Open" a
connection. FTP will
try for one minute to connect to the specified host. If you made a mistake
typing <host name> and wish to abort the connection
attempt, hit the middle unmarked key (opposite carriage-return).
Ordinarily, <host name> should be the name of some
host at Parc (e.g., "Maxc"). Most Altos and Novas
have names which have been registered on Maxc. So long as Maxc is
up, FTP is
able to obtain the information necessary to translate a known host name to a
Parc inter-network address (this information will eventually be
maintained on other hosts also).
If the name of the server machine is not known, one may
specify an inter-network address in place of the <host
name>. The general form of an inter-network address is: <network>
# <host> # <socket>
where each of the three fields is an octal number. The
<network> number designates the network to which the Server
host is connected (which may be different from the one to which
the User host is connected): this (along with the "#" that follows
it) may be omitted if the Server and User are known to be connected to the same
network. The <host> number designates the Server host's
address, which (for an Alto) is the same as its serial number. The
<socket> number designates the actual Server process on that host: ordinarily
it should be omitted, since the default is the regular FTP server socket.
Hence, to connect to the FTP server running in Alto serial number 123 on the
directly-connected Ethernet, one would say "Open 123#"
(the trailing "#" is required).
*CloseCR
Closes the currently open User FTP connection.
*Login <user name> <password>at
Supplies any login parameters required by the remote
server before it will permit file transfers. FTP will use the user name
and password in the Operating System, if they are there. Logging into FTP will set the user
name and password in the OS (in the same manner as the Alto
Executive's "Login" command).
When
you issue the "Login" command, FTP will first display the existing user name known to
the OS. If you now type a space, FTP will prompt you for a password, whereas if you want
to provide a different user name, you should first type that name (which will obliterate
the previous one) followed by a space. The command may be terminated by carriage
return after entering the user name to omit entering the password.
The parameters are not immediately checked for legality,
but rather are sent to the server for checking when the first file transfer
command is issued. If a file transfer command is refused by the server because
the name or password is incorrect, FTP will prompt the user as
if he had issued the LOGIN command and then retry the transfer request. Hitting
delete in this context will abort the transfer command.
At present, a user name and password need be supplied only
when transferring files to and
from Maxc. A future version of the Alto FTP Server may require
a password to be supplied if the server machine's disk is
password-protected.
*Connect <directory name> <password>C11
Requests
the FTP server
to "connect" (in the Tenex sense) the user to the specified directory
on the remote system. The password may be omitted by typing carriage
return after the directory name. As with Login, these parameters
are not verified until the next transfer command is issued. At
present, the "Connect" command is meaningful only when transferring
files to or from Maxc; the Alto FTP server currently ignores connect requests. If
the "multiple directory" feature of the Alto Operating System ever
comes into widespread use, this may be changed.
*Directory
<directory
name>CR
Causes
<directory name> to be used as the default remote directory in Store,
Retrieve, and List commands. Specifying a default directory
is different from connecting to a directory; connecting
gives you 'owner access', but specifying a default directory in no way modifies
your access privileges. Explicitly mentioning
a directory in a file name overrides the default directory, which
overrides the connected directory, which overrides the login directory.
*Retrieve
<remote
filename>cR
Initiates
transfer of the specified remote file to the local host. The syntax of
<remote filename> must conform to the remote host's file
system name conventions. Before transferring a file, FTP will suggest a
local filename based on the "name body" (name and extension)
of the file about to be transferred, and will tell you whether or not the file already
exists on your local disk. If the suggested name is ok, you should
type <return> or <esc>. If you do not want the file, type
<del>. If you want to call the file by a different name
on the local file system, type the new local file name followed by
<return>; the name suggested by FTP will disappear and the new file name will
replace it.
If <remote filename> designates multiple files (the
remote host permits "*" or some equivalent in file names), each file
will be sent separately and the process of suggesting a local
filename will repeat for each
file. At present, only the Maxc FTP Server supports this capability. That is, you
may supply "*"s in the <remote filename> when retrieving files from
Maxc, but not when retrieving files from another Alto.
*Store <local filename>gg
Initiates
transfer of the specified local file to the remote host. Alto filename
conventions apply to the <local filename>; "*"
expansion is not supported. FTP will suggest a remote filename based on
the "name body" of the local file. If the suggested name
is ok, type <return> or <esc> and the transfer will begin. If you
wish to abort the transfer at this time, type <del>. If you wish to call
the file by a different name on the remote host, type the
new remote file name followed by <return>; the name suggested by FTP will disappear, the
new file name will replace it, and the transfer will begin.
*List <remote file
designator>CR
Lists all files in the
remote file system which correspond to <remote file designator>. The
'<remote file designator> must conform to file naming conventions on the
remote host, and may
designate multiple files if "*" expansion or some equivalent is
supported there. The printout is similar to that of the Tenex Exec QFD command,
displaying the filename, type (text
or binary, and if binary the byte size), and creation date. Only the Maxc FTP server supports this command at present, so List is only useful for listing a
directory if you are connected to Maxc.
*Quitgl
Returns control to the Alto Executive, closing
all open connections.
*Type <data type>g
Forces the data to be
interpreted according to the specified <data type>, which may be Text or Binary. Initially the type is Unspecified,
meaning that the source process should, if possible, decide on the appropriate type based on local information.
*Byte-size <decimal
number>CR
Applicable only to files of type Binary,
Byte-size specifies the logical byte size of the data to be transferred. The default is 8.
*EOL <convention>01
Applicable only to files of type
Text, this command specifies the End-of-line convention to be used for transferring text files. The
values for <convention> are CR, CRLF, and Transparent. The default is CR.
*Telnet <command>g11-
Controls the operation of
the User Telnet. The only command currently implemented is "Quit" which closes any open
connection and reinitializes the Telnet process.
*DebugCR
Toggles a switch controlling whether or not
protocol interactions for both the User and Server FTP are displayed. Warning:
this printout sometimes includes passwords.
6. Command line syntax
The
User FTP will alternatively take commands from the command line. As explained above,
the first token after the subsystem name and server switches must be a legal
host name: if the User FTP can't connect to the FTP Server on
that host it will abort and return control to the Alto
Executive. If a <command list> follows the host name, the command line
interpreter is invoked instead of the interactive keyboard interpreter. This
permits the full capabilities of the Alto Executive (filename
recognition, "*" expansion, command files, etc.)
to be used in constructing commands for FTP.
Each
command is of the form:
<Keyword>/<SwitchList> <arg> <arg>
To get a special character (any one of "*#';")
past the Alto Executive, it must be preceded by a single quote. To get a
"I" into an FTP argument, the "1" must be proceeded by two
single quotes (the second one tells FTP to treat the "I" as an
ordinary character in the argument, and the first one gets the second one
past the Alto Executive).
Unambiguous
abbreviations of commands (which in most cases amount to the first letter of a
command keyword) are legal. However, when constructing command files, one
should always spell commands in full, since the uniqueness of
abbreviations in the present version of FTP is not guaranteed in
future versions.
A command is distinguished from arguments to the previous
command by having a switch on it, so every command must have at least one
switch. The switch "/C" has no special meaning and should
be used on commands where no other switches are needed or desired.
When the command line has been completely executed, FTP
returns control to the Alto Executive. If the Debug
command has been given or any errors have occurred, FTP will pause before
finishing. This prevents error messages from disappearing before the user has a
chance to see them. In this situation, FTP will terminate after one minute has
elapsed or any key has been struck on the keyboard.
6.1 Command line
commands
Connect/C
<directory name> <password>
See
description in "Keyboard commands". The <password> may be
omitted.
Connect/Q <directory name>
Causes
FTP to prompt the user for the password needed to connect to the specified <directory
name>. This form of the "Connect" command should be used in
command files (since including passwords in command files is
bad practice).
Directory/C <default directory>
See
description in "Keyboard commands".
Retrieve/C <remote filename> ... <remote
filename>
Retrieves each <remote filename>, constructing a
local filename from the—name body of the actual remote filename as
received from the Server, and writes it in the local file system. FTP will overwrite an existing file unless the
IN (No overwrite) switch is
appended to the Retrieve command keyword.
If the remote host allows "s" (or
some equivalent) in a filename, a single <remote filename>
may result in the retrieval of several files. (Note that one must quote the
"s" to get it past the Alto
Executive's command scanner.) As noted previously, this capability is implemented
only by the Maxc FTP Server
at present.
Retrieve/S <remote filename> <local
filename>
Retrieves <remote filename> and names it <local
filename> in the local file system. This version of
Retrieve must have exactly two arguments. FTP will overwrite an existing file unless
the /N (No overwrite) switch is also appended to the Retrieve command keyword.
The <remote filename> should not cause the server
to send multiple files.
Retrieve/U <remote filename> ... <remote
filename>
Retrieves <remote filename> if its creation date is
later than the creation date of the local file. A file will not be
retrieved if the local filename does not exist, or if the FTP server does
not send a Creation-date property. This option can be combined with Retrieve/S
to rename the file as it is transferred.
Store/C <local filename> ... <local filename>
Stores each <local filename> • on the remote host,
constructing a remote filename from the name body of the <local
filename>. A <local filename> may contain "s",
since it will be expanded by the Alto Executive into the actual
list of filenames before the FTP subsystem is invoked.
Store/S <local filename> <remote filename>
Stores <local filename> on the remote host as
<remote filename>. The <remote filename> must
conform to the file name conventions of the remote host. This version of store
must have exactly two arguments.
Type/C <data type>
See
the description in "Keyboard commands".
Byte-size/C <decimal number>
See
the description in "Keyboard commands".
EOL/C <convention>
See the description in "Keyboard commands".
Debug/C
See
the description in "Keyboard commands".
7.
Telnet
FTP provides a simple User Telnet as a convenience for
logging into a remote host (e.g., Maxc) to poke around without
having to leave the FTP subsystem and start Chat. It lacks most
of the creature comforts Chat provides, such as automatic attaching to detached
jobs, automatic logging in, etc. The Telnet is not enabled when
the User FTP is being controlled from the command line. When
the Telnet does not have an open connection, it waits for you
to type a host name with the syntax explained above for the Open command, and
then attempts to connect to the specified host. If you wish to
abort the connection attempt, hit the bottom unmarked key
(opposite right-shift).
8.
File Property Defaulting
Without explicit information from the file system, it is
often difficult to determine whether a file is Binary
or Text, if Binary, what its byte-size is, and if Text, what End-of-line
convention is used. The User and Server FTPS use some simple heuristics to determine
the correct manner in which to transfer a file. The heuristics generally
do the right thing in the face of incomplete information, and
can be overridden by explicit commands from a human user
who knows better.
The FTP protocol specifies a standard representation for
a file while in transit over a network. If the file is of
type Binary, each logical byte is packed right-justified in an integral
number of 8-bit bytes. The byte-size is sent as a property along with the file.
If the file is of type Text, each character is sent
right-justified in an 8-bit byte. An EOL convention may be sent as a
file property. The default is CR.
8.1
File types
FTP determines the type of a local file by
reading it and looking for bytes with the high-order bit on. If any
byte in the file has a high-order bit on, the file is assumed to be Type
Binary, otherwise it is assumed to be Type Text. FTP will generate a warning,
but allow you to send what it thinks to be a text file as
type Binary, since no information is lost. It will refuse to send a binary file
as type text.
Moral: Don't
specify a Type unless you know what you are doing. The heuristic will not lose
information.
8.2
Byte-size
If a file is type Binary, the byte-size is assumed to be
8 unless otherwise specified. The FTP User and Server will
both accept binary files of any byte-size and write them as 8 bit bytes
on the disk. No transformation is done on the data as it is written to the
disk: it is stored in network default format. Since there is no place
to save the byte-size property, it is lost.
Similarly, requests for Binary files will be honored with
any bytesize, and whatever is on the disk will be shoved
out to the net without transformation. Since Alto files have no byte-size
information, the byte-size property will be defaulted to 8 unless otherwise specified,
in which case whatever was otherwise specified will be returned as the
byte-size.
Moral: Don't
specify a Byte-size unless you know what you are doing.
Alto-Alto transfers can't go wrong. Alto-Maxc transfers
with weird byte-sizes will not work unless the byte-size
specified in the Alto to Maxc direction is the same as the byte-size
in which the file was stored on the Alto. If it isn't, the Alto will not give
any error indication, but the result will be garbage.
8.3
End-of-line conventions
FTPS are
expected to be able to convert text files between their own internal EOL convention
and the network standard. Conveniently enough, the Alto file system's internal representation
of a text file is the same as the network standard. The Alto FTP does not do any transformations on text files. It will
refuse to store a text file coming in from the net whose
EOL convention
is CRLF.
As an escape to bypass conversion and checking, EOL convention
'transparent' tells both ends not to
convert to network standard, but rather send a file 'as is'. This is included
for Lisp files which contain internal character pointers that
are messed up by removing IFS.
Moral: Don't specify an EOL convention unless
you know what you are doing. If your text file is a Lisp source file,
specify EOL convention
'Transparent'.
9.
Abort
and error messages
Error
and Abort packets are displayed in the system window. Abort packets are fatal;
Error packets are not necessarily so.
The
most common Abort message is "Timeout. Good bye", generated by Maxc
when a server process has not received any commands for 5
minutes.
The most common Error message is "Port input queue
overflowed" indicating a momentary shortage of input buffers
at the remote host. Receiving an Error Pup does not imply that the
file in transit has been damaged. Loss of or damage to a file will be indicated
by an explicit message in the User FTP window. The next
iteration of Pup will probably rename 'Error Pups' to be
'Information Pups'.
10.
Server
options
Server options are
controlled by switches on the subsystem name. There are currently four options:
 Action
If no server option is specified, retrieve requests (disk
to net) are allOwed. Store requests (net to disk) are allowed unless
the store would overwrite an already existing file.
(mnemonic
'Protected') Retrieve requests are allowed. No stores are
allowed.
(mnemonic 'Overwrite') Retrieve requests are allowed. Store
requests can overwrite files.
No server is started.
11. Command line examples
To transfer files Scavenger.run and Scavenger.syms
from the Alto called "Michelson" to the Alto called "Morley", one might start up FTP
on Michelson (to act as an FTP
Server), then walk
over to Morley and type:
>Ftp Michelson Retrieve/c
Scavenger.run Scavenger.symsgl
Alternatively, one could start an FTP
server on Morley (invoking it by
"Ftp/O" to permit files to be
overwritten on Morley's disk), then issue the following command to Michelson: >Ftp Morley Store/c Scavenger.run Scavenger.synisCR
The
latter approach is recommended for transferring large groups of files such as
"*.run" (since expansion of the
"*" will be performed by the Alto Executive).
To retrieve User.cm from the FTP
server running on Alto serial number 123 (name unknown):
>Ftp 123'# Retrieve
User.cm-C-t-
Note that the "#" must be preceded by a single
quote when included in a command line, since
otherwise the Alto Executive does funny things with it. (This is not true when
typing to FTP's interactive keyboard interpreter).
To start FTP, have the FTP User connect to Maxc, and then accept further commands
from the keyboard:
>Ftp Maxc
To
retrieve <System>Pup-Network.txt from Maxc and store it on the Alto as PupDirectory.bravo, and store PupRTP.bcpl,
Puplb.bcpl, and PupBSPStreams.bcpl on <DRB> with their names unchanged:
>Ftp
Maxc Connect/c drb mypassword Retrieve/s <System>Pup-Network.txt PupDirectory.bravo Store/c PupRTP.bcpl Puplb.bcpl
PupBSPStreams.bcplCR
To
retrieve the latest copy of all .RUN files from the <alto> directory,
overwriting copies on the
Alto disk (The single quote is necessary to prevent the Alto Executive from expanding the "*"):
>Ftp Maxc Ret/c
<alto>'*.rung1
To update the Alto disk with new copies of all
<Alto> files whose names are contained in file
UpdateFiles.cm:
>Ftp Maxc Dir/c Alto Ret/u @UpdateFiles.cm@CR
To store all files with
extension .BCPL from the local Alto disk to your login directory on Maxc (the Alto Executive will expand "*.bcp1"
before invoking FTP):
>Ftp Maxc St/c *.bcpla-1.
To
retrieve <System>Host-name/descriptor-file.txt;43 (two single quotes are
necessary to get the
"1" past the Alto Executive and the FTP command scanner, and one quote is necessary to get the ";" past the Alto
Executive):
>Ftp Maxc R/c
<System>Host-name"/descriptor-file.txt°;43cR
To cause Memo.ears to be spooled for printing on
Ears by the Maxc printing system: >Ftp
Maxc Store/s Memo.ears LPT:ak‑
This also works for Press files
and unformatted text files if you know what you are doing. It does not do the right thing for Bravo-format
files.